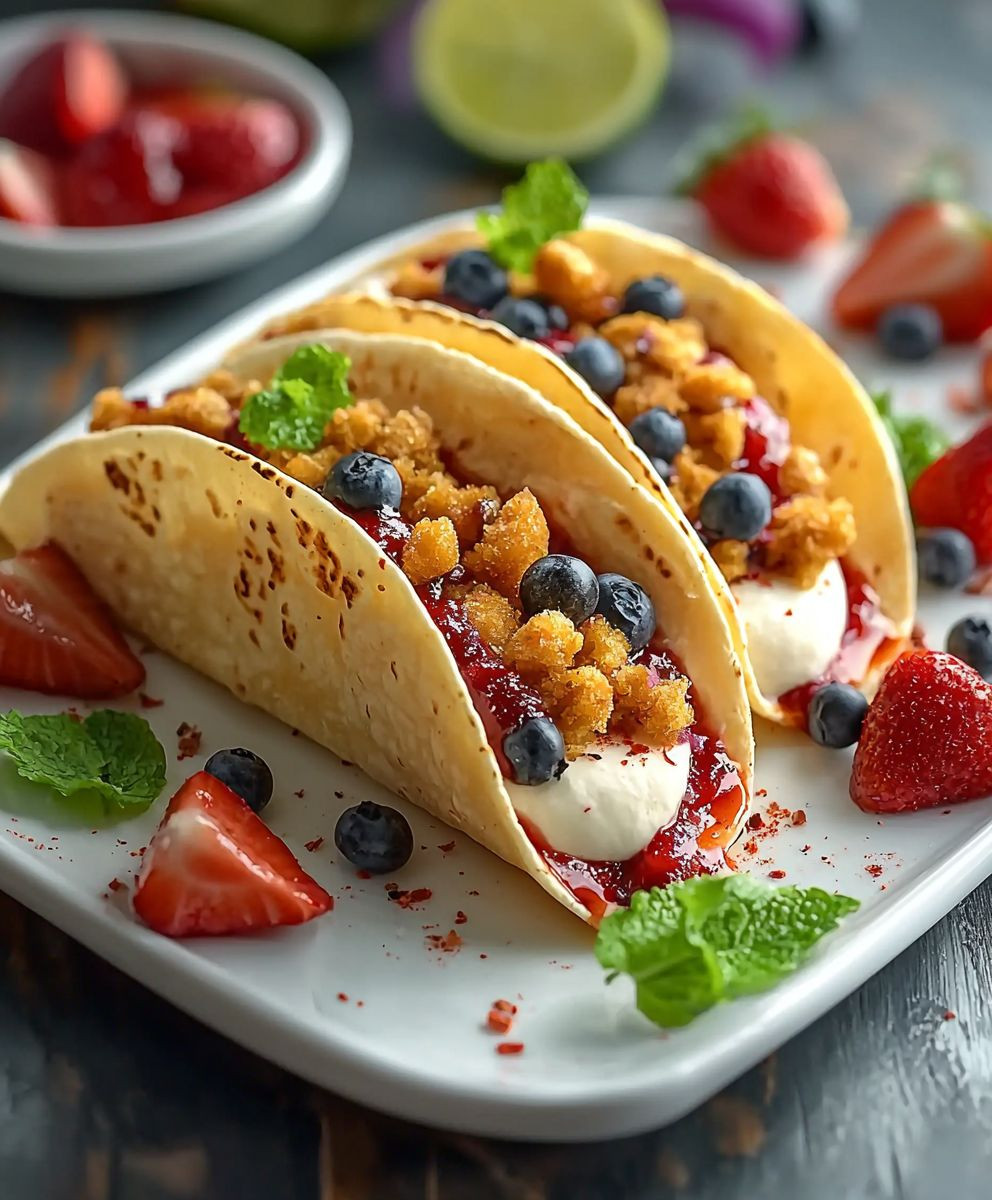
Cheesecake Tacos: Prepare to have your dessert world turned upside down! Imagine the creamy, decadent delight of a classic cheesecake, but instead of a graham cracker crust, it’s nestled inside a sweet, crispy taco shell. Intrigued? You should be! This isn’t your abuela’s traditional taco, but it’s a delightful fusion of cultures and flavors that will have everyone begging for more.
While the exact origins of cheesecake tacos are a bit hazy, their popularity has exploded thanks to innovative food bloggers and adventurous dessert enthusiasts. They represent a playful twist on both the beloved cheesecake and the iconic taco, blending the best of both worlds. Think of it as a dessert taco party in your mouth!
What makes these little treats so irresistible? It’s the perfect combination of textures and tastes. The crunchy, slightly sweet taco shell provides a satisfying contrast to the smooth, rich cheesecake filling. Plus, they’re incredibly convenient and fun to eat! Forget forks and plates; these handheld delights are perfect for parties, potlucks, or simply a sweet treat on the go. Get ready to experience a dessert sensation that’s as delicious as it is unique!

Ingredients:
- For the “Taco Shells” (Cinnamon-Sugar Crisps):
- 1 package (14.1 ounces) refrigerated pie crusts
- 4 tablespoons unsalted butter, melted
- 1/2 cup granulated sugar
- 2 tablespoons ground cinnamon
- For the Cheesecake Filling:
- 2 packages (8 ounces each) cream cheese, softened
- 1/2 cup granulated sugar
- 1 teaspoon vanilla extract
- 1/4 cup sour cream
- 1/4 cup heavy cream
- For the Strawberry Topping:
- 1 pound fresh strawberries, hulled and sliced
- 2 tablespoons granulated sugar
- 1 tablespoon lemon juice
- Optional Toppings:
- Chocolate shavings
- Whipped cream
- Sprinkles
- Other fresh berries (blueberries, raspberries)
Preparing the Cinnamon-Sugar Crisps (“Taco Shells”):
- Preheat and Prepare: Preheat your oven to 375°F (190°C). Line two large baking sheets with parchment paper. This will prevent the crisps from sticking and make cleanup a breeze.
- Roll Out the Pie Crust: Unroll one of the pie crusts onto a lightly floured surface. Use a rolling pin to gently roll it out slightly thinner, about 1/8 inch thick. This will help the crisps get nice and, well, crispy!
- Cut Out Circles: Use a 4-inch round cookie cutter (or a sharp knife if you don’t have a cookie cutter) to cut out circles from the pie crust. You should get about 6-8 circles from each crust. Re-roll the scraps to get as many circles as possible. Don’t worry if they aren’t perfect; we’re going for rustic charm here!
- Shape the Crisps: Gently drape each circle over an oven rack rung to create a taco shell shape. Be careful not to tear the dough. If the dough is too soft, chill it in the freezer for a few minutes to firm it up. You can also use a metal taco holder if you have one. This will help them keep their shape during baking.
- Brush with Butter: Brush the tops of the shaped crisps with melted butter. This will help the cinnamon-sugar adhere and give them a beautiful golden color.
- Cinnamon-Sugar Coating: In a small bowl, combine the granulated sugar and ground cinnamon. Sprinkle the cinnamon-sugar mixture generously over the buttered crisps. Make sure they’re well coated for maximum flavor!
- Bake: Carefully transfer the baking sheets to the preheated oven and bake for 8-10 minutes, or until the crisps are golden brown and crispy. Keep a close eye on them, as they can burn quickly.
- Cool Completely: Remove the baking sheets from the oven and let the crisps cool completely on the baking sheets. As they cool, they will harden and become even crispier. Be patient! This is important for the final texture.
- Repeat: Repeat steps 2-8 with the second pie crust.
Preparing the Cheesecake Filling:
- Soften the Cream Cheese: Make sure your cream cheese is completely softened to room temperature. This is crucial for a smooth and creamy filling. If it’s not soft enough, you’ll end up with lumps.
- Cream the Cream Cheese and Sugar: In a large bowl, beat the softened cream cheese and granulated sugar together with an electric mixer until smooth and creamy. This usually takes about 2-3 minutes. Scrape down the sides of the bowl as needed to ensure everything is well combined.
- Add Vanilla and Sour Cream: Add the vanilla extract and sour cream to the cream cheese mixture and beat until just combined. Don’t overmix, as this can make the filling too thin.
- Whip in the Heavy Cream: Gradually add the heavy cream and beat until the filling is light and fluffy. Again, be careful not to overmix. You want the filling to be thick enough to hold its shape in the taco shells.
- Chill the Filling: Cover the bowl with plastic wrap and refrigerate the cheesecake filling for at least 30 minutes, or up to 2 hours. This will allow the filling to firm up slightly, making it easier to pipe or spoon into the taco shells.
Preparing the Strawberry Topping:
- Prepare the Strawberries: Hull and slice the fresh strawberries. You can slice them thinly or leave them in larger chunks, depending on your preference.
- Combine Ingredients: In a medium bowl, combine the sliced strawberries, granulated sugar, and lemon juice.
- Let Macerate: Gently toss the ingredients together and let the strawberry mixture sit at room temperature for at least 15 minutes, or up to 30 minutes. This will allow the sugar to draw out the juices from the strawberries, creating a delicious and syrupy sauce.
- Drain Excess Liquid (Optional): If you prefer a thicker topping, you can drain off some of the excess liquid from the strawberry mixture before assembling the tacos.
Assembling the Cheesecake Tacos:
- Fill the Taco Shells: Spoon or pipe the chilled cheesecake filling into the cinnamon-sugar crisps. Be generous, but don’t overfill them, or they’ll be difficult to eat.
- Top with Strawberries: Spoon the strawberry topping over the cheesecake filling.
- Add Optional Toppings: If desired, sprinkle with chocolate shavings, add a dollop of whipped cream, or garnish with other fresh berries. Get creative and have fun!
- Serve Immediately: Serve the cheesecake tacos immediately for the best flavor and texture. The crisps will soften over time, so they’re best enjoyed fresh.
Tips and Variations:
- Make Ahead: You can prepare the cinnamon-sugar crisps and cheesecake filling a day in advance. Store them separately and assemble the tacos just before serving.
- Different Fruits: Feel free to substitute other fruits for the strawberries, such as blueberries, raspberries, peaches, or mangoes.
- Chocolate Filling: For a chocolate cheesecake filling, add 2 tablespoons of cocoa powder to the cream cheese mixture.
- Nutella Filling: For a Nutella cheesecake filling, substitute 1/4 cup of Nutella for 1/4 cup of the cream cheese.
- Spiced Crisps: Add a pinch of nutmeg or cardamom to the cinnamon-sugar mixture for a warm and spicy flavor.
- Gluten-Free Option: Use gluten-free pie crusts to make this recipe gluten-free.
- Vegan Option: Use vegan cream cheese and vegan pie crusts to make this recipe vegan. You may also need to find a vegan substitute for the heavy cream.
- Mini Tacos: Use a smaller cookie cutter to make mini cheesecake tacos. These are perfect for parties and gatherings.
- Piping Bag: Using a piping bag with a decorative tip can make the filling look more elegant.
- Preventing Soggy Shells: To prevent the taco shells from getting soggy, you can brush the inside of the shells with melted chocolate before adding the filling. The chocolate will create a barrier between the filling and the shell.
Enjoy your delicious and fun Cheesecake Tacos!
Conclusion:
And there you have it! These Cheesecake Tacos are truly a must-try dessert that will have everyone begging for more. The creamy, tangy cheesecake filling nestled inside a crispy, cinnamon-sugar dusted taco shell is an explosion of textures and flavors that’s simply irresistible. It’s the perfect balance of sweet and crunchy, rich and light, making it an ideal treat for any occasion, from a casual weeknight dessert to a fun and festive party snack. But why are these Cheesecake Tacos so special? It’s more than just the novelty of the presentation. It’s the way the cool, smooth cheesecake filling contrasts with the warm, crunchy shell. It’s the burst of cinnamon that complements the creamy tang of the cheesecake. And it’s the sheer joy of eating something so unexpectedly delicious and fun. Trust me, once you take that first bite, you’ll understand why I’m so enthusiastic about this recipe. Serving Suggestions and Variations: The beauty of these Cheesecake Tacos is that they’re incredibly versatile. You can easily customize them to suit your taste preferences and dietary needs. Here are a few ideas to get you started: * Fruit Fiesta: Top your Cheesecake Tacos with fresh berries, sliced bananas, or diced mango for a burst of fruity flavor and added visual appeal. A drizzle of raspberry sauce or a sprinkle of shredded coconut would also be fantastic. * Chocolate Lover’s Dream: Drizzle melted chocolate over the tacos, or add chocolate chips to the cheesecake filling. You could even dip the taco shells in melted chocolate before coating them in cinnamon sugar. * Nutty Delight: Sprinkle chopped nuts, such as pecans, walnuts, or almonds, over the cheesecake filling for added crunch and nutty flavor. * Spiced Up: Add a pinch of nutmeg or cardamom to the cheesecake filling for a warm, aromatic twist. * Dietary Considerations: For a gluten-free version, use gluten-free tortillas. For a dairy-free version, experiment with dairy-free cream cheese alternatives. You can also use sugar substitutes to reduce the sugar content. * Mini Tacos: Use smaller tortillas to create bite-sized Cheesecake Tacos, perfect for parties and gatherings. * Savory-Sweet: For a more adventurous twist, try adding a pinch of sea salt to the cheesecake filling or topping the tacos with crumbled bacon. I truly believe that this cheesecake tacos recipe is a winner. It’s easy to make, fun to eat, and guaranteed to impress. So, what are you waiting for? Gather your ingredients, preheat your oven, and get ready to create a dessert masterpiece. I’m so excited for you to try this recipe! Once you’ve made your own batch of Cheesecake Tacos, I’d love to hear about your experience. Did you try any of the variations I suggested? Did you come up with your own creative toppings? Share your photos and stories in the comments below! Let’s create a community of Cheesecake Taco enthusiasts and inspire each other with our culinary creations. Happy baking (or should I say, taco-ing?)! I can’t wait to see what you come up with! Print
Cheesecake Tacos: The Ultimate Dessert Recipe You Need to Try
- Total Time: 60 minutes
- Yield: 12–16 tacos 1x
Description
Crispy cinnamon-sugar “taco shells” filled with creamy cheesecake and topped with fresh, macerated strawberries. A fun and delicious dessert perfect for parties or a special treat!
Ingredients
- 1 package (14.1 ounces) refrigerated pie crusts
- 4 tablespoons unsalted butter, melted
- 1/2 cup granulated sugar
- 2 tablespoons ground cinnamon
- 2 packages (8 ounces each) cream cheese, softened
- 1/2 cup granulated sugar
- 1 teaspoon vanilla extract
- 1/4 cup sour cream
- 1/4 cup heavy cream
- 1 pound fresh strawberries, hulled and sliced
- 2 tablespoons granulated sugar
- 1 tablespoon lemon juice
- Chocolate shavings
- Whipped cream
- Sprinkles
- Other fresh berries (blueberries, raspberries)
Instructions
- Preheat your oven to 375°F (190°C). Line two large baking sheets with parchment paper.
- Unroll one of the pie crusts onto a lightly floured surface. Use a rolling pin to gently roll it out slightly thinner, about 1/8 inch thick.
- Use a 4-inch round cookie cutter (or a sharp knife) to cut out circles from the pie crust. You should get about 6-8 circles from each crust. Re-roll the scraps to get as many circles as possible.
- Gently drape each circle over an oven rack rung to create a taco shell shape. Be careful not to tear the dough. If the dough is too soft, chill it in the freezer for a few minutes to firm it up. You can also use a metal taco holder if you have one.
- Brush the tops of the shaped crisps with melted butter.
- In a small bowl, combine the granulated sugar and ground cinnamon. Sprinkle the cinnamon-sugar mixture generously over the buttered crisps.
- Carefully transfer the baking sheets to the preheated oven and bake for 8-10 minutes, or until the crisps are golden brown and crispy. Keep a close eye on them, as they can burn quickly.
- Remove the baking sheets from the oven and let the crisps cool completely on the baking sheets. As they cool, they will harden and become even crispier.
- Repeat steps 2-8 with the second pie crust.
- Make sure your cream cheese is completely softened to room temperature.
- In a large bowl, beat the softened cream cheese and granulated sugar together with an electric mixer until smooth and creamy. This usually takes about 2-3 minutes. Scrape down the sides of the bowl as needed to ensure everything is well combined.
- Add the vanilla extract and sour cream to the cream cheese mixture and beat until just combined. Don’t overmix, as this can make the filling too thin.
- Gradually add the heavy cream and beat until the filling is light and fluffy. Again, be careful not to overmix. You want the filling to be thick enough to hold its shape in the taco shells.
- Cover the bowl with plastic wrap and refrigerate the cheesecake filling for at least 30 minutes, or up to 2 hours. This will allow the filling to firm up slightly, making it easier to pipe or spoon into the taco shells.
- Hull and slice the fresh strawberries.
- In a medium bowl, combine the sliced strawberries, granulated sugar, and lemon juice.
- Gently toss the ingredients together and let the strawberry mixture sit at room temperature for at least 15 minutes, or up to 30 minutes. This will allow the sugar to draw out the juices from the strawberries, creating a delicious and syrupy sauce.
- Drain off some of the excess liquid from the strawberry mixture before assembling the tacos.
- Spoon or pipe the chilled cheesecake filling into the cinnamon-sugar crisps. Be generous, but don’t overfill them, or they’ll be difficult to eat.
- Spoon the strawberry topping over the cheesecake filling.
- If desired, sprinkle with chocolate shavings, add a dollop of whipped cream, or garnish with other fresh berries. Get creative and have fun!
- Serve the cheesecake tacos immediately for the best flavor and texture. The crisps will soften over time, so they’re best enjoyed fresh.
Notes
- Make Ahead: You can prepare the cinnamon-sugar crisps and cheesecake filling a day in advance. Store them separately and assemble the tacos just before serving.
- Different Fruits: Feel free to substitute other fruits for the strawberries, such as blueberries, raspberries, peaches, or mangoes.
- Chocolate Filling: For a chocolate cheesecake filling, add 2 tablespoons of cocoa powder to the cream cheese mixture.
- Nutella Filling: For a Nutella cheesecake filling, substitute 1/4 cup of Nutella for 1/4 cup of the cream cheese.
- Spiced Crisps: Add a pinch of nutmeg or cardamom to the cinnamon-sugar mixture for a warm and spicy flavor.
- Gluten-Free Option: Use gluten-free pie crusts to make this recipe gluten-free.
- Vegan Option: Use vegan cream cheese and vegan pie crusts to make this recipe vegan. You may also need to find a vegan substitute for the heavy cream.
- Mini Tacos: Use a smaller cookie cutter to make mini cheesecake tacos. These are perfect for parties and gatherings.
- Piping Bag: Using a piping bag with a decorative tip can make the filling look more elegant.
- Preventing Soggy Shells: To prevent the taco shells from getting soggy, you can brush the inside of the shells with melted chocolate before adding the filling. The chocolate will create a barrier between the filling and the shell.
- Prep Time: 30 minutes
- Cook Time: 10 minutes