Tiramisu Ice Cream: Prepare to be swept away by a symphony of flavors that will transport you straight to an Italian café, no passport required! Imagine the rich, coffee-soaked ladyfingers, the creamy mascarpone, and the dusting of cocoa powder now picture all of that, perfectly frozen into a decadent, dreamy ice cream. Yes, you read that right!
Tiramisu, meaning “pick me up” or “cheer me up” in Italian, has a relatively modern history, believed to have originated in the Veneto region of Italy in the latter half of the 20th century. While its exact origins are debated, its popularity is undeniable. This beloved dessert has captured hearts worldwide with its irresistible combination of textures and tastes.
But what makes Tiramisu so universally adored? It’s the dance between the bitter coffee, the sweet cream, and the subtle chocolate notes. It’s the soft, yielding texture of the ladyfingers against the smooth, velvety mascarpone. And now, we’ve taken all of those elements and transformed them into a frozen delight. This Tiramisu Ice Cream recipe is not only incredibly delicious but also surprisingly easy to make at home. Get ready to experience a new level of dessert bliss!

Ingredients:
- For the Zabaglione Base:
- 6 large egg yolks
- ¾ cup granulated sugar
- ½ cup Marsala wine (sweet or semi-sweet)
- Pinch of salt
- For the Mascarpone Cream:
- 16 ounces (2 cups) mascarpone cheese, cold
- 1 cup heavy cream, cold
- ¼ cup granulated sugar
- 1 teaspoon vanilla extract
- For the Coffee Soak:
- 1 cup strong brewed coffee, cooled
- 2 tablespoons coffee liqueur (such as Kahlua or Tia Maria)
- For the Ladyfingers:
- Approximately 24 ladyfingers (savoiardi biscuits)
- For Dusting:
- Unsweetened cocoa powder, for dusting
- Optional Additions:
- Chocolate shavings, for garnish
- Espresso beans, for garnish
Preparing the Zabaglione Base
The zabaglione is the heart of this Tiramisu Ice Cream, giving it that rich, custardy flavor. Don’t skip this step it’s what makes it truly special!
- Combine Egg Yolks, Sugar, and Salt: In a heatproof bowl (stainless steel or glass), whisk together the egg yolks, granulated sugar, and a pinch of salt until the mixture is pale yellow and slightly thickened. This usually takes about 2-3 minutes of vigorous whisking. The sugar should be well incorporated into the yolks.
- Add Marsala Wine: Gradually whisk in the Marsala wine. Make sure to whisk constantly to prevent the egg yolks from cooking. The mixture will become slightly thinner.
- Cook Over a Double Boiler: Place the bowl over a saucepan of simmering water, making sure the bottom of the bowl doesn’t touch the water. This creates a gentle, indirect heat. Continue to whisk constantly and vigorously for about 8-10 minutes, or until the mixture has thickened significantly and coats the back of a spoon. You should be able to draw a line through the zabaglione on the back of the spoon with your finger, and the line should hold. The zabaglione will also increase in volume and become light and airy. Be patient and don’t stop whisking! If the mixture starts to curdle, immediately remove it from the heat and whisk vigorously until it smooths out.
- Cool the Zabaglione: Remove the bowl from the heat and immediately transfer the zabaglione to a clean bowl. This stops the cooking process. Whisk for another minute or two to release any remaining heat. Then, place the bowl in an ice bath (a larger bowl filled with ice and a little water) and continue to whisk occasionally until the zabaglione is completely cool. This is crucial to prevent the egg yolks from cooking further and to ensure a smooth, creamy texture. This cooling process can take about 20-30 minutes.
Making the Mascarpone Cream
The mascarpone cream adds a lovely richness and tanginess to the ice cream. Make sure your mascarpone and heavy cream are very cold for the best results.
- Whip the Heavy Cream: In a separate bowl, using an electric mixer (stand mixer or hand mixer), whip the cold heavy cream until soft peaks form. Soft peaks mean that when you lift the beaters, the peaks of the cream will droop slightly.
- Add Sugar and Vanilla: Gradually add the granulated sugar and vanilla extract to the whipped cream and continue to whip until stiff peaks form. Stiff peaks mean that when you lift the beaters, the peaks of the cream will stand straight up. Be careful not to overwhip the cream, as it can turn into butter.
- Soften the Mascarpone: In a large bowl, gently soften the cold mascarpone cheese with a spatula. You want to break it up slightly so it’s easier to incorporate into the whipped cream.
- Combine Mascarpone and Whipped Cream: Gently fold the whipped cream into the softened mascarpone cheese in two or three additions. Use a light hand to avoid deflating the whipped cream. Mix until just combined; do not overmix.
Preparing the Coffee Soak and Ladyfingers
The coffee-soaked ladyfingers are what give this ice cream its signature Tiramisu flavor. Don’t over-soak them, or they’ll become soggy.
- Prepare the Coffee Soak: In a shallow dish, combine the cooled strong brewed coffee and the coffee liqueur (if using).
- Quickly Dip the Ladyfingers: Working quickly, dip each ladyfinger into the coffee mixture for just a few seconds per side. You want them to be moistened but not completely saturated. A quick dip is key! Over-soaked ladyfingers will make the ice cream soggy.
- Cut the Ladyfingers (Optional): Depending on the size of your container, you may need to cut the soaked ladyfingers into smaller pieces. I usually cut them in half or thirds.
Assembling the Tiramisu Ice Cream
Now comes the fun part putting it all together! Layering the ingredients ensures that every bite is packed with flavor and texture.
- Combine Zabaglione and Mascarpone Cream: Gently fold the cooled zabaglione base into the mascarpone cream mixture until just combined. Be careful not to overmix, as this can deflate the mixture.
- Layer in a Freezer-Safe Container: In a freezer-safe container (such as a loaf pan or a plastic container), spread a thin layer of the zabaglione-mascarpone cream mixture on the bottom.
- Add a Layer of Ladyfingers: Arrange a layer of the coffee-soaked ladyfingers over the cream. Make sure to cover the entire surface.
- Repeat Layers: Repeat the layers of cream and ladyfingers until all the ingredients are used, ending with a layer of cream on top.
- Cover and Freeze: Cover the container tightly with plastic wrap, pressing it directly onto the surface of the ice cream to prevent ice crystals from forming. Then, cover with a lid or another layer of foil. Freeze for at least 6 hours, or preferably overnight, until the ice cream is firm.
Serving the Tiramisu Ice Cream
Finally, the moment you’ve been waiting for! A few simple touches will make this dessert even more impressive.
- Thaw Slightly: Before serving, let the ice cream sit at room temperature for about 10-15 minutes to soften slightly. This will make it easier to scoop.
- Dust with Cocoa Powder: Dust the top of the ice cream generously with unsweetened cocoa powder. This adds a beautiful visual appeal and a touch of bitterness that complements the sweetness of the ice cream.
- Garnish (Optional): If desired, garnish with chocolate shavings or espresso beans for an extra touch of elegance.
- Scoop and Serve: Scoop the ice cream into bowls or cones and serve immediately. Enjoy!

Conclusion:
And there you have it! This Tiramisu Ice Cream isn’t just another frozen dessert; it’s an experience. It’s the perfect marriage of classic Italian flavors and the refreshing coolness of ice cream, creating a symphony of textures and tastes that will leave you wanting more. I truly believe this recipe is a must-try for any dessert enthusiast, especially if you’re looking for something a little different and utterly delightful. Why is it a must-try? Because it’s surprisingly easy to make, even without an ice cream maker (though having one definitely speeds things up!). The combination of the coffee-soaked ladyfingers, the creamy mascarpone base, and the dusting of cocoa powder creates a flavor profile that’s both familiar and exciting. It’s the kind of dessert that will impress your guests at a dinner party or simply brighten up a weeknight. Plus, who can resist the allure of tiramisu in ice cream form? It’s the best of both worlds! But the fun doesn’t stop there! Feel free to get creative with your serving suggestions and variations. For a truly decadent experience, serve a scoop of this Tiramisu Ice Cream alongside a warm brownie or a slice of chocolate cake. The contrast of temperatures and textures is simply divine. You could also crumble some extra ladyfingers on top for added crunch, or drizzle a little chocolate sauce for an extra touch of sweetness.Serving Suggestions and Variations:
* Affogato Style: Pour a shot of hot espresso over a scoop of the ice cream for an instant affogato. The bitterness of the coffee perfectly complements the sweetness of the ice cream. * Ice Cream Sandwiches: Use chocolate wafers or biscotti to create delicious ice cream sandwiches. * Tiramisu Sundae: Layer the ice cream with whipped cream, cocoa powder, and chocolate shavings in a sundae glass. * Boozy Boost: Add a tablespoon or two of coffee liqueur or rum to the ice cream base for an extra kick. * Nutty Delight: Sprinkle chopped hazelnuts or almonds on top for added texture and flavor. * Chocolate Chips: Fold in mini chocolate chips for a bit of extra chocolatey goodness. I’m so excited for you to try this recipe and experience the magic of homemade Tiramisu Ice Cream for yourself. It’s a labor of love, but the results are well worth the effort. The rich, creamy texture and the bold coffee flavor will transport you straight to Italy with every spoonful. So, what are you waiting for? Gather your ingredients, put on your favorite music, and get ready to embark on a delicious adventure. I promise you won’t be disappointed. And once you’ve made it, I’d love to hear about your experience! Share your photos and comments on social media using #TiramisuIceCream and let me know what you think. Did you try any of the variations? What did you serve it with? I can’t wait to see your creations! Happy ice cream making! I am confident that you will love this recipe as much as I do. It is a guaranteed crowd-pleaser and a delightful way to enjoy the classic flavors of tiramisu in a refreshing and unique format. Don’t hesitate, give it a try today! Print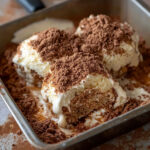
Tiramisu Ice Cream: The Ultimate Guide to Making It at Home
- Total Time: 420 minutes
- Yield: 6–8 servings 1x
Description
Creamy, dreamy Tiramisu Ice Cream! This no-churn recipe combines a rich zabaglione base with mascarpone cream and coffee-soaked ladyfingers for the ultimate Italian dessert experience.
Ingredients
- 6 large egg yolks
- ¾ cup granulated sugar
- ½ cup Marsala wine (sweet or semi-sweet)
- Pinch of salt
- 16 ounces (2 cups) mascarpone cheese, cold
- 1 cup heavy cream, cold
- ¼ cup granulated sugar
- 1 teaspoon vanilla extract
- 1 cup strong brewed coffee, cooled
- 2 tablespoons coffee liqueur (such as Kahlua or Tia Maria)
- Approximately 24 ladyfingers (savoiardi biscuits)
- Unsweetened cocoa powder, for dusting
- Chocolate shavings, for garnish
- Espresso beans, for garnish
Instructions
- Prepare the Zabaglione Base: In a heatproof bowl, whisk together egg yolks, sugar, and salt until pale yellow and slightly thickened (2-3 minutes). Gradually whisk in Marsala wine.
- Place the bowl over a saucepan of simmering water (double boiler). Whisk constantly for 8-10 minutes, or until the mixture thickens and coats the back of a spoon. Remove from heat and transfer to a clean bowl.
- Whisk for another minute or two to release any remaining heat. Then, place the bowl in an ice bath (a larger bowl filled with ice and a little water) and continue to whisk occasionally until the zabaglione is completely cool. This cooling process can take about 20-30 minutes.
- Make the Mascarpone Cream: In a separate bowl, whip cold heavy cream until soft peaks form. Gradually add sugar and vanilla extract; continue whipping until stiff peaks form. Be careful not to overwhip.
- In a large bowl, gently soften cold mascarpone cheese with a spatula. Gently fold the whipped cream into the softened mascarpone cheese in two or three additions. Use a light hand to avoid deflating the whipped cream. Mix until just combined; do not overmix.
- Prepare Coffee Soak and Ladyfingers: In a shallow dish, combine cooled coffee and coffee liqueur (if using). Quickly dip each ladyfinger into the coffee mixture for a few seconds per side. Cut ladyfingers into smaller pieces if needed.
- Assemble the Tiramisu Ice Cream: Gently fold the cooled zabaglione base into the mascarpone cream mixture until just combined. Be careful not to overmix, as this can deflate the mixture.
- In a freezer-safe container, spread a thin layer of the zabaglione-mascarpone cream mixture on the bottom.
- Arrange a layer of the coffee-soaked ladyfingers over the cream. Make sure to cover the entire surface.
- Repeat the layers of cream and ladyfingers until all the ingredients are used, ending with a layer of cream on top.
- Cover the container tightly with plastic wrap, pressing it directly onto the surface of the ice cream to prevent ice crystals from forming. Then, cover with a lid or another layer of foil. Freeze for at least 6 hours, or preferably overnight, until the ice cream is firm.
- Serve: Let the ice cream sit at room temperature for about 10-15 minutes to soften slightly. Dust the top with cocoa powder. Garnish with chocolate shavings or espresso beans (optional). Scoop and serve.
Notes
- The zabaglione is the heart of this Tiramisu Ice Cream, giving it that rich, custardy flavor. Don’t skip this step it’s what makes it truly special!
- Be patient and don’t stop whisking! If the mixture starts to curdle, immediately remove it from the heat and whisk vigorously until it smooths out.
- Make sure your mascarpone and heavy cream are very cold for the best results.
- Be careful not to overwhip the cream, as it can turn into butter.
- A quick dip is key! Over-soaked ladyfingers will make the ice cream soggy.
- Be careful not to overmix, as this can deflate the mixture.
- Prep Time: 45 minutes
- Cook Time: 10 minutes