Milk Mochi: Prepare to be utterly captivated by this delightful Japanese confection! Imagine a dessert that’s as pillowy soft as a cloud, subtly sweet, and melts in your mouth with every bite. That’s exactly what you get with Milk Mochi, and I’m thrilled to share my foolproof recipe with you.
Mochi, in its various forms, has a rich history in Japanese culture, often associated with celebrations and good fortune. While traditionally made with glutinous rice flour, this milk-infused version offers a unique and modern twist on a beloved classic. Its believed that the introduction of milk mochi came about as a way to appeal to a broader audience, blending traditional techniques with readily available ingredients.
What makes this particular recipe so irresistible? Well, beyond its ethereal texture, the subtle milky sweetness is incredibly satisfying without being overpowering. It’s a comforting treat that’s surprisingly easy to make at home, requiring minimal ingredients and effort. Whether you’re looking for a simple dessert to impress guests or a comforting snack to enjoy on a cozy evening, this Milk Mochi recipe is guaranteed to become a new favorite. Get ready to experience a taste of pure bliss!

Ingredients:
- 1 cup whole milk
- 1/2 cup granulated sugar
- 1 cup glutinous rice flour (also known as mochiko)
- 1/4 cup cornstarch, for dusting
- Optional toppings: kinako (roasted soybean flour), cocoa powder, matcha powder, fresh fruit, sweetened condensed milk
Preparing the Mochi Batter
Alright, let’s get started on making this incredibly soft and chewy milk mochi! The first step is creating the batter, which is surprisingly simple.
- Combine Milk and Sugar: In a large, microwave-safe bowl, pour in the 1 cup of whole milk. Add the 1/2 cup of granulated sugar. Give it a good stir until the sugar is mostly dissolved. Don’t worry if a few granules remain; they’ll melt during the cooking process. Using a whisk at this stage helps to ensure even distribution.
- Whisk in the Glutinous Rice Flour: Now, the star of the show the glutinous rice flour! Gradually add the 1 cup of glutinous rice flour to the milk and sugar mixture. It’s crucial to add it slowly and whisk continuously to prevent lumps from forming. If you add it all at once, you’ll end up with a clumpy mess, and nobody wants that! Keep whisking until you have a smooth, milky-white batter. The consistency should be similar to a thick pancake batter.
- Check for Lumps: Once you think you’ve whisked enough, take a close look at the batter. Are there any stubborn little lumps hiding at the bottom of the bowl? If so, keep whisking! You can also use a fine-mesh sieve to strain the batter if you’re really struggling to get rid of the lumps. This will ensure a perfectly smooth and silky mochi.
Cooking the Mochi
Now comes the fun part cooking the mochi! We’ll be using the microwave for this, which is quick and easy. However, it’s important to cook it in intervals to prevent it from exploding or becoming too tough.
- Cover and Microwave (First Interval): Cover the bowl tightly with microwave-safe plastic wrap. Make sure the plastic wrap is touching the surface of the batter. This will help to prevent the mochi from drying out. Microwave on high for 2 minutes.
- Stir Vigorously: Carefully remove the bowl from the microwave (it will be hot!). Peel back the plastic wrap, being cautious of the steam. The batter will look partially cooked and a bit bubbly. Now, stir the mixture vigorously with a spatula or wooden spoon. You’ll notice it’s starting to thicken and become more translucent.
- Cover and Microwave (Second Interval): Re-cover the bowl with the plastic wrap, again ensuring it touches the surface of the batter. Microwave on high for another 1 minute.
- Stir Again: Remove the bowl from the microwave and stir vigorously again. The mochi should be significantly thicker and more translucent now. It should be pulling away from the sides of the bowl.
- Cover and Microwave (Final Interval): Cover the bowl one last time and microwave on high for a final 30 seconds.
- Final Stir: Remove the bowl and give it one last stir. The mochi should be very thick, sticky, and translucent. It should form a cohesive mass that pulls away from the sides of the bowl. If it still looks a bit milky or runny, you can microwave it for another 15-30 seconds, but be careful not to overcook it, as it will become tough.
Shaping and Coating the Mochi
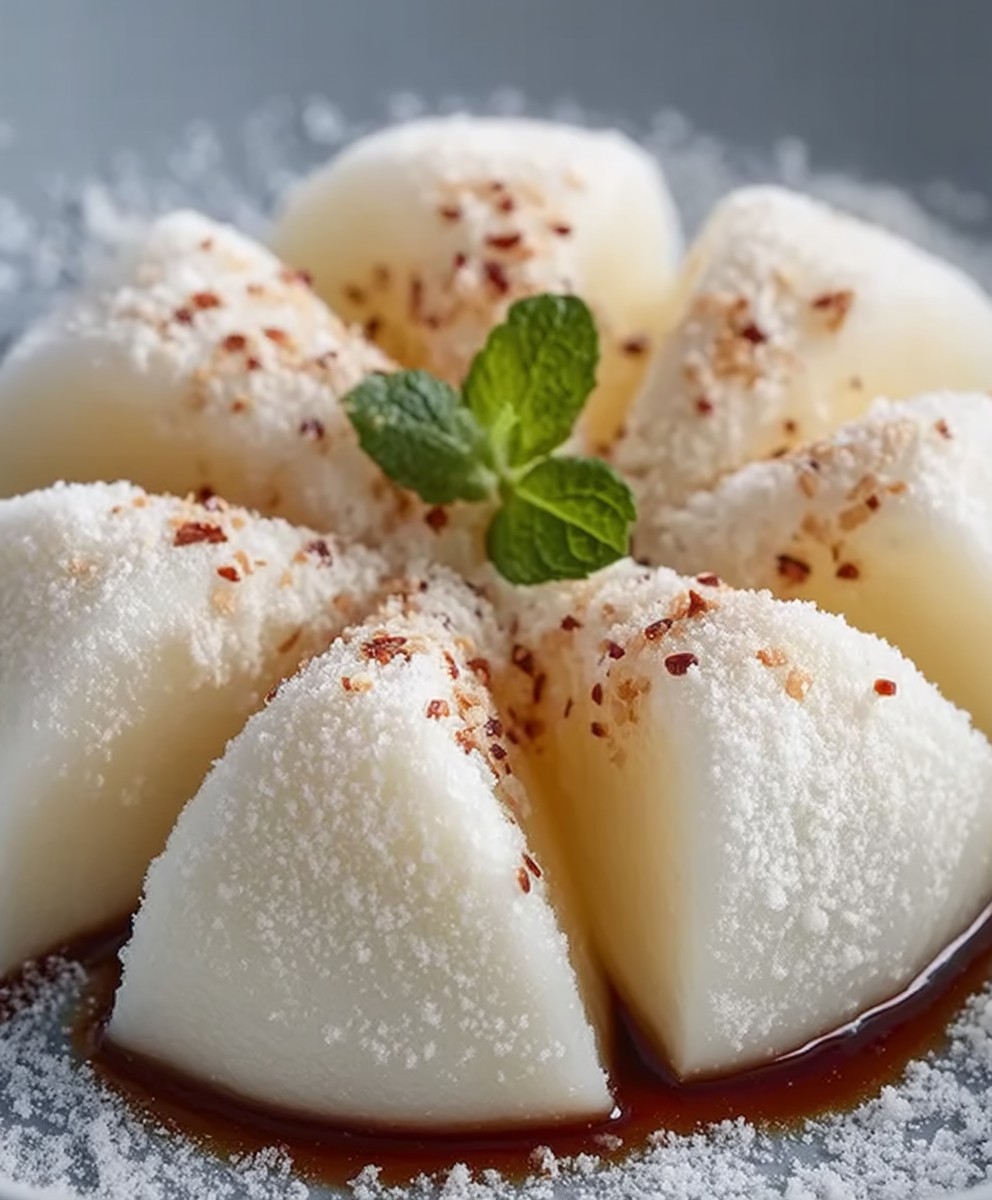
The mochi is now cooked, but it’s incredibly sticky! We need to coat it in cornstarch to make it manageable and prevent it from sticking to everything.
- Prepare Your Work Surface: Generously dust a clean, flat surface (like a cutting board or baking sheet) with cornstarch. Don’t be shy with the cornstarch you’ll need plenty to prevent the mochi from sticking. Also, dust your hands with cornstarch.
- Transfer the Mochi: Carefully transfer the hot mochi from the bowl onto the prepared cornstarch-dusted surface. Be careful, as it will be very hot and sticky!
- Coat with Cornstarch: Sprinkle more cornstarch on top of the mochi to coat it completely. Use your hands (dusted with cornstarch, of course!) to gently pat the mochi into a flat disc, about 1/2 inch thick.
- Cut into Pieces: Using a sharp knife or a bench scraper, cut the mochi into small, bite-sized squares or rectangles. Make sure to dust the knife or scraper with cornstarch before each cut to prevent sticking.
- Coat Each Piece: As you cut the mochi, make sure each piece is well-coated with cornstarch. This will prevent them from sticking together.
Serving and Enjoying Your Milk Mochi
Your milk mochi is now ready to be enjoyed! You can eat it plain, or you can get creative with toppings.
- Choose Your Toppings: This is where you can let your creativity shine! Some popular toppings for mochi include:
- Kinako (Roasted Soybean Flour): This adds a nutty and slightly savory flavor.
- Cocoa Powder: For a chocolatey twist.
- Matcha Powder: For a slightly bitter and earthy flavor.
- Fresh Fruit: Strawberries, blueberries, raspberries, or mangoes are all delicious choices.
- Sweetened Condensed Milk: Adds extra sweetness and creaminess.
- Coat with Toppings: Simply roll the mochi pieces in your chosen toppings, or drizzle them with sweetened condensed milk.
- Serve Immediately: Milk mochi is best enjoyed fresh, as it tends to become slightly harder as it sits. However, you can store leftovers in an airtight container at room temperature for a day or two.
Tips and Tricks for Perfect Milk Mochi
Here are a few extra tips to help you make the best milk mochi possible:
- Use High-Quality Glutinous Rice Flour: The quality of your glutinous rice flour will affect the texture of your mochi. Look for a brand that is specifically labeled “glutinous rice flour” or “mochiko.”
- Don’t Overcook the Mochi: Overcooked mochi will be tough and rubbery. Be sure to cook it in intervals and stir it frequently to prevent it from overheating.
- Adjust the Sugar to Your Taste: If you prefer a less sweet mochi, you can reduce the amount of sugar.
- Experiment with Flavors: Feel free to add other flavorings to the batter, such as vanilla extract, almond extract, or even a few drops of food coloring.
- Keep Your Hands and Work Surface Well-Dusted: This is the key to preventing the mochi from sticking to everything.
- Use a Microwave-Safe Bowl: Make sure the bowl you use is microwave-safe to avoid any accidents.
- Be Careful of the Steam: When removing the plastic wrap from the bowl, be careful of the steam, as it can be very hot.
Troubleshooting
Sometimes, things don’t go exactly as planned. Here are a few common problems and how to fix them:
- Mochi is Too Sticky: This usually means you didn’t use enough cornstarch. Simply dust the mochi with more cornstarch.
- Mochi is Too Tough: This usually means you overcooked it. Unfortunately, there’s not much you can do to fix it at this point. Try reducing the cooking time slightly next time.
- Mochi is Lumpy: This usually means you didn’t whisk the glutinous rice flour in properly. Try sifting the flour before adding it to the milk and sugar mixture next time.
- Mochi is Not Translucent Enough: This usually means you didn’t cook it long enough. Microwave it for another 15-30 seconds, but be careful not to overcook it.
Variations
Once you’ve mastered the basic milk mochi recipe, you can start experimenting with different variations. Here are a few ideas:
- Chocolate Milk Mochi: Add 2 tablespoons of cocoa powder to the batter along with the glutinous rice flour.
- Matcha Milk Mochi: Add 1 tablespoon of matcha powder to the batter along with the glutinous rice flour.
Conclusion:
And there you have it! This Milk Mochi recipe is truly something special, and I genuinely believe it’s a must-try for anyone looking for a delightful and unique dessert experience. The incredibly soft, chewy texture combined with the subtle sweetness of the milk creates a flavor profile that’s both comforting and exciting. It’s a far cry from your average pudding or cake, offering a textural adventure that will keep you coming back for more.
But why is this recipe so irresistible? It’s the simplicity, really. With just a handful of ingredients and a straightforward process, you can whip up a batch of these delectable treats in no time. It’s perfect for those moments when you crave something sweet but don’t want to spend hours in the kitchen. Plus, the naturally gluten-free nature of mochi makes it a fantastic option for those with dietary restrictions. It’s a win-win!
Beyond the basic recipe, the possibilities are endless! For a richer flavor, try using full-fat milk or even adding a splash of cream. A sprinkle of toasted sesame seeds adds a nutty crunch, while a dusting of cocoa powder creates a chocolatey twist. If you’re feeling adventurous, experiment with different extracts like almond or vanilla. You could even incorporate fruit purees for a burst of fruity flavor. Imagine mango mochi or strawberry mochi the options are truly limitless!
Serving suggestions? Oh, where do I even begin? These Milk Mochi are fantastic on their own, enjoyed straight from the fridge. But they also pair beautifully with a scoop of ice cream, a drizzle of honey, or a side of fresh fruit. For a more traditional Japanese experience, serve them with a cup of green tea. They’re also a wonderful addition to bento boxes or dessert platters. And if you’re looking for a unique party treat, these mochi are sure to impress your guests.
I’ve personally made this recipe countless times, and it’s always a hit. From casual weeknight desserts to special occasion gatherings, these Milk Mochi never fail to bring a smile to everyone’s face. The soft, pillowy texture is simply addictive, and the subtle sweetness is just right. It’s a dessert that’s both satisfying and light, making it the perfect ending to any meal.
So, what are you waiting for? Grab your ingredients and give this recipe a try! I promise you won’t be disappointed. It’s a fun, easy, and incredibly rewarding experience. And the best part? You get to enjoy the delicious results!
Once you’ve made your own batch of Milk Mochi, I’d absolutely love to hear about your experience. Did you try any variations? What were your favorite serving suggestions? Share your photos and stories in the comments below! I’m always eager to learn new tips and tricks, and I’m sure other readers would appreciate your insights as well. Let’s create a community of mochi lovers!
Don’t be afraid to experiment and make this recipe your own. That’s the beauty of cooking it’s all about creativity and personal expression. So go ahead, unleash your inner chef and create some mochi magic! I’m confident that this recipe will become a staple in your kitchen, just as it has in mine. Happy cooking, and happy mochi-ing!
Milk Mochi: The Ultimate Guide to Making This Delicious Dessert
Soft, chewy milk mochi made easily in the microwave! This simple recipe requires just a few ingredients for a quick and satisfying dessert.
Ingredients
- 1 cup whole milk
- 1/2 cup granulated sugar
- 1 cup glutinous rice flour (mochiko)
- 1/4 cup cornstarch, for dusting
- Optional toppings: kinako (roasted soybean flour), cocoa powder, matcha powder, fresh fruit, sweetened condensed milk
Instructions
- Combine Milk and Sugar: In a large, microwave-safe bowl, combine milk and sugar. Stir until sugar is mostly dissolved.
- Whisk in Flour: Gradually whisk in glutinous rice flour until smooth and lump-free. Use a sieve if needed.
- Microwave (First Interval): Cover tightly with microwave-safe plastic wrap (touching the surface). Microwave on high for 2 minutes.
- Stir Vigorously: Remove from microwave (careful, it’s hot!). Stir vigorously with a spatula.
- Microwave (Second Interval): Re-cover with plastic wrap. Microwave on high for 1 minute.
- Stir Again: Remove and stir vigorously. The mochi should be thickening.
- Microwave (Final Interval): Re-cover and microwave on high for 30 seconds.
- Final Stir: Remove and stir. The mochi should be very thick, sticky, and translucent. If needed, microwave for another 15-30 seconds, but don’t overcook.
- Prepare Work Surface: Generously dust a clean, flat surface with cornstarch. Dust your hands too.
- Transfer and Coat: Carefully transfer the hot mochi to the cornstarch-dusted surface. Sprinkle more cornstarch on top.
- Shape and Cut: Gently pat the mochi into a 1/2-inch thick disc. Cut into bite-sized pieces, dusting the knife with cornstarch between cuts.
- Coat Each Piece: Ensure each piece is well-coated with cornstarch.
- Serve: Enjoy plain or with your favorite toppings like kinako, cocoa powder, matcha, fresh fruit, or sweetened condensed milk.
Notes
- Use high-quality glutinous rice flour (mochiko) for the best texture.
- Don’t overcook the mochi, or it will become tough.
- Adjust the sugar to your taste.
- Experiment with flavorings like vanilla or almond extract.
- Keep your hands and work surface well-dusted with cornstarch to prevent sticking.
- Be careful of the steam when removing the plastic wrap.
- If the mochi is too sticky, use more cornstarch.
- If the mochi is lumpy, sift the flour next time.
- If the mochi isn’t translucent enough, microwave it a bit longer.
- Milk mochi is best enjoyed fresh, as it tends to become slightly harder as it sits. However, you can store leftovers in an airtight container at room temperature for a day or two.