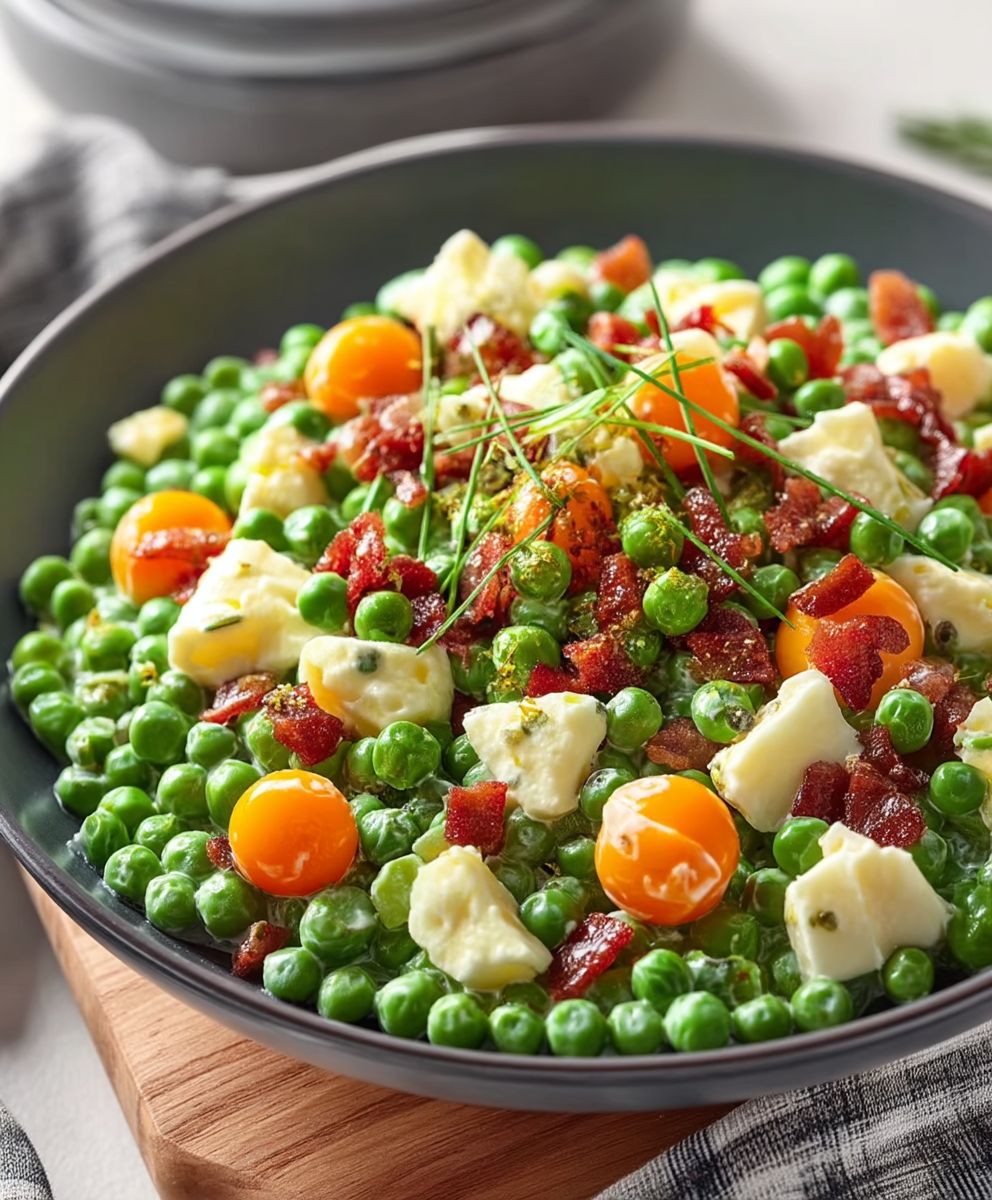
Pea Salad: It’s not just a side dish; it’s a vibrant celebration of spring on a plate! I know what you might be thinking: peas? Salad? But trust me, this creamy, crunchy, and surprisingly addictive concoction will have you reaching for seconds (and maybe thirds!). Forget everything you thought you knew about boring salads because this one is a game-changer.
While its exact origins are a bit hazy, pea salad has been a beloved staple at potlucks, picnics, and family gatherings across America for generations. Some trace its roots back to the Midwest, where fresh peas were abundant and readily available. Others believe it evolved from similar European salads. Regardless of its precise history, it has become a quintessential comfort food, evoking memories of sunny days and shared meals.
So, what makes this simple salad so irresistible? It’s the delightful combination of textures and flavors. The sweetness of the peas is perfectly balanced by the salty bacon, the sharp cheddar cheese, and the creamy dressing. The crispness of the red onion adds another layer of complexity, making each bite a delightful experience. Plus, it’s incredibly easy to make, requiring minimal cooking and prep time. Whether you’re looking for a quick and easy side dish for a weeknight dinner or a crowd-pleasing addition to your next barbecue, this pea salad recipe is sure to be a hit!

Ingredients:
- Frozen Peas: 1 pound (thawed) – I prefer using frozen peas because they retain their bright green color and sweetness.
- Cooked Bacon: 8 slices, cooked until crispy and crumbled – Don’t skimp on the bacon! It adds a wonderful smoky flavor and salty crunch.
- Sharp Cheddar Cheese: 1 cup, cubed into small pieces – I like sharp cheddar, but you can use your favorite cheese. Colby Jack or even a mild cheddar would work well.
- Red Onion: 1/2 cup, finely diced – Red onion adds a nice bite, but if you prefer a milder flavor, you can use sweet onion or even green onions.
- Celery: 1/2 cup, finely diced – Celery provides a refreshing crunch.
- Mayonnaise: 1 cup – Use your favorite brand of mayonnaise. I prefer a full-fat mayonnaise for the best flavor and texture.
- Sour Cream: 1/2 cup – Sour cream adds a tangy creaminess to the dressing.
- Apple Cider Vinegar: 1 tablespoon – This adds a touch of acidity to balance the sweetness.
- Granulated Sugar: 2 tablespoons – Sugar helps to balance the acidity and enhance the sweetness of the peas.
- Salt: 1/2 teaspoon, or to taste – Seasoning is key!
- Black Pepper: 1/4 teaspoon, or to taste – Freshly ground black pepper is always best.
Preparing the Pea Salad:
- Thaw the Peas: If you’re using frozen peas (which I highly recommend!), make sure they are completely thawed. You can thaw them in the refrigerator overnight, or quickly thaw them by running them under cold water for a few minutes. Drain them well to remove any excess water. Excess water will make the salad soggy.
- Cook the Bacon: Cook the bacon until it’s nice and crispy. You can cook it in a skillet over medium heat, or bake it in the oven at 400°F (200°C) for about 15-20 minutes. Once the bacon is cooked, let it cool slightly, then crumble it into small pieces. I like to use kitchen shears to cut the bacon into small pieces its much easier than crumbling it by hand!
- Dice the Vegetables and Cheese: Finely dice the red onion and celery. You want the pieces to be small enough that they don’t overpower the other ingredients. Cube the cheddar cheese into small, bite-sized pieces. The smaller the pieces, the better they will incorporate into the salad.
- Combine the Ingredients: In a large bowl, combine the thawed peas, crumbled bacon, cubed cheddar cheese, diced red onion, and diced celery. Make sure the bowl is large enough to comfortably mix all the ingredients without spilling.
Making the Dressing:
- Whisk Together the Dressing Ingredients: In a separate, smaller bowl, whisk together the mayonnaise, sour cream, apple cider vinegar, granulated sugar, salt, and black pepper. Whisk until the dressing is smooth and creamy. Taste the dressing and adjust the seasonings as needed. You might want to add a little more sugar if you prefer a sweeter salad, or a little more vinegar if you prefer a tangier salad.
- Adjusting the Sweetness and Tanginess: This is where you can really customize the salad to your liking. If you find the dressing too tart, add a little more sugar, a teaspoon at a time, until you reach your desired level of sweetness. If you prefer a tangier flavor, add a little more apple cider vinegar, a half-teaspoon at a time. Remember to taste after each addition to ensure you don’t overdo it.
Assembling the Pea Salad:
- Pour the Dressing Over the Salad: Pour the dressing over the pea mixture in the large bowl.
- Gently Toss to Combine: Gently toss all the ingredients together until they are evenly coated with the dressing. Be careful not to overmix, as this can make the peas mushy. You want to just coat everything nicely.
- Chill Before Serving: Cover the bowl with plastic wrap and refrigerate the pea salad for at least 30 minutes before serving. This allows the flavors to meld together and the salad to chill properly. Chilling the salad is crucial for the best flavor and texture. I often chill it for an hour or two.
- Taste and Adjust Seasonings (Again!): Before serving, give the pea salad another taste and adjust the seasonings if necessary. You might find that the flavors have changed slightly after chilling, so a little extra salt or pepper might be needed.
- Serve and Enjoy!: Serve the pea salad chilled. It’s a great side dish for picnics, barbecues, potlucks, or any summer gathering. It also pairs well with grilled chicken, burgers, or sandwiches.
Tips and Variations:
- Add Hard-Boiled Eggs: For extra protein and flavor, add 2-3 hard-boiled eggs, chopped, to the salad.
- Use Different Cheese: Experiment with different types of cheese, such as Colby Jack, Monterey Jack, or even crumbled feta cheese.
- Add Water Chestnuts: For added crunch, add 1/2 cup of sliced water chestnuts.
- Substitute Yogurt for Sour Cream: If you’re looking for a lighter option, you can substitute plain Greek yogurt for the sour cream.
- Make it Ahead: Pea salad can be made a day ahead of time. Just store it in an airtight container in the refrigerator. The flavors will meld together even more overnight.
- Bacon Alternatives: If you don’t eat bacon, you can use turkey bacon or even crumbled vegetarian bacon.
- Sweetness Control: If you prefer a less sweet salad, reduce the amount of sugar to 1 tablespoon or even omit it altogether.
- Spice it Up: Add a pinch of red pepper flakes to the dressing for a little bit of heat.
- Fresh Herbs: A sprinkle of fresh dill or parsley can add a bright, fresh flavor to the salad.
Serving Suggestions:
- Picnics and Barbecues: Pea salad is a classic side dish for picnics and barbecues. It’s easy to transport and always a crowd-pleaser.
- Potlucks: Bring pea salad to your next potluck and watch it disappear!
- Sandwiches and Burgers: Serve pea salad alongside sandwiches or burgers for a complete meal.
- Grilled Meats: Pea salad pairs well with grilled chicken, steak, or fish.
- Holiday Gatherings: Pea salad is a great addition to any holiday gathering, especially Easter or Thanksgiving.
Storage Instructions:
Store leftover pea salad in an airtight container in the refrigerator for up to 3 days. The salad may become slightly watery as it sits, so you may want to drain off any excess liquid before serving.
Important Considerations:
Food Safety: Always ensure that your ingredients are fresh and properly stored. Keep the pea salad refrigerated at all times to prevent bacterial growth.
Allergies: Be mindful of any allergies when preparing and serving pea salad. Common allergens include dairy (mayonnaise, sour cream, cheese) and soy (mayonnaise). Adjust the recipe accordingly if needed.
Conclusion:
This isn’t your grandma’s boring side dish; this Pea Salad is a vibrant, flavorful explosion that will have everyone reaching for seconds! The creamy dressing, the salty bacon, the sweet peas, and the crunchy red onion all come together in perfect harmony. Trust me, this recipe is a game-changer, and once you try it, you’ll understand why it’s become a staple in my kitchen.
Why is this a must-try? Because it’s incredibly easy to make, requires minimal ingredients, and delivers maximum flavor. It’s the perfect make-ahead dish for potlucks, barbecues, or even a simple weeknight dinner. Plus, it’s a fantastic way to sneak in some extra veggies without sacrificing taste. I’ve served this Pea Salad to even the pickiest eaters, and they’ve all been pleasantly surprised. It’s truly a crowd-pleaser!
But the best part? It’s incredibly versatile! While the recipe I’ve shared is my go-to, feel free to experiment and make it your own.
Serving Suggestions and Variations:
* For a lighter version: Substitute Greek yogurt for some of the mayonnaise. This will add a tangy flavor and reduce the overall fat content.
* Add some protein: Grilled chicken or ham would be delicious additions, turning this side dish into a complete meal.
* Spice it up: A pinch of red pepper flakes or a dash of hot sauce can add a subtle kick.
* Get creative with the cheese: While cheddar is classic, try using crumbled feta or goat cheese for a more sophisticated flavor.
* Make it vegetarian: Simply omit the bacon for a delicious vegetarian option. You could even add some toasted walnuts or pecans for extra crunch.
* Serve it differently: Instead of serving it as a side dish, try using it as a filling for lettuce wraps or as a topping for crackers.
* Add some herbs: Fresh dill or parsley would be wonderful additions, adding a bright, herbaceous note.
* Make it ahead: This salad actually tastes better after it’s had a chance to sit in the refrigerator for a few hours, allowing the flavors to meld together. Just be sure to add the croutons right before serving to prevent them from getting soggy.
I truly believe that this Pea Salad recipe is a winner. It’s simple, delicious, and adaptable to your own personal preferences. I’ve made it countless times, and it always receives rave reviews.
So, what are you waiting for? Gather your ingredients, follow the easy steps, and prepare to be amazed. I’m confident that this will become a new favorite in your household.
I’m so excited for you to try this recipe! Once you do, I would absolutely love to hear about your experience. Did you make any variations? What did you think of the flavor? Did your family and friends enjoy it? Please share your thoughts and photos in the comments below. Your feedback is invaluable, and it helps me to continue creating recipes that you’ll love. Happy cooking!
Pea Salad: The Ultimate Guide to Making the Perfect Dish
Classic pea salad with sweet peas, crispy bacon, sharp cheddar, and a creamy, tangy dressing. A perfect side dish for picnics, potlucks, and barbecues!
Ingredients
- 1 pound frozen peas, thawed
- 8 slices cooked bacon, crumbled
- 1 cup sharp cheddar cheese, cubed
- 1/2 cup red onion, finely diced
- 1/2 cup celery, finely diced
- 1 cup mayonnaise
- 1/2 cup sour cream
- 1 tablespoon apple cider vinegar
- 2 tablespoons granulated sugar
- 1/2 teaspoon salt, or to taste
- 1/4 teaspoon black pepper, or to taste
Instructions
- Thaw the Peas: If using frozen peas, ensure they are completely thawed. Drain well to remove excess water.
- Cook the Bacon: Cook bacon until crispy. Let cool slightly, then crumble into small pieces.
- Dice the Vegetables and Cheese: Finely dice the red onion and celery. Cube the cheddar cheese into small, bite-sized pieces.
- Combine Ingredients: In a large bowl, combine the thawed peas, crumbled bacon, cubed cheddar cheese, diced red onion, and diced celery.
- Make the Dressing: In a separate bowl, whisk together the mayonnaise, sour cream, apple cider vinegar, granulated sugar, salt, and black pepper until smooth. Taste and adjust seasonings as needed.
- Assemble the Salad: Pour the dressing over the pea mixture.
- Gently Toss: Gently toss all ingredients until evenly coated with dressing.
- Chill: Cover and refrigerate for at least 30 minutes before serving.
- Taste and Adjust: Before serving, taste and adjust seasonings if necessary.
- Serve: Serve chilled.
Notes
- Additions: Consider adding hard-boiled eggs, water chestnuts, or fresh herbs like dill or parsley.
- Cheese Variations: Experiment with Colby Jack, Monterey Jack, or feta cheese.
- Lighter Option: Substitute plain Greek yogurt for sour cream.
- Make Ahead: Can be made a day ahead and stored in the refrigerator.
- Bacon Alternatives: Use turkey bacon or vegetarian bacon.
- Sweetness Control: Adjust or omit sugar to taste.
- Spice it Up: Add a pinch of red pepper flakes.
- Serving Suggestions: Great for picnics, barbecues, potlucks, sandwiches, and grilled meats.
- Storage: Store leftovers in an airtight container in the refrigerator for up to 3 days.
- Food Safety: Keep refrigerated to prevent bacterial growth.
- Allergies: Be mindful of dairy and soy allergies.