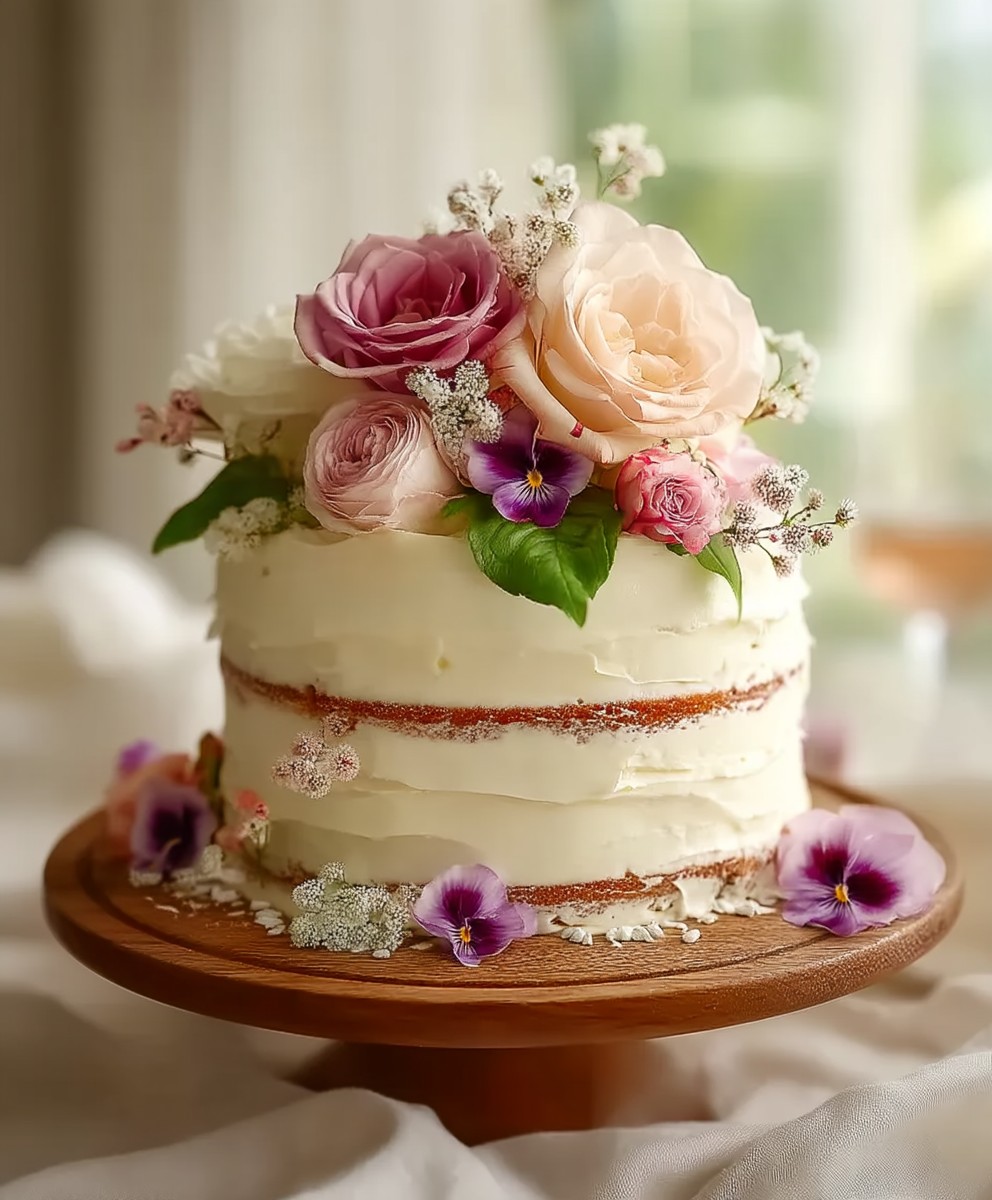
Spring Floral Cake: Prepare to be enchanted! Imagine a dessert so breathtakingly beautiful, it rivals a freshly bloomed garden. A cake so delicious, it melts in your mouth with the delicate flavors of spring. This isn’t just a cake; it’s an edible masterpiece, perfect for celebrating the season of renewal and joy.
Floral cakes have a rich history, often gracing the tables of royalty and appearing at significant celebrations throughout the centuries. The artistry of decorating cakes with edible flowers dates back to ancient times, with each bloom carefully chosen for its symbolic meaning and aesthetic appeal. Today, we continue this tradition, bringing a touch of elegance and nature’s beauty to our modern kitchens.
What makes a Spring Floral Cake so irresistible? It’s the perfect combination of visual appeal and delectable taste. The light, airy sponge cake provides a delightful base, while the creamy frosting offers a smooth, luxurious texture. But the real magic lies in the edible flowers, which not only add a stunning visual element but also impart subtle floral notes that complement the overall flavor profile. People adore this dish because it’s not just a treat for the taste buds; it’s a feast for the eyes, a conversation starter, and a memorable centerpiece for any occasion. Plus, with a little practice, you can create a stunning floral cake that will impress your friends and family without spending a fortune at a bakery!

Ingredients:
- For the Vanilla Cake:
- 3 cups all-purpose flour
- 3 teaspoons baking powder
- 1/2 teaspoon baking soda
- 1 teaspoon salt
- 1 cup (2 sticks) unsalted butter, softened
- 2 cups granulated sugar
- 4 large eggs
- 1 tablespoon vanilla extract
- 1 1/2 cups buttermilk
- For the Swiss Meringue Buttercream:
- 6 large egg whites
- 1 1/2 cups granulated sugar
- 2 cups (4 sticks) unsalted butter, softened
- 1 teaspoon vanilla extract
- Pinch of salt
- For the Floral Decorations:
- Assorted edible flowers (pansies, violas, roses, etc.) – ensure they are pesticide-free and safe for consumption
- Optional: Green food coloring gel
- Optional: Sprinkles or edible glitter
- Simple Syrup (Optional, for extra moisture):
- 1/2 cup granulated sugar
- 1/2 cup water
Preparing the Vanilla Cake:
- Preheat and Prep: First things first, preheat your oven to 350°F (175°C). Grease and flour three 8-inch round cake pans. I like to use parchment paper rounds at the bottom for easy release, but that’s totally optional!
- Dry Ingredients: In a large bowl, whisk together the flour, baking powder, baking soda, and salt. Make sure everything is evenly distributed this helps the cake rise properly.
- Cream Butter and Sugar: In a separate large bowl (or the bowl of your stand mixer), cream together the softened butter and granulated sugar until light and fluffy. This usually takes about 3-5 minutes. Don’t rush this step; it’s crucial for a tender cake.
- Add Eggs: Beat in the eggs one at a time, making sure each egg is fully incorporated before adding the next. Then, stir in the vanilla extract.
- Alternate Wet and Dry: Gradually add the dry ingredients to the wet ingredients, alternating with the buttermilk. Begin and end with the dry ingredients. So, add about a third of the dry ingredients, then half of the buttermilk, then another third of the dry ingredients, then the remaining buttermilk, and finally the last third of the dry ingredients. Mix until just combined. Be careful not to overmix! Overmixing develops the gluten in the flour, which can lead to a tough cake.
- Divide and Bake: Divide the batter evenly among the prepared cake pans. Bake for 25-30 minutes, or until a wooden skewer inserted into the center comes out clean.
- Cool Completely: Let the cakes cool in the pans for about 10 minutes before inverting them onto a wire rack to cool completely. This prevents them from sticking to the pans. Make sure they are completely cool before frosting!
Making the Swiss Meringue Buttercream:
- Combine Egg Whites and Sugar: In a heatproof bowl (like stainless steel or glass) set over a saucepan of simmering water (make sure the bottom of the bowl doesn’t touch the water!), combine the egg whites and sugar.
- Whisk and Heat: Whisk constantly until the sugar is completely dissolved and the mixture is hot to the touch. You should not feel any sugar granules when you rub a bit of the mixture between your fingers. This usually takes about 5-7 minutes.
- Whip to Stiff Peaks: Remove the bowl from the heat and transfer the mixture to the bowl of your stand mixer fitted with the whisk attachment. Whip on high speed until stiff, glossy peaks form and the bowl is cool to the touch. This can take a while, sometimes 8-10 minutes, so be patient! The meringue needs to be completely cool before adding the butter, or it will melt.
- Add Butter Gradually: With the mixer on medium speed, add the softened butter one tablespoon at a time, waiting until each tablespoon is fully incorporated before adding the next. The mixture might look curdled at first, but don’t worry! Just keep mixing, and it will eventually come together into a smooth, creamy buttercream.
- Flavor and Finish: Once all the butter is added and the buttercream is smooth, add the vanilla extract and a pinch of salt. Mix until combined. If you want to tint the buttercream green for a more floral look, add a few drops of green food coloring gel and mix until you achieve your desired shade.
Assembling and Decorating the Cake:
- Level the Cakes (Optional): If your cakes have a dome, use a serrated knife to level them. This will make stacking and frosting much easier.
- Simple Syrup (Optional): If you want a super moist cake, brush each layer with simple syrup. To make simple syrup, combine the sugar and water in a small saucepan and heat over medium heat until the sugar is dissolved. Let it cool completely before using.
- First Layer: Place one cake layer on a cake stand or serving plate. Spread a generous layer of Swiss meringue buttercream over the top.
- Second Layer: Carefully place the second cake layer on top of the buttercream. Spread another generous layer of buttercream.
- Third Layer: Place the final cake layer on top.
- Crumb Coat: Apply a thin layer of buttercream all over the cake. This is called a crumb coat, and it seals in any loose crumbs. Chill the cake in the refrigerator for at least 30 minutes to allow the crumb coat to set.
- Final Frosting: Apply a final, thicker layer of buttercream all over the cake. Smooth it out with a spatula or cake smoother. You can create a smooth finish or add texture, depending on your preference.
- Floral Decorations: Now for the fun part! Gently arrange the edible flowers on top of the cake. You can create a simple border, a cascading effect, or a full floral crown. Get creative and have fun! I like to use a variety of colors and sizes for a more visually appealing design.
- Finishing Touches (Optional): Sprinkle with edible glitter or add other edible decorations as desired.
- Chill and Serve: Chill the cake for at least 30 minutes before serving to allow the buttercream to set. This will make it easier to slice and serve.
Conclusion:
This Spring Floral Cake isn’t just a dessert; it’s an experience, a celebration of the season baked into every delicious bite. From the delicate crumb of the cake itself to the vibrant, edible flowers adorning its surface, this recipe is a guaranteed showstopper that will impress your friends and family. I truly believe this is a must-try recipe, and here’s why: it’s surprisingly simple to execute, even for novice bakers. The instructions are clear, the ingredients are readily available, and the result is a cake that looks and tastes like it came straight from a professional bakery.
But beyond its aesthetic appeal, the flavor profile is what truly sets this cake apart. The subtle sweetness of the cake is perfectly balanced by the light, floral notes of the edible flowers, creating a symphony of flavors that dance on your palate. It’s a refreshing and delightful treat that’s perfect for springtime gatherings, afternoon tea, or simply a special occasion.
Looking for serving suggestions? This cake is absolutely divine on its own, but you can also elevate it with a few simple additions. A dollop of freshly whipped cream or a scoop of vanilla bean ice cream complements the cake beautifully. For a more sophisticated touch, try serving it with a glass of chilled Moscato or a light-bodied rosé wine.
And don’t be afraid to get creative with variations! If you’re not a fan of edible flowers, you can substitute them with fresh berries, citrus zest, or even a dusting of powdered sugar. You could also experiment with different flavor extracts in the cake batter, such as almond, lemon, or orange. For a richer flavor, consider adding a layer of homemade fruit compote between the cake layers. The possibilities are endless!
One variation I particularly love is to infuse the simple syrup used to moisten the cake with a hint of lavender. The subtle floral aroma adds another layer of complexity to the flavor profile and complements the edible flowers beautifully. Another fun idea is to create a mini version of this cake as cupcakes, perfect for individual servings at parties or picnics.
I’ve poured my heart into perfecting this recipe, and I’m confident that you’ll love it as much as I do. It’s a labor of love, but the end result is well worth the effort. The joy of creating something beautiful and delicious from scratch is truly rewarding, and I can’t wait for you to experience that joy for yourself.
So, what are you waiting for? Gather your ingredients, preheat your oven, and get ready to bake the most stunning and delicious Spring Floral Cake you’ve ever tasted. I’m so excited for you to try this recipe and create your own beautiful masterpiece.
Once you’ve baked your cake, I would absolutely love to hear about your experience! Share your photos and stories on social media using the hashtag #SpringFloralCakeRecipe. Let me know what variations you tried, what you loved most about the recipe, and any tips or tricks you discovered along the way. Your feedback is invaluable, and it helps me to continue creating and sharing recipes that you’ll love. Happy baking!
Spring Floral Cake: A Guide to Baking and Decorating
Three-layer vanilla cake with Swiss meringue buttercream and edible flowers, perfect for celebrations.
Ingredients
- 3 cups all-purpose flour
- 3 teaspoons baking powder
- 1/2 teaspoon baking soda
- 1 teaspoon salt
- 1 cup (2 sticks) unsalted butter, softened
- 2 cups granulated sugar
- 4 large eggs
- 1 tablespoon vanilla extract
- 1 1/2 cups buttermilk
- 6 large egg whites
- 1 1/2 cups granulated sugar
- 2 cups (4 sticks) unsalted butter, softened
- 1 teaspoon vanilla extract
- Pinch of salt
- Assorted edible flowers (pansies, violas, roses, etc.) – ensure they are pesticide-free and safe for consumption
- Optional: Green food coloring gel
- Optional: Sprinkles or edible glitter
- 1/2 cup granulated sugar
- 1/2 cup water
Instructions
- Preheat your oven to 350°F (175°C). Grease and flour three 8-inch round cake pans. Use parchment paper rounds at the bottom for easy release (optional).
- In a large bowl, whisk together the flour, baking powder, baking soda, and salt.
- In a separate large bowl (or the bowl of your stand mixer), cream together the softened butter and granulated sugar until light and fluffy (3-5 minutes).
- Beat in the eggs one at a time, fully incorporating each egg before adding the next. Then, stir in the vanilla extract.
- Gradually add the dry ingredients to the wet ingredients, alternating with the buttermilk. Begin and end with the dry ingredients. Mix until just combined. Be careful not to overmix!
- Divide the batter evenly among the prepared cake pans. Bake for 25-30 minutes, or until a wooden skewer inserted into the center comes out clean.
- Let the cakes cool in the pans for about 10 minutes before inverting them onto a wire rack to cool completely. Make sure they are completely cool before frosting!
- In a heatproof bowl (like stainless steel or glass) set over a saucepan of simmering water (make sure the bottom of the bowl doesn’t touch the water!), combine the egg whites and sugar.
- Whisk constantly until the sugar is completely dissolved and the mixture is hot to the touch. You should not feel any sugar granules when you rub a bit of the mixture between your fingers. This usually takes about 5-7 minutes.
- Remove the bowl from the heat and transfer the mixture to the bowl of your stand mixer fitted with the whisk attachment. Whip on high speed until stiff, glossy peaks form and the bowl is cool to the touch. This can take a while, sometimes 8-10 minutes, so be patient! The meringue needs to be completely cool before adding the butter, or it will melt.
- With the mixer on medium speed, add the softened butter one tablespoon at a time, waiting until each tablespoon is fully incorporated before adding the next. The mixture might look curdled at first, but don’t worry! Just keep mixing, and it will eventually come together into a smooth, creamy buttercream.
- Once all the butter is added and the buttercream is smooth, add the vanilla extract and a pinch of salt. Mix until combined. If you want to tint the buttercream green for a more floral look, add a few drops of green food coloring gel and mix until you achieve your desired shade.
- If your cakes have a dome, use a serrated knife to level them. This will make stacking and frosting much easier.
- If you want a super moist cake, brush each layer with simple syrup. To make simple syrup, combine the sugar and water in a small saucepan and heat over medium heat until the sugar is dissolved. Let it cool completely before using.
- Place one cake layer on a cake stand or serving plate. Spread a generous layer of Swiss meringue buttercream over the top.
- Carefully place the second cake layer on top of the buttercream. Spread another generous layer of buttercream.
- Place the final cake layer on top.
- Apply a thin layer of buttercream all over the cake. This is called a crumb coat, and it seals in any loose crumbs. Chill the cake in the refrigerator for at least 30 minutes to allow the crumb coat to set.
- Apply a final, thicker layer of buttercream all over the cake. Smooth it out with a spatula or cake smoother. You can create a smooth finish or add texture, depending on your preference.
- Now for the fun part! Gently arrange the edible flowers on top of the cake. You can create a simple border, a cascading effect, or a full floral crown. Get creative and have fun! I like to use a variety of colors and sizes for a more visually appealing design.
- Sprinkle with edible glitter or add other edible decorations as desired.
- Chill the cake for at least 30 minutes before serving to allow the buttercream to set. This will make it easier to slice and serve.
Notes
- Ensure all edible flowers are pesticide-free and safe for consumption.
- Don’t overmix the cake batter to avoid a tough cake.
- The Swiss meringue buttercream might look curdled at first, but keep mixing, and it will come together.
- Chilling the cake after the crumb coat and final frosting helps the buttercream set and makes slicing easier.