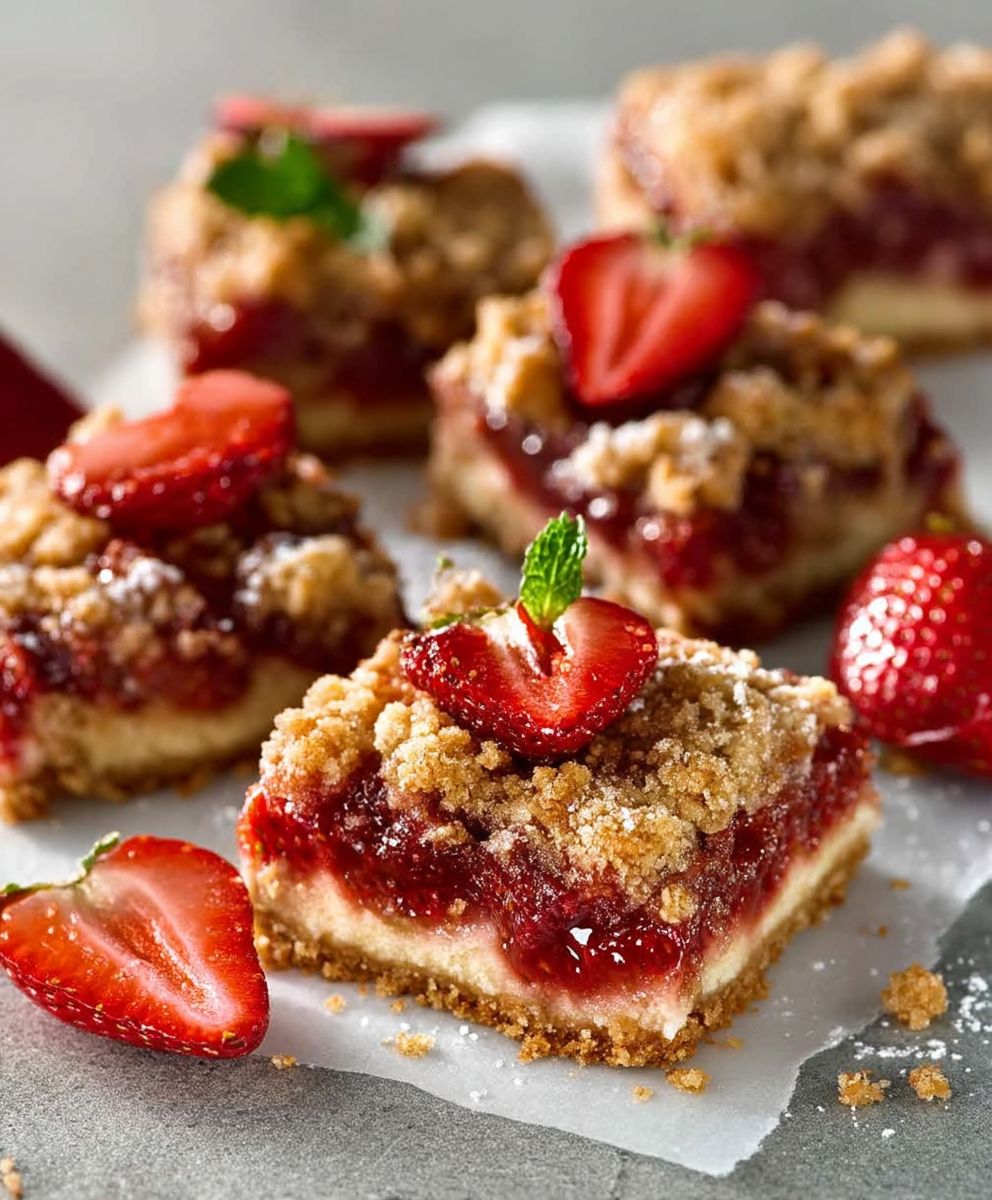
Strawberry bars, those delightful squares of sunshine, are more than just a dessert; they’re a nostalgic trip to simpler times, a burst of summer in every bite. Imagine sinking your teeth into a buttery, crumbly crust, giving way to a sweet and tangy strawberry filling that practically melts in your mouth. Is your mouth watering yet? Mine is!
While the exact origins of strawberry bars are a bit hazy, similar fruit-filled bars have been gracing tables for generations. They evoke memories of county fairs, church picnics, and grandma’s kitchen, where the aroma of baking fruit filled the air with warmth and love. These bars represent a celebration of seasonal fruit and the joy of sharing homemade treats with loved ones.
What makes these bars so irresistible? It’s the perfect combination of textures and flavors. The buttery, slightly salty crust provides a wonderful contrast to the sweet and juicy strawberries. They are incredibly easy to make, requiring minimal ingredients and effort, making them a perfect choice for busy weeknights or impromptu gatherings. Plus, they are endlessly customizable! You can add a sprinkle of oats to the crust for extra texture, a hint of lemon zest to brighten the filling, or even a drizzle of glaze for an extra touch of sweetness. So, let’s get baking and create some strawberry bar magic!

Ingredients:
- For the Crust:
- 1 ½ cups all-purpose flour
- ½ cup (1 stick) unsalted butter, cold and cubed
- ½ cup powdered sugar
- ¼ teaspoon salt
- 2-4 tablespoons ice water
- For the Strawberry Filling:
- 4 cups fresh strawberries, hulled and sliced
- ¾ cup granulated sugar
- 3 tablespoons cornstarch
- 1 tablespoon lemon juice
- ½ teaspoon vanilla extract
- For the Crumble Topping:
- ¾ cup all-purpose flour
- ½ cup packed light brown sugar
- ½ cup rolled oats
- ½ teaspoon ground cinnamon
- ½ cup (1 stick) unsalted butter, cold and cubed
Preparing the Crust
- Combine Dry Ingredients: In a large bowl, whisk together the flour, powdered sugar, and salt. This ensures that the powdered sugar is evenly distributed, preventing any lumps in the crust.
- Cut in the Butter: Add the cold, cubed butter to the flour mixture. Using a pastry blender or your fingertips, cut the butter into the flour until the mixture resembles coarse crumbs. The key here is to work quickly so the butter stays cold. Cold butter is crucial for a flaky crust. If you don’t have a pastry blender, you can use two knives to cut the butter in.
- Add Ice Water: Gradually add the ice water, one tablespoon at a time, mixing gently after each addition. Continue adding water until the dough just comes together. Be careful not to overmix, as this will develop the gluten in the flour and result in a tough crust. The amount of water needed can vary depending on the humidity, so start with 2 tablespoons and add more as needed.
- Form the Dough: Gently press the dough into a ball. Flatten the ball into a disc, wrap it in plastic wrap, and refrigerate for at least 30 minutes. This allows the gluten to relax and the butter to firm up, making the dough easier to roll out. Chilling is a very important step, don’t skip it!
- Roll Out the Dough: Preheat your oven to 375°F (190°C). On a lightly floured surface, roll out the dough to fit the bottom of a 9×13 inch baking pan. You can also use a slightly smaller pan, like an 8×12, if you prefer a thicker crust.
- Transfer to Pan: Carefully transfer the rolled-out dough to the baking pan. Press the dough evenly into the bottom of the pan and up the sides slightly. Use a fork to prick the bottom of the crust several times. This prevents the crust from puffing up during baking.
- Pre-bake the Crust: Bake the crust for 15-20 minutes, or until it is lightly golden brown. Pre-baking the crust helps to prevent it from becoming soggy when the strawberry filling is added. Keep a close eye on it, as oven temperatures can vary.
Making the Strawberry Filling
- Prepare the Strawberries: While the crust is baking, prepare the strawberry filling. Hull and slice the fresh strawberries. I like to slice them about ¼ inch thick, but you can adjust the thickness to your preference.
- Combine Ingredients: In a large bowl, combine the sliced strawberries, granulated sugar, cornstarch, lemon juice, and vanilla extract. Gently toss to coat the strawberries evenly. The cornstarch will help to thicken the filling as it bakes, and the lemon juice will brighten the flavor and prevent the strawberries from becoming too sweet.
- Let it Sit: Let the strawberry mixture sit for about 10 minutes. This allows the sugar to draw out some of the juices from the strawberries, creating a more flavorful and saucy filling.
Preparing the Crumble Topping
- Combine Dry Ingredients: In a medium bowl, whisk together the flour, brown sugar, rolled oats, and cinnamon. The cinnamon adds a warm and comforting flavor to the crumble topping.
- Cut in the Butter: Add the cold, cubed butter to the flour mixture. Using a pastry blender or your fingertips, cut the butter into the flour until the mixture resembles coarse crumbs. Just like with the crust, it’s important to keep the butter cold for a crumbly texture.
- Mix Until Crumbly: Continue mixing until the mixture resembles coarse crumbs. You should have some larger clumps of butter mixed in with the flour.
Assembling and Baking the Strawberry Bars
- Pour in the Filling: Once the crust is pre-baked, remove it from the oven. Pour the strawberry filling evenly over the crust.
- Sprinkle the Crumble: Sprinkle the crumble topping evenly over the strawberry filling. Make sure to cover the entire surface of the filling with the crumble.
- Bake the Bars: Bake the bars for 30-35 minutes, or until the crumble topping is golden brown and the strawberry filling is bubbly. The baking time may vary depending on your oven, so keep a close eye on them.
- Cool Completely: Remove the bars from the oven and let them cool completely in the pan before cutting. This is very important, as the filling will be very runny when it’s hot. Cooling allows the filling to set up and makes the bars easier to cut and serve. I know it’s hard to wait, but trust me, it’s worth it!
- Cut and Serve: Once the bars are completely cool, cut them into squares and serve. You can dust them with powdered sugar for an extra touch of sweetness, if desired. These strawberry bars are delicious served warm or cold.
Tips for Success
- Use Cold Butter: Cold butter is essential for both the crust and the crumble topping. It creates pockets of steam during baking, resulting in a flaky crust and a crumbly topping.
- Don’t Overmix the Dough: Overmixing the dough will develop the gluten in the flour, resulting in a tough crust. Mix just until the dough comes together.
- Pre-bake the Crust: Pre-baking the crust helps to prevent it from becoming soggy when the strawberry filling is added.
- Cool Completely: Let the bars cool completely before cutting. This allows the filling to set up and makes the bars easier to cut and serve.
- Adjust Sweetness: Adjust the amount of sugar in the filling to your preference. If your strawberries are very sweet, you may want to reduce the amount of sugar.
- Add Nuts: For added flavor and texture, you can add chopped nuts to the crumble topping. Pecans or walnuts would be a great addition.
- Use Other Berries: Feel free to substitute other berries for the strawberries. Blueberries, raspberries, or blackberries would all work well. You can even use a combination of berries.
- Storage: Store leftover strawberry bars in an airtight container at room temperature for up to 3 days, or in the refrigerator for up to 5 days.
Variations
- Strawberry Rhubarb Bars: Add diced rhubarb to the strawberry filling for a tart and tangy twist.
- Gluten-Free Strawberry Bars: Use a gluten-free flour blend for the crust and crumble topping.
- Vegan Strawberry Bars: Use vegan butter and a flax egg (1 tablespoon flaxseed meal mixed with 3 tablespoons water) for the crust and crumble topping.
Conclusion:
And there you have it! These strawberry bars are truly a must-try for anyone who loves a sweet treat with a burst of fresh, fruity flavor. From the buttery, crumbly base to the luscious, jammy strawberry filling and the optional (but highly recommended!) streusel topping, every element of this recipe works together in perfect harmony. I know, I know, I’m biased, but I genuinely believe these are the best strawberry bars you’ll ever make.
What makes them so special? It’s the simplicity, really. We’re using real ingredients, avoiding artificial flavors, and letting the natural sweetness of the strawberries shine through. Plus, the recipe is surprisingly easy to follow, even for beginner bakers. You don’t need any fancy equipment or complicated techniques just a little bit of time and a whole lot of love. And the result? A batch of golden-brown, irresistible bars that will disappear faster than you can say “strawberry shortcake.”
But don’t just take my word for it! I urge you to give these strawberry bars a try. I promise you won’t be disappointed. And the best part is, there are so many ways to customize them to your liking.
Looking for serving suggestions? These bars are fantastic on their own, warm or cold. But if you want to take them to the next level, try serving them with a scoop of vanilla ice cream or a dollop of whipped cream. A sprinkle of powdered sugar adds a touch of elegance, and a few fresh strawberry slices make them even more visually appealing. They’re perfect for picnics, potlucks, bake sales, or simply enjoying as an afternoon snack with a cup of tea or coffee.
And if you’re feeling adventurous, here are a few variations you might want to experiment with:
* Berry Medley: Substitute some of the strawberries with other berries like raspberries, blueberries, or blackberries for a more complex flavor profile.
* Lemon Zest: Add a teaspoon of lemon zest to the strawberry filling for a bright, citrusy twist.
* Almond Extract: A few drops of almond extract in the crust or filling can enhance the nutty notes and add a touch of sophistication.
* Chocolate Chips: Fold in some mini chocolate chips into the filling for a decadent treat.
* Gluten-Free: Use a gluten-free flour blend to make these bars suitable for those with gluten sensitivities.
The possibilities are endless! Feel free to get creative and adapt the recipe to your own taste preferences.
I’m so excited for you to try these strawberry bars and experience the joy of baking (and eating!) them for yourself. Once you do, I would absolutely love to hear about your experience. Did you make any modifications? What did you think of the flavor and texture? Did your family and friends enjoy them?
Please, please, please share your photos and stories with me! You can leave a comment below, tag me on social media (find me on [insert social media handles here]), or send me an email. I’m always eager to see your creations and hear your feedback. Your input helps me improve my recipes and inspires other bakers to try them too.
So go ahead, grab your ingredients, preheat your oven, and get ready to bake a batch of these delightful strawberry bars. I have a feeling they’ll become a new family favorite! Happy baking!
Strawberry Bars: The Ultimate Guide to Baking Delicious Treats
Delicious strawberry bars with a buttery crust, sweet strawberry filling, and a crumbly oat topping. Perfect for a summer dessert!
Ingredients
- 1 ½ cups all-purpose flour
- ½ cup (1 stick) unsalted butter, cold and cubed
- ½ cup powdered sugar
- ¼ teaspoon salt
- 2-4 tablespoons ice water
- 4 cups fresh strawberries, hulled and sliced
- ¾ cup granulated sugar
- 3 tablespoons cornstarch
- 1 tablespoon lemon juice
- ½ teaspoon vanilla extract
- ¾ cup all-purpose flour
- ½ cup packed light brown sugar
- ½ cup rolled oats
- ½ teaspoon ground cinnamon
- ½ cup (1 stick) unsalted butter, cold and cubed
Instructions
- In a large bowl, whisk together the flour, powdered sugar, and salt.
- Add the cold, cubed butter to the flour mixture. Using a pastry blender or your fingertips, cut the butter into the flour until the mixture resembles coarse crumbs.
- Gradually add the ice water, one tablespoon at a time, mixing gently after each addition. Continue adding water until the dough just comes together.
- Gently press the dough into a ball. Flatten the ball into a disc, wrap it in plastic wrap, and refrigerate for at least 30 minutes.
- Preheat your oven to 375°F (190°C). On a lightly floured surface, roll out the dough to fit the bottom of a 9×13 inch baking pan.
- Carefully transfer the rolled-out dough to the baking pan. Press the dough evenly into the bottom of the pan and up the sides slightly. Use a fork to prick the bottom of the crust several times.
- Bake the crust for 15-20 minutes, or until it is lightly golden brown.
- Hull and slice the fresh strawberries.
- In a large bowl, combine the sliced strawberries, granulated sugar, cornstarch, lemon juice, and vanilla extract. Gently toss to coat the strawberries evenly.
- Let the strawberry mixture sit for about 10 minutes.
- In a medium bowl, whisk together the flour, brown sugar, rolled oats, and cinnamon.
- Add the cold, cubed butter to the flour mixture. Using a pastry blender or your fingertips, cut the butter into the flour until the mixture resembles coarse crumbs.
- Continue mixing until the mixture resembles coarse crumbs.
- Once the crust is pre-baked, remove it from the oven. Pour the strawberry filling evenly over the crust.
- Sprinkle the crumble topping evenly over the strawberry filling.
- Bake the bars for 30-35 minutes, or until the crumble topping is golden brown and the strawberry filling is bubbly.
- Remove the bars from the oven and let them cool completely in the pan before cutting.
- Once the bars are completely cool, cut them into squares and serve.
Notes
- Use cold butter for both the crust and crumble.
- Don’t overmix the dough.
- Pre-baking the crust helps prevent a soggy bottom.
- Cool completely before cutting for best results.
- Adjust sweetness to your preference.
- Add chopped nuts to the crumble for extra flavor.
- Substitute other berries for the strawberries.
- Store leftovers in an airtight container at room temperature for up to 3 days, or in the refrigerator for up to 5 days.