Barbecue Beef Brisket: the mere mention of it conjures images of smoky flavors, tender, melt-in-your-mouth textures, and gatherings filled with laughter and good company. Have you ever dreamt of mastering the art of crafting the perfect brisket, the kind that has everyone begging for seconds? Well, dream no more! I’m here to guide you through the process, ensuring your next barbecue is an unforgettable culinary triumph.
This iconic cut of beef, deeply rooted in American barbecue tradition, has a rich history. Originating from humble beginnings as a tough, inexpensive cut, brisket has been transformed into a prized delicacy through the magic of slow smoking. Its cultural significance is undeniable, representing community, celebration, and the simple pleasure of sharing a delicious meal.
But what is it about barbecue beef brisket that makes it so universally loved? It’s the symphony of flavors, the perfect balance of smoky bark and succulent meat. The low and slow cooking process renders the fat, creating an incredibly tender and juicy texture that is simply irresistible. Plus, let’s be honest, there’s something incredibly satisfying about presenting a perfectly cooked brisket to your friends and family, knowing you’ve created something truly special. So, let’s fire up those smokers and get ready to embark on a delicious journey!

Ingredients:
- For the Brisket:
- 1 whole beef brisket (12-14 pounds), point and flat
- 1/4 cup yellow mustard, as a binder
- For the Dry Rub:
- 1/2 cup coarse kosher salt
- 1/4 cup freshly ground black pepper
- 2 tablespoons granulated garlic
- 2 tablespoons onion powder
- 1 tablespoon smoked paprika
- 1 tablespoon chili powder
- 1 teaspoon cayenne pepper (optional, for heat)
- 1 teaspoon ground cumin
- For the Mop Sauce (Optional):
- 1 cup apple cider vinegar
- 1/2 cup water
- 1/4 cup Worcestershire sauce
- 2 tablespoons brown sugar
- 1 tablespoon chili powder
- 1 teaspoon black pepper
- For Wrapping (Texas Crutch):
- Heavy-duty aluminum foil or butcher paper
- 1/2 cup beef tallow or melted butter (optional, for extra richness)
Preparing the Brisket:
- Trim the Brisket: This is arguably the most important step! Carefully trim the excess fat from the brisket, leaving about 1/4 inch of fat cap. Too much fat and it won’t render properly; too little and the brisket will dry out. Pay special attention to the hard, thick fat pockets on the underside of the brisket. You want to remove these completely. Use a sharp knife and work slowly, using long, smooth strokes. Don’t be afraid to make mistakes; it’s better to remove too much than too little. I like to use a flexible boning knife for this task.
- Apply the Mustard Binder: Slather the entire brisket with yellow mustard. Don’t worry, you won’t taste the mustard in the final product. The mustard acts as a binder, helping the dry rub adhere to the meat. Make sure to coat every nook and cranny. A thin, even layer is all you need.
- Mix the Dry Rub: In a large bowl, combine the kosher salt, black pepper, granulated garlic, onion powder, smoked paprika, chili powder, cayenne pepper (if using), and ground cumin. Mix well to ensure all the spices are evenly distributed. This is your flavor powerhouse, so make sure it’s well-blended.
- Apply the Dry Rub: Generously coat the entire brisket with the dry rub. Press the rub firmly into the mustard binder to ensure it sticks. Don’t be shy! You want a thick, even coating on all sides. I like to start with the top (fat cap side) and then flip it over and do the bottom. Make sure to get the sides as well.
- Rest the Brisket: Wrap the seasoned brisket tightly in plastic wrap and refrigerate for at least 2 hours, or preferably overnight. This allows the flavors of the rub to penetrate the meat and helps to create a beautiful bark during the smoking process. The longer it rests, the better the flavor will be.
Preparing the Smoker:
- Choose Your Wood: Hickory and oak are classic choices for smoking brisket, but you can experiment with other woods like pecan or mesquite. I personally prefer a blend of oak and hickory for a balanced smoky flavor. Use wood chunks or splits, not wood chips, for a longer, more consistent smoke.
- Prepare the Smoker: Set up your smoker for indirect cooking. This means the heat source is not directly under the brisket. For a charcoal smoker, use the snake method or a minion method. For a pellet smoker, simply fill the hopper with your chosen wood pellets. For a gas smoker, use a smoker box filled with wood chunks.
- Preheat the Smoker: Preheat your smoker to 225-250°F (107-121°C). Maintaining a consistent temperature is crucial for a successful brisket. Use a reliable thermometer to monitor the temperature inside the smoker. I recommend using a digital thermometer with probes that can be placed inside the smoker and in the brisket itself.
Smoking the Brisket:
- Place the Brisket in the Smoker: Remove the brisket from the refrigerator and unwrap it. Place the brisket in the smoker, fat cap up. This helps to protect the meat from the direct heat and allows the fat to render down and baste the brisket.
- Monitor the Temperature: Insert a meat thermometer into the thickest part of the flat. Maintain the smoker temperature between 225-250°F (107-121°C). Check the temperature of the brisket every hour or two.
- Apply Mop Sauce (Optional): If using a mop sauce, begin mopping the brisket after about 3-4 hours of smoking. Apply the mop sauce every hour or two to keep the brisket moist and add flavor. Be careful not to over-mop, as this can lower the temperature of the smoker.
- The Stall: Around 150-170°F (66-77°C), the brisket will likely experience “the stall,” where the internal temperature plateaus for several hours. This is due to evaporative cooling. Don’t panic! This is normal. The next step will help you power through it.
Wrapping the Brisket (Texas Crutch):
- Prepare for Wrapping: Once the brisket reaches an internal temperature of 160-170°F (71-77°C) and has developed a good bark, it’s time to wrap it. This helps to retain moisture and speed up the cooking process.
- Wrap the Brisket: Lay out a large sheet of heavy-duty aluminum foil or butcher paper. If using butcher paper, double-layer it for extra protection. Pour the beef tallow or melted butter (if using) onto the foil or paper. Place the brisket in the center of the foil or paper, fat cap up. Wrap the brisket tightly, creating a sealed package. The goal is to trap the moisture and prevent it from escaping.
- Return to the Smoker: Place the wrapped brisket back in the smoker, seam-side up. Continue to cook until the internal temperature reaches 203-205°F (95-96°C). The brisket should be probe-tender, meaning a thermometer or probe should slide into the meat with little to no resistance. This is the most important indicator of doneness. Temperature is a guide, but probe tenderness is the key.
Resting the Brisket:
- Rest the Brisket: Once the brisket is probe-tender, remove it from the smoker. Leave it wrapped and place it in a cooler or insulated container. Fill any empty space in the cooler with towels to help maintain the temperature. Rest the brisket for at least 2 hours, or preferably 4-6 hours. This allows the juices to redistribute throughout the meat, resulting in a more tender and flavorful brisket. This is a crucial step that should not be skipped! The longer you rest it, the better it will be. You can even rest it overnight in a cooler.
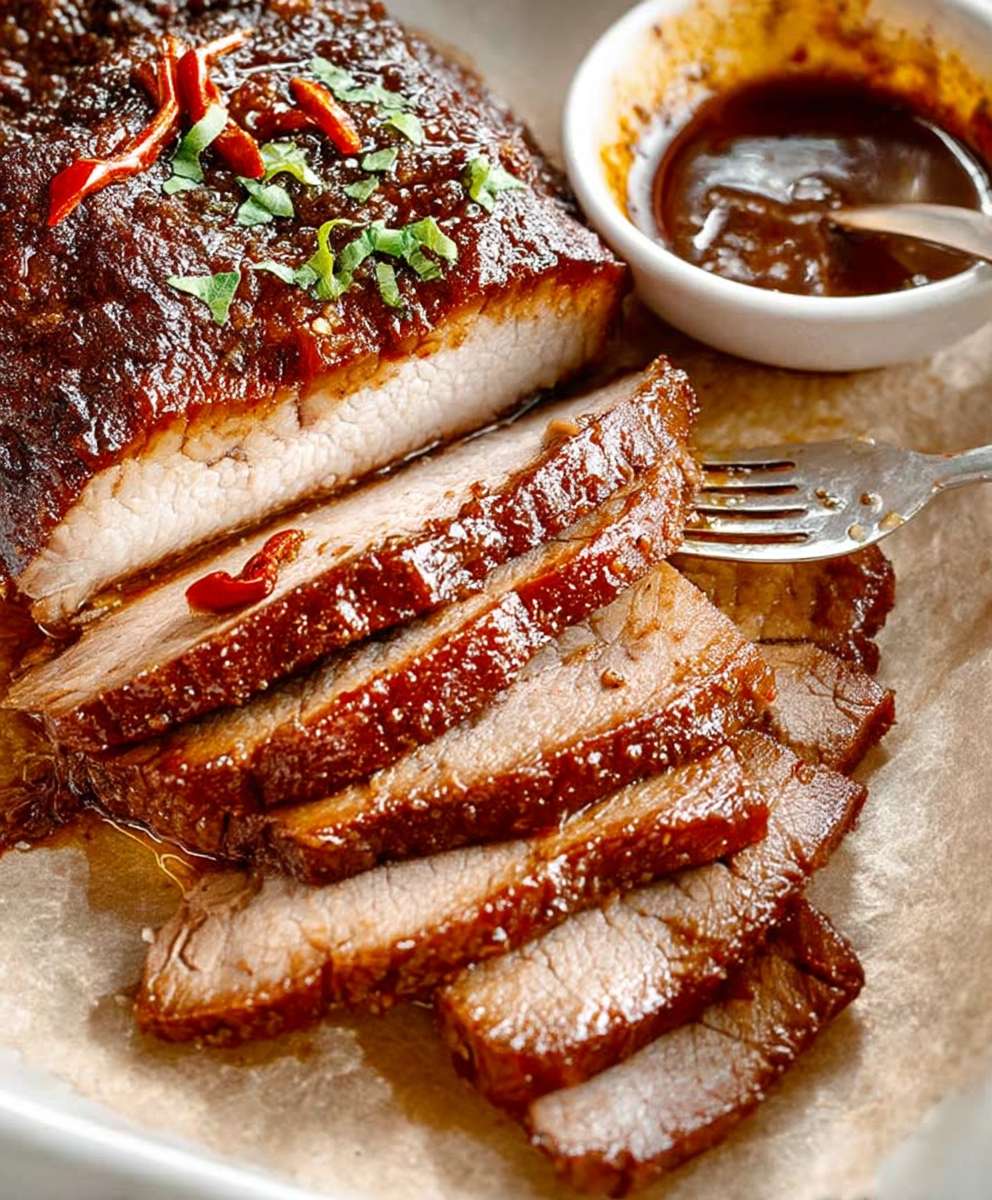
Slicing and Serving:
- Unwrap the Brisket: Carefully unwrap the brisket, reserving any juices that have accumulated in the foil or paper. These juices can be used to moisten the sliced brisket.
- Separate the Point and Flat: Locate the fat seam that separates the point (the thicker, fattier end) from the flat (the leaner end). Carefully separate the two muscles.
- Slice the Flat: Slice the flat against the grain into 1/4-inch thick slices. The grain runs in different directions in different parts of the brisket, so pay attention and adjust your slicing angle accordingly. Slicing against the grain is essential for tender slices.
- Slice the Point: The point is often used to make burnt ends. Cut the point into 1-inch cubes and toss them with your favorite barbecue sauce. Return them to the smoker for another hour or two to caramelize the sauce. Alternatively, you can slice the point like the flat, but it will be fattier.
- Serve and Enjoy: Serve the sliced brisket with your favorite barbecue sides,
Conclusion:
This Barbecue Beef Brisket recipe isn’t just another recipe; it’s a journey into smoky, tender, and utterly delicious barbecue heaven. I truly believe that once you’ve tasted brisket prepared this way, you’ll understand why it’s considered a king among barbecue cuts. The deep, rich flavor, the melt-in-your-mouth texture, and the satisfying bark it all comes together to create an unforgettable culinary experience. It’s a labor of love, yes, but the reward is more than worth the effort. Trust me on this one; you absolutely need to try this.
But why is this particular recipe a must-try? It’s all about the balance. We’ve carefully considered every step, from the initial trimming and rub application to the low and slow cooking process and the crucial resting period. Each element contributes to the final masterpiece. The rub, with its blend of sweet, savory, and spicy notes, perfectly complements the beef’s natural richness. The low and slow cooking ensures that the brisket becomes incredibly tender, breaking down the tough connective tissue and rendering the fat into a luscious, flavorful elixir. And the resting period? That’s where the magic truly happens, allowing the juices to redistribute throughout the meat, resulting in a brisket that’s moist, juicy, and bursting with flavor.
Now, let’s talk serving suggestions and variations. The classic way to enjoy this Barbecue Beef Brisket is simply sliced and served on its own, allowing the incredible flavor to shine through. But don’t be afraid to get creative! Pile it high on a toasted bun with your favorite barbecue sauce and coleslaw for a truly satisfying sandwich. Shred it and use it as a filling for tacos or quesadillas. Add it to chili for an extra layer of smoky depth. Or, for a truly decadent treat, try making brisket mac and cheese. The possibilities are endless!
If you’re feeling adventurous, you can also experiment with different wood chips to impart unique smoky flavors. Hickory is a classic choice for brisket, providing a strong, smoky flavor. Oak is another popular option, offering a more subtle and balanced smoke. Mesquite adds a bold, earthy flavor that pairs well with beef. You can even try blending different wood chips to create your own signature smoke profile.
Another variation to consider is the type of barbecue sauce you use. While I’m a big fan of a classic Texas-style barbecue sauce, you can certainly experiment with different regional variations. A Kansas City-style sauce, with its sweet and tangy flavor, would be a delicious complement to the brisket. Or, for a spicier kick, try a Carolina-style sauce with its vinegar-based tang.
I’m so excited for you to try this recipe and experience the joy of homemade Barbecue Beef Brisket. It’s a dish that’s perfect for special occasions, family gatherings, or simply a weekend treat. So, gather your ingredients, fire up your smoker, and get ready to create something truly amazing.
And most importantly, I want to hear about your experience! Did you try any variations? What wood chips did you use? What was your favorite way to serve it? Share your photos and stories in the comments below. I can’t wait to see what you create! Happy barbecuing! I am confident that this will be your go-to recipe for years to come.
Barbecue Beef Brisket: The Ultimate Guide to Perfect BBQ Brisket
Slow-smoked Texas-style beef brisket, rubbed with a flavorful spice blend and optionally mopped with a tangy sauce, then wrapped to tender perfection.
Ingredients
- 1 whole beef brisket (12-14 pounds), point and flat
- 1/4 cup yellow mustard, as a binder
- 1/2 cup coarse kosher salt
- 1/4 cup freshly ground black pepper
- 2 tablespoons granulated garlic
- 2 tablespoons onion powder
- 1 tablespoon smoked paprika
- 1 tablespoon chili powder
- 1 teaspoon cayenne pepper (optional, for heat)
- 1 teaspoon ground cumin
- 1 cup apple cider vinegar
- 1/2 cup water
- 1/4 cup Worcestershire sauce
- 2 tablespoons brown sugar
- 1 tablespoon chili powder
- 1 teaspoon black pepper
- Heavy-duty aluminum foil or butcher paper
- 1/2 cup beef tallow or melted butter (optional, for extra richness)
Instructions
- Trim the Brisket: Trim excess fat from the brisket, leaving about 1/4 inch of fat cap. Remove hard fat pockets.
- Apply the Mustard Binder: Slather the entire brisket with yellow mustard.
- Mix the Dry Rub: Combine kosher salt, black pepper, granulated garlic, onion powder, smoked paprika, chili powder, cayenne pepper (if using), and ground cumin in a bowl.
- Apply the Dry Rub: Generously coat the entire brisket with the dry rub, pressing it firmly into the mustard.
- Rest the Brisket: Wrap the seasoned brisket tightly in plastic wrap and refrigerate for at least 2 hours, or preferably overnight.
- Choose Your Wood: Use hickory and oak, pecan or mesquite.
- Prepare the Smoker: Set up your smoker for indirect cooking.
- Preheat the Smoker: Preheat your smoker to 225-250°F (107-121°C).
- Place the Brisket in the Smoker: Remove the brisket from the refrigerator and unwrap it. Place the brisket in the smoker, fat cap up.
- Monitor the Temperature: Insert a meat thermometer into the thickest part of the flat. Maintain the smoker temperature between 225-250°F (107-121°C).
- Apply Mop Sauce (Optional): If using a mop sauce, begin mopping the brisket after about 3-4 hours of smoking. Apply the mop sauce every hour or two.
- The Stall: Around 150-170°F (66-77°C), the brisket will likely experience “the stall,” where the internal temperature plateaus for several hours.
- Prepare for Wrapping: Once the brisket reaches an internal temperature of 160-170°F (71-77°C) and has developed a good bark, it’s time to wrap it.
- Wrap the Brisket: Lay out a large sheet of heavy-duty aluminum foil or butcher paper. Pour the beef tallow or melted butter (if using) onto the foil or paper. Place the brisket in the center of the foil or paper, fat cap up. Wrap the brisket tightly, creating a sealed package.
- Return to the Smoker: Place the wrapped brisket back in the smoker, seam-side up. Continue to cook until the internal temperature reaches 203-205°F (95-96°C). The brisket should be probe-tender.
- Rest the Brisket: Once the brisket is probe-tender, remove it from the smoker. Leave it wrapped and place it in a cooler or insulated container. Rest the brisket for at least 2 hours, or preferably 4-6 hours.
- Unwrap the Brisket: Carefully unwrap the brisket, reserving any juices that have accumulated in the foil or paper.
- Separate the Point and Flat: Locate the fat seam that separates the point from the flat. Carefully separate the two muscles.
- Slice the Flat: Slice the flat against the grain into 1/4-inch thick slices.
- Slice the Point: Cut the point into 1-inch cubes and toss them with your favorite barbecue sauce. Return them to the smoker for another hour or two to caramelize the sauce. Alternatively, you can slice the point like the flat, but it will be fattier.
- Serve and Enjoy: Serve the sliced brisket with your favorite barbecue sides.
Notes
- Trimming the brisket properly is crucial for rendering fat and preventing dryness.
- Don’t worry about the mustard flavor; it acts as a binder for the rub.
- Maintaining a consistent smoker temperature is essential.
- The “stall” is normal; wrapping the brisket helps overcome it.
- Probe tenderness is the most important indicator of doneness.
- Resting the brisket is vital for juicy, tender results.
- Slice against the grain for the most tender slices.
- The point can be used for burnt ends.