Berry Sparklers: Prepare to ignite your taste buds with a burst of summer fun! Imagine this: a warm, sunny afternoon, the laughter of friends and family filling the air, and in your hand, a dazzling, refreshing treat that perfectly captures the joy of the season. These aren’t just ordinary desserts; they’re edible fireworks, ready to light up any gathering.
While the exact origins of layering fruit and bubbly beverages are somewhat hazy, the concept of celebratory drinks dates back centuries. Think of the ancient Romans adorning their wines with fruits and herbs! Today, Berry Sparklers represent a modern twist on that tradition, a delightful and visually stunning way to elevate any occasion. They’re incredibly versatile, easily adaptable to different fruits and sparkling beverages, making them a crowd-pleaser for all ages.
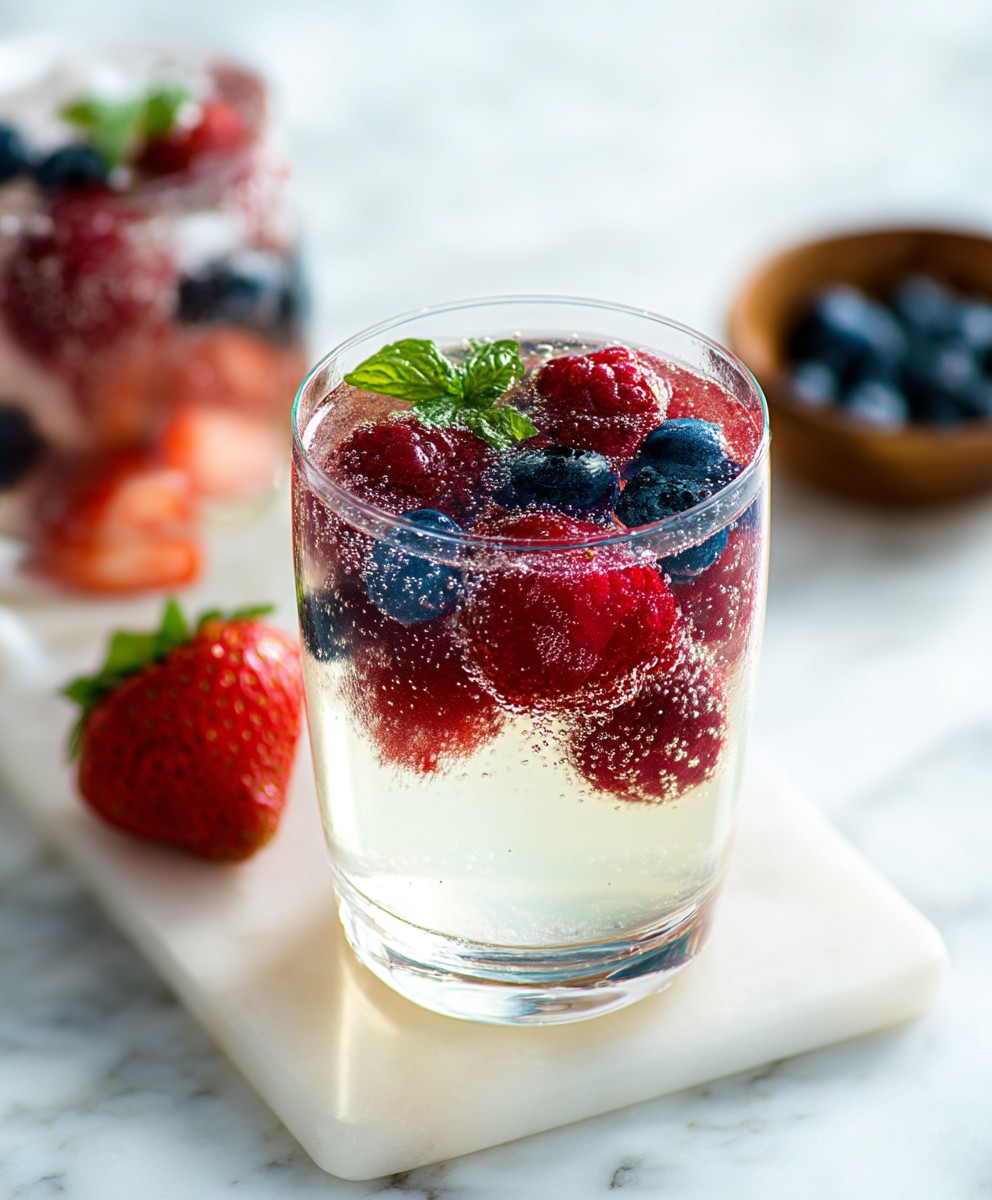
What makes these Berry Sparklers so irresistible? It’s the perfect combination of sweet, tart, and fizzy. The juicy berries offer a burst of natural sweetness, while the sparkling beverage adds a delightful effervescence that dances on your tongue. They’re incredibly easy to make, requiring minimal effort and ingredients, making them ideal for impromptu gatherings or a quick and satisfying treat on a hot day. Plus, their vibrant colors and elegant presentation make them a show-stopping addition to any table. Get ready to wow your guests with these simple yet stunning delights!

Ingredients:
- 1 package (3 ounces) strawberry-flavored gelatin
- 1 cup boiling water
- 1 cup cold water
- 1 can (12 ounces) lemon-lime soda, chilled
- 1 pint fresh strawberries, hulled and sliced
- 1 pint fresh blueberries
- 1 pint fresh raspberries
- 1 cup seedless green grapes, halved
- 1 cup seedless red grapes, halved
- Optional: Fresh mint sprigs, for garnish
- Optional: Whipped cream, for serving
Preparing the Gelatin Base
Okay, let’s get started! The first thing we need to do is create our gelatin base. This is what will hold all those delicious berries together and give our Berry Sparklers their signature jiggly texture. Don’t worry, it’s super easy!
- Dissolve the Gelatin: In a large bowl, pour in the strawberry-flavored gelatin powder. Then, carefully add the boiling water. Stir continuously until the gelatin is completely dissolved. Make sure there are no little clumps of powder left we want a smooth, even base. This usually takes about 2-3 minutes of vigorous stirring.
- Add Cold Water: Once the gelatin is fully dissolved, pour in the cold water. Stir again to combine. This will help cool down the mixture and get it ready for the next step.
- Chill the Gelatin Mixture: Now, cover the bowl with plastic wrap and place it in the refrigerator. We want the gelatin to partially set, but not completely solidify. This usually takes about 1 to 1.5 hours. You’re looking for a consistency that’s thicker than liquid but still soft enough to stir. It should be like a very loose jelly. Check it periodically you don’t want it to become completely firm!
Preparing the Fruit
While the gelatin is chilling, let’s get our fruit ready. Fresh, vibrant berries are the stars of this show, so make sure you choose the best quality you can find. Wash everything thoroughly and pat it dry before we start.
- Prepare the Strawberries: Hull the strawberries (remove the green tops) and slice them into even pieces. I like to slice them about ¼ inch thick, but you can adjust the thickness to your preference.
- Prepare the Blueberries: Rinse the blueberries and pick out any stems or leaves. Make sure they are nice and dry before adding them to the mix.
- Prepare the Raspberries: Gently rinse the raspberries. They are quite delicate, so be careful not to crush them. Pat them dry with a paper towel.
- Prepare the Grapes: Wash the green and red grapes. Halve them lengthwise. This makes them easier to eat and also helps them distribute evenly throughout the gelatin.
Combining the Fruit and Gelatin
Alright, the gelatin should be partially set by now, and our fruit is prepped and ready to go. Time to bring everything together!
- Stir the Gelatin: Remove the gelatin from the refrigerator. Give it a good stir to break up any clumps and ensure it’s a uniform consistency. If it has become too firm, you can gently warm it in the microwave for a few seconds at a time, stirring in between, until it reaches the desired consistency. Be careful not to overheat it, or it won’t set properly later.
- Add the Fruit: Gently fold in the sliced strawberries, blueberries, raspberries, and halved grapes into the partially set gelatin. Make sure the fruit is evenly distributed throughout the mixture.
- Pour in the Lemon-Lime Soda: Slowly pour in the chilled lemon-lime soda. The soda adds a lovely fizz and a touch of sweetness to the Berry Sparklers. Stir gently to combine, being careful not to deflate the bubbles too much.
Setting the Berry Sparklers
Now that everything is combined, it’s time to let the magic happen in the refrigerator. This is where the gelatin will fully set and create those beautiful, jiggly layers.
- Pour into Serving Dishes: You can pour the mixture into individual serving dishes, such as small bowls or parfait glasses, or you can use a larger serving bowl. If you’re using a large bowl, you can easily scoop out portions later.
- Refrigerate to Set: Cover the serving dishes or bowl with plastic wrap and place them in the refrigerator. Allow the Berry Sparklers to set completely, which usually takes at least 4 hours, or preferably overnight. The longer they chill, the firmer they will become.
Serving and Garnishing
The Berry Sparklers are now fully set and ready to be enjoyed! Here are some tips for serving and garnishing to make them extra special.
- Garnish (Optional): Before serving, you can garnish the Berry Sparklers with fresh mint sprigs for a pop of color and a refreshing aroma. You can also add a dollop of whipped cream on top for an extra touch of indulgence.
- Serving: Serve the Berry Sparklers chilled. They are perfect for parties, picnics, or any occasion where you want a light and refreshing dessert.
- Storage: Leftover Berry Sparklers can be stored in the refrigerator for up to 3 days. Make sure to cover them tightly with plastic wrap to prevent them from drying out.
Tips and Variations
Here are a few extra tips and variations to make your Berry Sparklers even more personalized:
- Different Gelatin Flavors: Experiment with different gelatin flavors, such as raspberry, blueberry, or even orange. This will change the overall flavor profile of the Berry Sparklers.
- Different Fruits: Feel free to add other fruits, such as sliced peaches, mandarin oranges, or kiwi. Just make sure the fruits are not too watery, as this can affect the setting of the gelatin.
- Sugar-Free Option: Use sugar-free gelatin and diet lemon-lime soda for a healthier version.
- Layered Effect: For a more visually appealing presentation, you can create a layered effect by adding the fruit in stages. Pour a layer of gelatin, add some fruit, let it partially set, then add another layer of gelatin and more fruit. Repeat until all the ingredients are used.
- Sparkling Wine: For an adult version, you can substitute some of the lemon-lime soda with sparkling wine or champagne. This will add a sophisticated touch to the Berry Sparklers.
- Individual Jars: Make individual servings in small mason jars for a cute and portable treat.
Enjoy Your Berry Sparklers!
I hope you enjoy making and eating these Berry Sparklers as much as I do! They are a fun, festive, and delicious treat that’s perfect for any occasion. Don’t be afraid to get creative and experiment with different flavors and ingredients to make them your own. Happy cooking!
Conclusion:
This Berry Sparklers recipe is more than just a drink; it’s a burst of summer in a glass, a celebration of fresh flavors, and a guaranteed crowd-pleaser. I truly believe you’ll find yourself reaching for this recipe again and again, whether you’re hosting a backyard barbecue, celebrating a special occasion, or simply craving a refreshing treat on a warm afternoon. The combination of juicy berries, tangy citrus, and bubbly soda water creates a symphony of flavors that will tantalize your taste buds and leave you feeling invigorated.
But what truly makes this recipe a must-try is its versatility. Feel free to experiment with different types of berries raspberries, blueberries, blackberries, or even a mix of all three! Each berry brings its unique sweetness and tartness to the table, allowing you to customize the flavor profile to your liking. And don’t be afraid to get creative with the citrus. While lemon and lime are classic choices, you could also try adding a splash of orange juice or grapefruit juice for a more complex and nuanced flavor.
Looking for serving suggestions? These Berry Sparklers are perfect on their own, served chilled in tall glasses with a sprig of mint for garnish. But they also pair beautifully with a variety of foods. Imagine sipping on a Berry Sparkler alongside a grilled chicken salad, a plate of fresh seafood, or a decadent chocolate dessert. The possibilities are endless!
And if you’re feeling adventurous, why not try some variations? For a more adult-friendly version, add a splash of vodka, gin, or rum. Or, for a non-alcoholic twist, try using sparkling grape juice or apple cider instead of soda water. You could even freeze the Berry Sparkler mixture into popsicles for a refreshing and healthy summer treat.
I’ve had so much fun creating and perfecting this recipe, and I’m confident that you’ll love it just as much as I do. It’s simple, quick, and requires minimal ingredients, making it the perfect recipe for busy weeknights or impromptu gatherings. Plus, it’s a great way to use up any leftover berries you might have in your fridge.
So, what are you waiting for? Gather your ingredients, put on some music, and get ready to create a batch of these delicious Berry Sparklers. I promise you won’t be disappointed. And once you’ve tried it, I’d love to hear about your experience! Share your photos, comments, and variations in the comments section below. Let me know what you thought of the recipe, what berries you used, and what you paired it with. I’m always eager to learn from my readers and see how they’re making my recipes their own. Happy sparkling! I can’t wait to see your creations and hear all about your Berry Sparkler adventures! Don’t forget to tag me in your social media posts so I can see your beautiful creations! Enjoy!
Berry Sparklers: A Refreshing Summer Drink Recipe
Refreshing dessert with strawberry gelatin, fresh berries, and lemon-lime soda. Perfect for parties, picnics, or a light, fruity treat.
Ingredients
- 1 package (3 ounces) strawberry-flavored gelatin
- 1 cup boiling water
- 1 cup cold water
- 1 can (12 ounces) lemon-lime soda, chilled
- 1 pint fresh strawberries, hulled and sliced
- 1 pint fresh blueberries
- 1 pint fresh raspberries
- 1 cup seedless green grapes, halved
- 1 cup seedless red grapes, halved
- Optional: Fresh mint sprigs, for garnish
- Optional: Whipped cream, for serving
Instructions
- Dissolve the Gelatin: In a large bowl, pour in the strawberry-flavored gelatin powder. Add the boiling water and stir continuously until the gelatin is completely dissolved (2-3 minutes).
- Add Cold Water: Pour in the cold water and stir to combine.
- Chill the Gelatin Mixture: Cover the bowl with plastic wrap and refrigerate for 1 to 1.5 hours, or until partially set (thicker than liquid but still soft enough to stir).
- Prepare the Fruit: Hull and slice the strawberries. Rinse and dry the blueberries and raspberries. Wash and halve the green and red grapes.
- Stir the Gelatin: Remove the gelatin from the refrigerator and stir to break up any clumps. If it’s too firm, gently warm it in the microwave for a few seconds at a time, stirring in between, until it reaches the desired consistency.
- Add the Fruit: Gently fold in the sliced strawberries, blueberries, raspberries, and halved grapes into the partially set gelatin.
- Pour in the Lemon-Lime Soda: Slowly pour in the chilled lemon-lime soda. Stir gently to combine.
- Pour into Serving Dishes: Pour the mixture into individual serving dishes or a large serving bowl.
- Refrigerate to Set: Cover the serving dishes or bowl with plastic wrap and refrigerate for at least 4 hours, or preferably overnight, to set completely.
- Garnish (Optional): Before serving, garnish with fresh mint sprigs and/or whipped cream.
- Serving: Serve chilled.
- Storage: Leftover can be stored in the refrigerator for up to 3 days.
Notes
- Experiment with different gelatin flavors, such as raspberry, blueberry, or even orange.
- Feel free to add other fruits, such as sliced peaches, mandarin oranges, or kiwi. Just make sure the fruits are not too watery, as this can affect the setting of the gelatin.
- Use sugar-free gelatin and diet lemon-lime soda for a healthier version.
- For a more visually appealing presentation, you can create a layered effect by adding the fruit in stages. Pour a layer of gelatin, add some fruit, let it partially set, then add another layer of gelatin and more fruit. Repeat until all the ingredients are used.
- For an adult version, you can substitute some of the lemon-lime soda with sparkling wine or champagne.
- Make individual servings in small mason jars for a cute and portable treat.