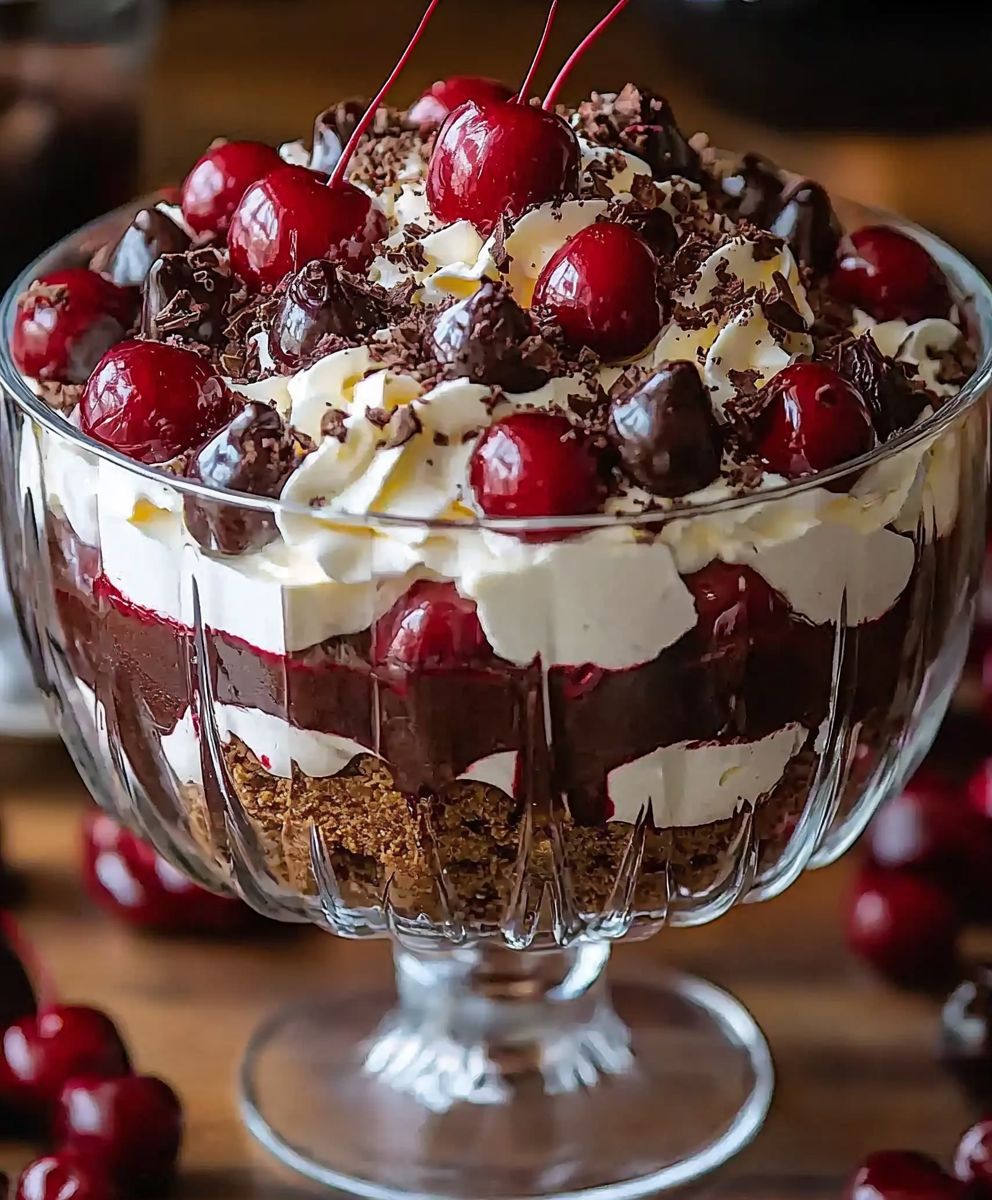
Black Forest Trifle: Prepare to be transported to a world of decadent delight with this show-stopping dessert! Imagine layers of rich chocolate cake, plump, juicy cherries, luscious whipped cream, and a hint of Kirsch liqueur, all mingling together in perfect harmony. This isn’t just a dessert; it’s an experience.
The Black Forest region of Germany, famed for its dense, dark forests and cherry orchards, is the inspiration behind this classic treat. While the exact origins of the trifle are debated, its connection to the Black Forest gateau is undeniable. Think of it as the gateau’s more relaxed, equally delicious cousin perfect for showcasing the same beloved flavors in a less formal setting.
What makes a Black Forest Trifle so irresistible? It’s the symphony of textures and tastes! The moist cake provides a comforting base, while the cherries offer a burst of fruity sweetness and a touch of tartness. The whipped cream adds a cloud-like lightness, and the Kirsch liqueur provides a subtle warmth that elevates the entire dish. Plus, it’s incredibly easy to assemble, making it ideal for both casual gatherings and elegant dinner parties. Get ready to impress your friends and family with this stunning and utterly delicious dessert!

Ingredients:
- For the Chocolate Cake:
- 1 1/2 cups all-purpose flour
- 3/4 cup unsweetened cocoa powder
- 1 1/2 teaspoons baking powder
- 1 1/2 teaspoons baking soda
- 3/4 teaspoon salt
- 1 1/2 cups granulated sugar
- 3/4 cup vegetable oil
- 1 1/2 cups buttermilk
- 2 large eggs
- 1 1/2 teaspoons vanilla extract
- 3/4 cup boiling water
- For the Cherry Filling:
- 2 (21 ounce) cans cherry pie filling
- 1/4 cup Kirsch (cherry liqueur), optional
- For the Whipped Cream:
- 3 cups heavy cream
- 1/2 cup powdered sugar
- 1 teaspoon vanilla extract
- For the Chocolate Shavings:
- 4 ounces bittersweet chocolate
Preparing the Chocolate Cake:
- Preheat and Prep: First things first, let’s get that oven ready! Preheat your oven to 350°F (175°C). Grease and flour a 9×13 inch baking pan. This will prevent the cake from sticking and make it easy to remove later. I like to use baking spray with flour already in it for extra insurance.
- Combine Dry Ingredients: In a large bowl, whisk together the flour, cocoa powder, baking powder, baking soda, and salt. Make sure everything is well combined so that the leavening agents are evenly distributed. This will ensure a nice, even rise for your cake.
- Combine Wet Ingredients: In a separate bowl, whisk together the sugar, oil, buttermilk, eggs, and vanilla extract. Whisk until the mixture is smooth and well combined. Don’t worry if it looks a little thin, that’s perfectly normal.
- Combine Wet and Dry: Gradually add the wet ingredients to the dry ingredients, mixing on low speed until just combined. Be careful not to overmix! Overmixing can lead to a tough cake.
- Add Boiling Water: Slowly pour in the boiling water, mixing until the batter is smooth and thin. The batter will be quite liquidy, but don’t be alarmed, this is what gives the cake its moist texture.
- Bake: Pour the batter into the prepared baking pan and bake for 30-35 minutes, or until a wooden skewer inserted into the center comes out clean. Keep an eye on it, as baking times can vary depending on your oven.
- Cool: Let the cake cool in the pan for 10 minutes before inverting it onto a wire rack to cool completely. This will prevent the cake from sticking to the pan and allow it to cool evenly.
Preparing the Cherry Filling:
- Combine Ingredients: In a medium bowl, combine the cherry pie filling and Kirsch (if using). The Kirsch adds a lovely depth of flavor, but it’s totally optional if you prefer to keep it alcohol-free.
- Mix Well: Stir the cherry mixture until it’s well combined. Set aside while you prepare the whipped cream.
Preparing the Whipped Cream:
- Chill Bowl and Whisk: This is a crucial step for achieving perfectly whipped cream! Place your mixing bowl and whisk (or the whisk attachment for your stand mixer) in the freezer for at least 15 minutes before you start. This will help the cream whip up faster and hold its shape better.
- Combine Ingredients: Pour the heavy cream into the chilled bowl. Add the powdered sugar and vanilla extract.
- Whip: Begin whipping the cream on medium speed, gradually increasing to high speed as it thickens. Whip until stiff peaks form. Be careful not to overwhip, or you’ll end up with butter! You’ll know it’s ready when the cream holds its shape and forms stiff peaks when you lift the whisk.
Assembling the Black Forest Trifle:
- Cut the Cake: Once the cake is completely cool, cut it into 1-inch cubes. This will make it easier to layer in the trifle dish.
- Choose Your Dish: Select a large trifle bowl or individual serving dishes. A clear glass bowl is ideal so you can see all the beautiful layers.
- First Layer: Start with a layer of chocolate cake cubes at the bottom of the bowl. Don’t pack them too tightly, you want to leave some room for the other layers.
- Second Layer: Spoon a generous layer of cherry filling over the cake cubes. Make sure to distribute the cherries evenly.
- Third Layer: Top the cherry filling with a layer of whipped cream. Spread it evenly over the cherries.
- Repeat Layers: Repeat the layers of cake, cherry filling, and whipped cream until you reach the top of the bowl. You should aim for at least three layers of each.
- Final Layer: Finish with a final layer of whipped cream. This will be the top of your trifle, so make it look pretty!
- Chocolate Shavings: Using a vegetable peeler or a sharp knife, shave the bittersweet chocolate into curls or shavings. Sprinkle the chocolate shavings generously over the top of the whipped cream.
- Chill: Cover the trifle with plastic wrap and refrigerate for at least 2 hours before serving. This will allow the flavors to meld together and the cake to soak up some of the cherry juice. Ideally, chill it for 4-6 hours, or even overnight, for the best flavor.
Conclusion:
This Black Forest Trifle isn’t just a dessert; it’s an experience. The layers of rich chocolate cake, sweet cherries, creamy custard, and whipped cream create a symphony of flavors and textures that will leave you wanting more. It’s the perfect showstopper for any occasion, from a casual family gathering to a sophisticated dinner party. Trust me, once you taste this, you’ll understand why it’s a must-try!
But the best part? It’s surprisingly easy to make! While it looks impressive, the steps are straightforward, and you can even prepare some components ahead of time. Imagine the look on your guests’ faces when you present this stunning trifle they’ll think you spent hours slaving away in the kitchen!
Why is this Black Forest Trifle a must-try? Because it’s:
* Incredibly delicious and satisfying.
* Visually stunning and impressive.
* Relatively easy to make, even for beginner bakers.
* Perfect for any occasion.
* A guaranteed crowd-pleaser.
Now, let’s talk about serving suggestions and variations. While this recipe is fantastic as is, there’s always room for a little personalization!
* Serving Suggestions: Serve chilled, ideally after it’s had a chance to sit in the refrigerator for at least a couple of hours to allow the flavors to meld together. A dollop of extra whipped cream and a sprinkle of chocolate shavings never hurt anyone! For an extra touch of elegance, garnish with fresh cherries just before serving.
* Variations: Feel free to experiment with different types of chocolate cake. A dark chocolate cake will add even more richness, while a lighter chocolate cake will create a more delicate flavor profile. You can also use different types of cherries, such as maraschino cherries for a sweeter taste or fresh cherries when they’re in season.
* Boozy Boost: For an adult twist, consider adding a splash of Kirsch (cherry liqueur) to the cherries or even to the custard. This will enhance the cherry flavor and add a subtle warmth to the trifle.
* Dietary Considerations: To make this trifle gluten-free, simply use a gluten-free chocolate cake. You can also find dairy-free custard and whipped cream alternatives to make it dairy-free.
I truly believe that this Black Forest Trifle will become a new favorite in your household. It’s a dessert that’s both comforting and elegant, perfect for celebrating special moments or simply indulging in a sweet treat.
So, what are you waiting for? Gather your ingredients, put on your apron, and get ready to create a masterpiece! I’m confident that you’ll be thrilled with the results.
And most importantly, I want to hear about your experience! Did you try the recipe? Did you make any variations? What did your family and friends think? Share your photos and stories in the comments below. I can’t wait to see your creations and hear all about your Black Forest Trifle adventures! Happy baking!
Black Forest Trifle: A Delicious & Easy Dessert Recipe
Decadent Black Forest Trifle with moist chocolate cake, sweet cherry filling, and fluffy whipped cream, topped with chocolate shavings. A show-stopping dessert!
Ingredients
- 1 1/2 cups all-purpose flour
- 3/4 cup unsweetened cocoa powder
- 1 1/2 teaspoons baking powder
- 1 1/2 teaspoons baking soda
- 3/4 teaspoon salt
- 1 1/2 cups granulated sugar
- 3/4 cup vegetable oil
- 1 1/2 cups buttermilk
- 2 large eggs
- 1 1/2 teaspoons vanilla extract
- 3/4 cup boiling water
- 2 (21 ounce) cans cherry pie filling
- 1/4 cup Kirsch (cherry liqueur), optional
- 3 cups heavy cream
- 1/2 cup powdered sugar
- 1 teaspoon vanilla extract
- 4 ounces bittersweet chocolate
Instructions
- Preheat your oven to 350°F (175°C). Grease and flour a 9×13 inch baking pan.
- In a large bowl, whisk together the flour, cocoa powder, baking powder, baking soda, and salt.
- In a separate bowl, whisk together the sugar, oil, buttermilk, eggs, and vanilla extract.
- Gradually add the wet ingredients to the dry ingredients, mixing on low speed until just combined. Be careful not to overmix!
- Slowly pour in the boiling water, mixing until the batter is smooth and thin.
- Pour the batter into the prepared baking pan and bake for 30-35 minutes, or until a wooden skewer inserted into the center comes out clean.
- Let the cake cool in the pan for 10 minutes before inverting it onto a wire rack to cool completely.
- In a medium bowl, combine the cherry pie filling and Kirsch (if using).
- Stir the cherry mixture until it’s well combined. Set aside while you prepare the whipped cream.
- Place your mixing bowl and whisk (or the whisk attachment for your stand mixer) in the freezer for at least 15 minutes before you start.
- Pour the heavy cream into the chilled bowl. Add the powdered sugar and vanilla extract.
- Begin whipping the cream on medium speed, gradually increasing to high speed as it thickens. Whip until stiff peaks form. Be careful not to overwhip, or you’ll end up with butter!
- Once the cake is completely cool, cut it into 1-inch cubes.
- Select a large trifle bowl or individual serving dishes. A clear glass bowl is ideal so you can see all the beautiful layers.
- Start with a layer of chocolate cake cubes at the bottom of the bowl. Don’t pack them too tightly, you want to leave some room for the other layers.
- Spoon a generous layer of cherry filling over the cake cubes. Make sure to distribute the cherries evenly.
- Top the cherry filling with a layer of whipped cream. Spread it evenly over the cherries.
- Repeat the layers of cake, cherry filling, and whipped cream until you reach the top of the bowl. You should aim for at least three layers of each.
- Finish with a final layer of whipped cream. This will be the top of your trifle, so make it look pretty!
- Using a vegetable peeler or a sharp knife, shave the bittersweet chocolate into curls or shavings. Sprinkle the chocolate shavings generously over the top of the whipped cream.
- Cover the trifle with plastic wrap and refrigerate for at least 2 hours before serving. Ideally, chill it for 4-6 hours, or even overnight, for the best flavor.
Notes
- For a richer chocolate flavor, use dark cocoa powder.
- If you don’t have buttermilk, you can make a substitute by adding 1 1/2 tablespoons of white vinegar or lemon juice to 1 1/2 cups of milk. Let it sit for 5 minutes before using.
- Chilling the bowl and whisk is crucial for achieving stable whipped cream.
- Don’t overwhip the whipped cream, or it will turn into butter.
- The Kirsch is optional but adds a lovely depth of flavor to the cherry filling.
- For the best flavor, chill the trifle for at least 2 hours before serving, or even overnight.