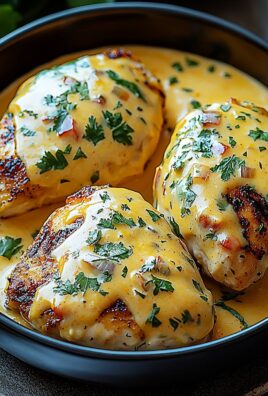
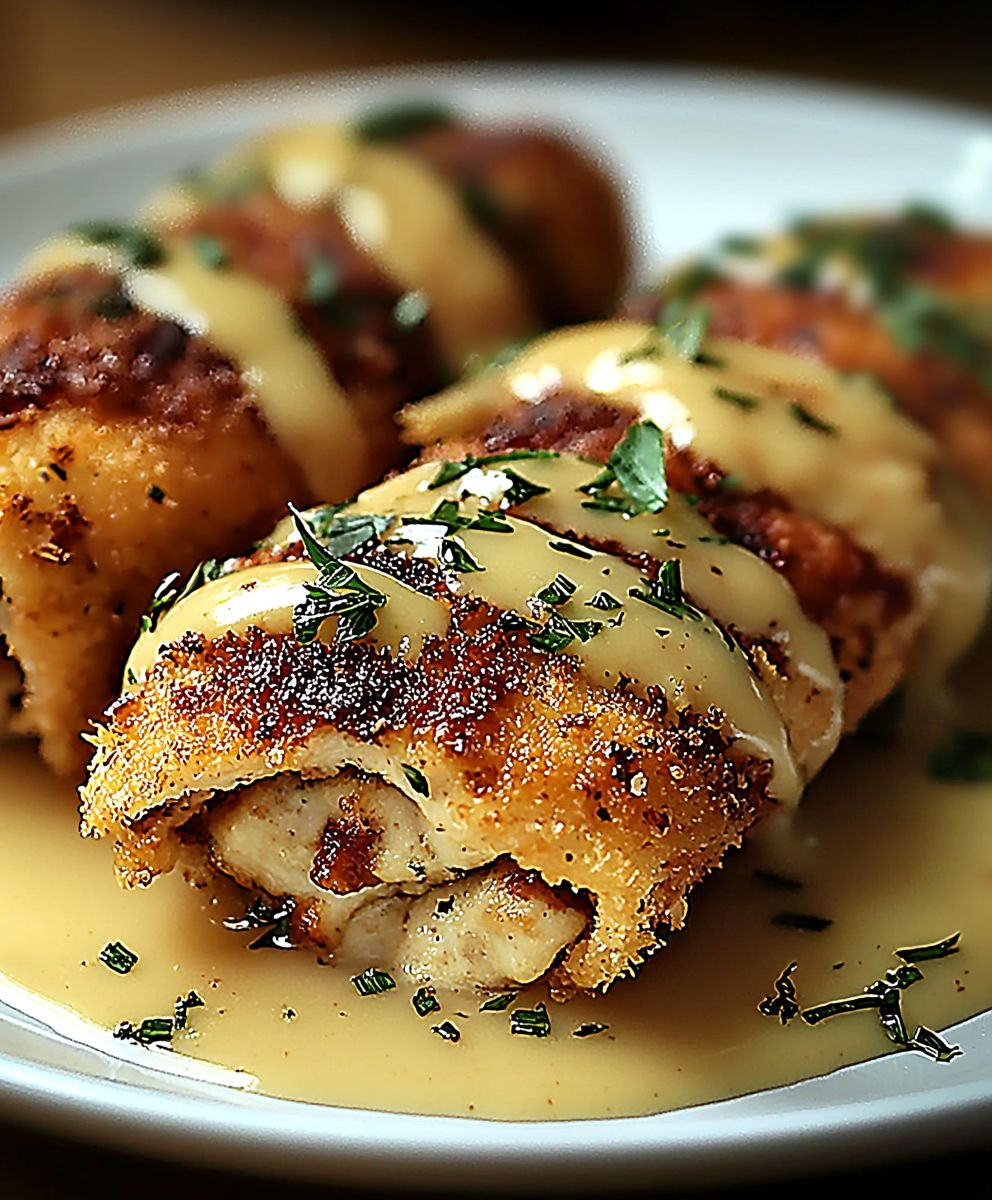
Breaded Stuffed Chicken, a culinary masterpiece that transforms ordinary chicken breasts into a flavor-packed, satisfying meal! Forget boring dinners; this recipe is your ticket to a restaurant-worthy experience right in your own kitchen. Imagine biting into a crispy, golden-brown breaded exterior, giving way to a juicy, tender chicken breast filled with a savory, melt-in-your-mouth stuffing. Are you drooling yet?
While the exact origins of stuffed chicken are difficult to pinpoint, the concept of stuffing poultry dates back centuries, with variations found across numerous cultures. From traditional holiday feasts to everyday family meals, stuffing adds depth and complexity to the humble chicken. What makes Breaded Stuffed Chicken so universally appealing? It’s the perfect combination of textures and flavors. The crispy breading provides a delightful crunch, while the moist chicken and flavorful stuffing create a symphony of tastes that will tantalize your taste buds.
People adore this dish because it’s surprisingly easy to make, yet feels incredibly special. It’s a fantastic way to impress guests, elevate a weeknight dinner, or simply treat yourself to something delicious. Plus, it’s incredibly versatile! You can customize the stuffing with your favorite ingredients, from classic herbs and cheeses to more adventurous combinations. So, are you ready to embark on a culinary adventure and create your own unforgettable breaded stuffed chicken?

Ingredients:
- 4 boneless, skinless chicken breasts (about 6-8 ounces each)
- 8 slices of provolone cheese
- 8 slices of ham
- 1 cup all-purpose flour
- 2 large eggs, beaten
- 2 cups panko breadcrumbs
- 1 teaspoon garlic powder
- 1 teaspoon onion powder
- 1/2 teaspoon paprika
- 1/4 teaspoon cayenne pepper (optional, for a little kick)
- 1/2 teaspoon dried oregano
- 1/2 teaspoon dried basil
- Salt and freshly ground black pepper to taste
- 1/4 cup olive oil
- 2 tablespoons butter
- Fresh parsley, chopped (for garnish)
Preparing the Chicken:
Alright, let’s get started with prepping our chicken breasts. This is a crucial step to ensure they’re perfectly stuffed and cook evenly.
-
Pound the Chicken: Place each chicken breast between two sheets of plastic wrap. Using a meat mallet or rolling pin, pound the chicken to an even thickness of about 1/4 to 1/2 inch. This helps tenderize the chicken and makes it easier to roll.
-
Season the Chicken: Season both sides of each chicken breast with salt, pepper, garlic powder, and onion powder. Don’t be shy with the seasoning; it’s what gives the chicken its flavor!
-
Layer the Filling: On each chicken breast, layer two slices of provolone cheese and two slices of ham. Make sure the cheese and ham are evenly distributed across the surface of the chicken.
-
Roll the Chicken: Carefully roll up each chicken breast, starting from one end. Tuck in the sides as you roll to keep the filling inside. Secure each roll with toothpicks. I usually use about 3-4 toothpicks per roll to make sure they stay closed during cooking.
Setting Up the Breading Station:
Now, let’s get our breading station ready. This is where the magic happens, transforming our stuffed chicken into crispy, golden-brown perfection.
-
Prepare the Flour: In a shallow dish, place the all-purpose flour. Season it with a pinch of salt, pepper, and a little bit of paprika. This adds extra flavor to the breading.
-
Prepare the Egg Wash: In another shallow dish, whisk the two large eggs until they are well combined. A smooth egg wash is essential for the breadcrumbs to adhere properly.
-
Prepare the Breadcrumbs: In a third shallow dish, combine the panko breadcrumbs, dried oregano, dried basil, and cayenne pepper (if using). Mix well to ensure the spices are evenly distributed throughout the breadcrumbs. Panko breadcrumbs are my secret weapon for extra crispy breading!
Breading the Stuffed Chicken:
Time to bread our stuffed chicken rolls! This process is a bit messy, but totally worth it for that amazing crispy crust.
-
Coat in Flour: Dredge each chicken roll in the flour, making sure to coat it evenly on all sides. Shake off any excess flour. This helps the egg wash stick better.
-
Dip in Egg Wash: Dip each floured chicken roll into the egg wash, ensuring it’s completely coated. Let any excess egg drip off.
-
Coat in Breadcrumbs: Finally, dredge each egg-washed chicken roll in the panko breadcrumb mixture, pressing gently to make sure the breadcrumbs adhere well. Coat it thoroughly on all sides. This is where you get that beautiful, crispy texture.
-
Rest the Breaded Chicken: Place the breaded chicken rolls on a plate or baking sheet and let them rest for about 10-15 minutes. This helps the breading set and prevents it from falling off during cooking.
Cooking the Stuffed Chicken:
Now for the cooking! We’re going to pan-fry these beauties to golden perfection, then finish them off in the oven to ensure the chicken is cooked through and the cheese is melty and delicious.
-
Sear the Chicken: In a large oven-safe skillet (cast iron is ideal), heat the olive oil and butter over medium-high heat. Once the oil is hot and shimmering, carefully place the breaded chicken rolls in the skillet. Don’t overcrowd the pan; you may need to cook them in batches.
-
Brown on All Sides: Sear the chicken rolls for about 2-3 minutes per side, until they are golden brown and crispy. This step is all about getting that beautiful color and texture. Be careful not to burn the breadcrumbs; adjust the heat if necessary.
-
Bake in the Oven: Once the chicken rolls are browned on all sides, transfer the skillet to a preheated oven at 375°F (190°C). Bake for 20-25 minutes, or until the chicken is cooked through and the internal temperature reaches 165°F (74°C). Use a meat thermometer to ensure accuracy.
-
Rest Before Slicing: Remove the skillet from the oven and let the chicken rolls rest for about 5-10 minutes before slicing. This allows the juices to redistribute, resulting in a more tender and flavorful chicken.
Serving and Enjoying:
The moment we’ve all been waiting for! Time to slice, serve, and savor the deliciousness of our breaded stuffed chicken.
-
Remove Toothpicks: Carefully remove the toothpicks from the chicken rolls before slicing.
-
Slice and Serve: Slice the chicken rolls into 1-inch thick slices. Arrange the slices on a serving platter.
-
Garnish: Garnish with fresh chopped parsley for a pop of color and freshness.
-
Serve with Sides: Serve the breaded stuffed chicken with your favorite sides. Mashed potatoes, roasted vegetables, pasta, or a simple salad all pair perfectly. A creamy sauce, like a Dijon mustard sauce or a cheese sauce, would also be amazing!
Tips and Variations:
Want to customize this recipe to your liking? Here are a few ideas:
-
Cheese Variations: Experiment with different types of cheese. Swiss, mozzarella, or even pepper jack would be delicious.
-
Ham Alternatives: Use prosciutto, bacon, or even cooked spinach instead of ham.
-
Sauce Options: Serve with a creamy mushroom sauce, a lemon butter sauce, or a simple marinara sauce.
-
Spice it Up: Add a pinch of red pepper flakes to the breadcrumb mixture for extra heat.
-
Air Fryer Option: You can also cook these in an air fryer! Preheat your air fryer to 375°F (190°C). Place the breaded chicken rolls in the air fryer basket, making sure they are not overcrowded. Cook for 15-20 minutes, or until the chicken is cooked through and the breading is golden brown. Flip halfway through for even cooking.
Make-Ahead Instructions:
Want to get a head start on dinner? You can prepare the stuffed chicken rolls ahead of time and store them in the refrigerator until you’re ready to cook them.
-
Prepare and Bread: Follow the recipe instructions up to the breading step.
-
Refrigerate: Place the breaded chicken rolls on a baking sheet lined with parchment paper. Cover tightly with plastic wrap and refrigerate for up to 24 hours.
-
Cook: When ready to cook,
Conclusion:
This Breaded Stuffed Chicken recipe isn’t just another chicken dish; it’s a flavor explosion waiting to happen! From the crispy, golden-brown breading to the savory, melty filling, every bite is a delightful experience. I truly believe this recipe is a must-try because it elevates the humble chicken breast into something truly special and impressive, without requiring hours in the kitchen. It’s the perfect balance of comfort food and elegant dining, making it suitable for a weeknight dinner or a weekend gathering with friends and family. But the best part? It’s incredibly versatile! Feel free to experiment with the filling. If you’re a cheese lover, try adding a blend of Gruyere and Parmesan for an extra nutty and sharp flavor. For a spicier kick, incorporate some chopped jalapeños or a dash of cayenne pepper into the cheese mixture. Sun-dried tomatoes and spinach would also be fantastic additions, adding a Mediterranean twist to the dish. As for serving suggestions, the possibilities are endless. I personally love pairing this Breaded Stuffed Chicken with a simple side of roasted asparagus or green beans. The slight bitterness of the vegetables complements the richness of the chicken perfectly. Creamy mashed potatoes or a light and fluffy quinoa salad are also excellent choices. And for a truly decadent meal, consider serving it with a side of creamy polenta. A crisp green salad with a light vinaigrette will also cut through the richness and provide a refreshing contrast. Don’t forget a squeeze of fresh lemon juice over the chicken just before serving it brightens up all the flavors! For variations, consider using different types of breading. Panko breadcrumbs will give you an extra crispy crust, while Italian breadcrumbs will add a touch of herb-infused flavor. You could even try using crushed cornflakes for a unique and surprisingly delicious texture. If you’re looking for a healthier option, try baking the chicken instead of frying it. While it won’t be quite as crispy, it will still be incredibly flavorful and satisfying. Just be sure to adjust the cooking time accordingly. I’m so excited for you to try this recipe and experience the deliciousness for yourself! It’s a guaranteed crowd-pleaser, and I’m confident that it will become a staple in your kitchen. Don’t be afraid to get creative and put your own spin on it. Cooking should be fun and experimental, so feel free to adjust the ingredients and techniques to suit your own taste preferences. Once you’ve made this amazing Breaded Stuffed Chicken, I would absolutely love to hear about your experience! Share your photos and comments on social media using [Your Hashtag Here] or leave a review on my website. Let me know what variations you tried, what sides you served it with, and what your family and friends thought. Your feedback is invaluable, and it helps me to continue creating and sharing delicious recipes that you’ll love. Happy cooking! I can’t wait to see what culinary masterpieces you create! Print
Breaded Stuffed Chicken: The Ultimate Recipe and Guide
- Total Time: 60 minutes
- Yield: 4 servings 1x
Description
Golden, crispy breaded chicken breasts stuffed with savory ham and melted provolone cheese. A delicious and satisfying meal!
Ingredients
- 4 boneless, skinless chicken breasts (about 6–8 ounces each)
- 8 slices provolone cheese
- 8 slices ham
- 1 cup all-purpose flour
- 2 large eggs, beaten
- 2 cups panko breadcrumbs
- 1 teaspoon garlic powder
- 1 teaspoon onion powder
- 1/2 teaspoon paprika
- 1/4 teaspoon cayenne pepper (optional, for a little kick)
- 1/2 teaspoon dried oregano
- 1/2 teaspoon dried basil
- Salt and freshly ground black pepper to taste
- 1/4 cup olive oil
- 2 tablespoons butter
- Fresh parsley, chopped (for garnish)
Instructions
- Place each chicken breast between two sheets of plastic wrap. Using a meat mallet or rolling pin, pound the chicken to an even thickness of about 1/4 to 1/2 inch.
- Season both sides of each chicken breast with salt, pepper, garlic powder, and onion powder.
- On each chicken breast, layer two slices of provolone cheese and two slices of ham.
- Carefully roll up each chicken breast, starting from one end. Tuck in the sides as you roll to keep the filling inside. Secure each roll with 3-4 toothpicks.
- In a shallow dish, place the all-purpose flour. Season it with a pinch of salt, pepper, and a little bit of paprika.
- In another shallow dish, whisk the two large eggs until they are well combined.
- In a third shallow dish, combine the panko breadcrumbs, dried oregano, dried basil, and cayenne pepper (if using). Mix well.
- Dredge each chicken roll in the flour, making sure to coat it evenly on all sides. Shake off any excess flour.
- Dip each floured chicken roll into the egg wash, ensuring it’s completely coated. Let any excess egg drip off.
- Dredge each egg-washed chicken roll in the panko breadcrumb mixture, pressing gently to make sure the breadcrumbs adhere well. Coat it thoroughly on all sides.
- Place the breaded chicken rolls on a plate or baking sheet and let them rest for about 10-15 minutes.
- In a large oven-safe skillet (cast iron is ideal), heat the olive oil and butter over medium-high heat. Carefully place the breaded chicken rolls in the skillet. Don’t overcrowd the pan; you may need to cook them in batches.
- Sear the chicken rolls for about 2-3 minutes per side, until they are golden brown and crispy.
- Once the chicken rolls are browned on all sides, transfer the skillet to a preheated oven at 375°F (190°C). Bake for 20-25 minutes, or until the chicken is cooked through and the internal temperature reaches 165°F (74°C). Use a meat thermometer to ensure accuracy.
- Remove the skillet from the oven and let the chicken rolls rest for about 5-10 minutes before slicing.
- Carefully remove the toothpicks from the chicken rolls before slicing.
- Slice the chicken rolls into 1-inch thick slices. Arrange the slices on a serving platter.
- Garnish with fresh chopped parsley.
- Serve with your favorite sides.
Notes
- Cheese Variations: Experiment with different types of cheese. Swiss, mozzarella, or even pepper jack would be delicious.
- Ham Alternatives: Use prosciutto, bacon, or even cooked spinach instead of ham.
- Sauce Options: Serve with a creamy mushroom sauce, a lemon butter sauce, or a simple marinara sauce.
- Spice it Up: Add a pinch of red pepper flakes to the breadcrumb mixture for extra heat.
- Air Fryer Option: You can also cook these in an air fryer! Preheat your air fryer to 375°F (190°C). Place the breaded chicken rolls in the air fryer basket, making sure they are not overcrowded. Cook for 15-20 minutes, or until the chicken is cooked through and the breading is golden brown. Flip halfway through for even cooking.
- Make-Ahead Instructions: You can prepare the stuffed chicken rolls ahead of time and store them in the refrigerator until you’re ready to cook them. Follow the recipe instructions up to the breading step. Place the breaded chicken rolls on a baking sheet lined with parchment paper. Cover tightly with plastic wrap and refrigerate for up to 24 hours.
- Prep Time: 30 minutes
- Cook Time: 30 minutes