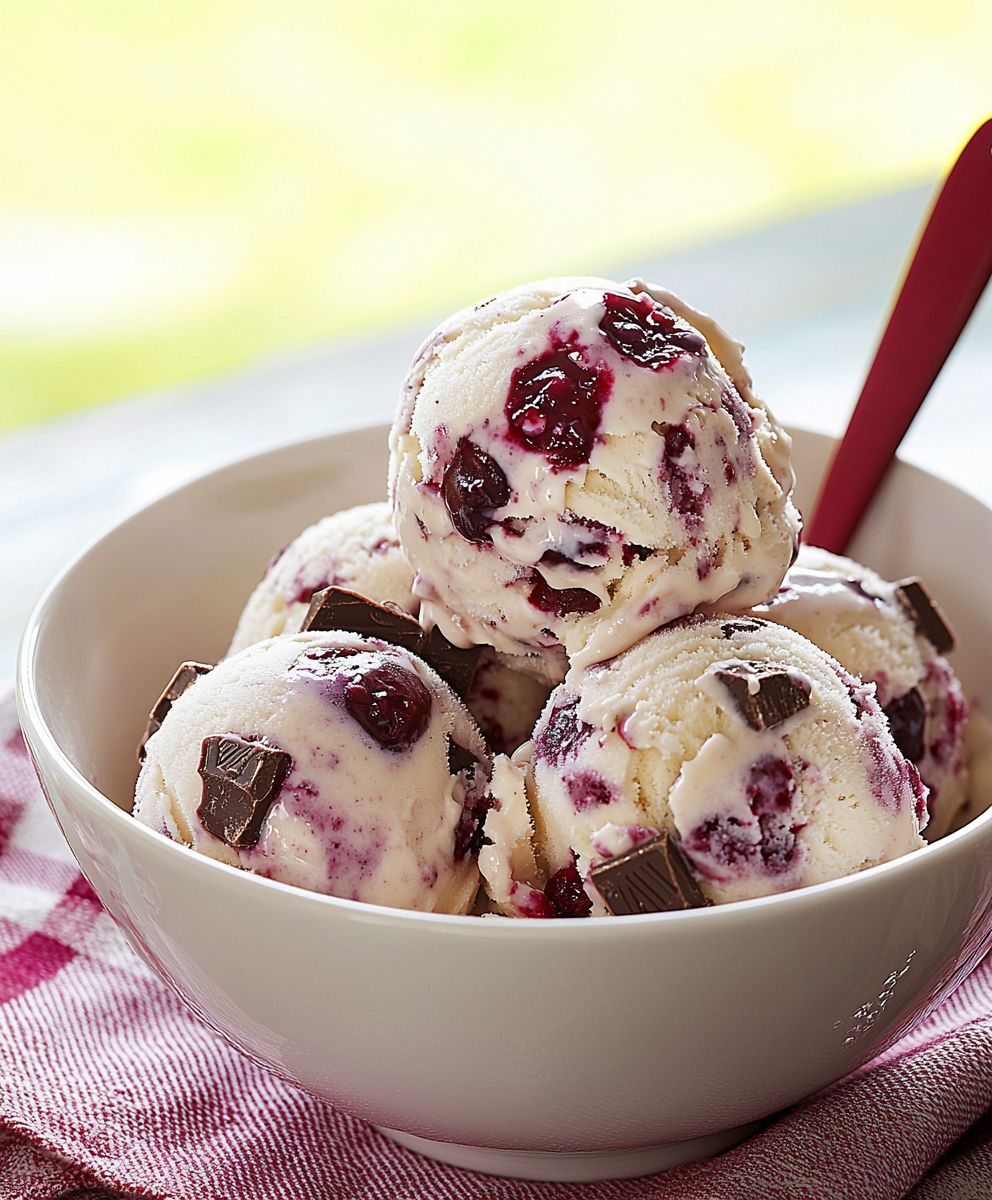
Cherry Chocolate Chunk Ice Cream: Prepare to embark on a frozen adventure that will tantalize your taste buds and leave you craving more! Imagine the creamy, dreamy texture of homemade ice cream, bursting with the sweet-tartness of ripe cherries and the decadent richness of dark chocolate chunks. This isn’t just dessert; it’s an experience.
While the exact origins of combining cherries and chocolate in frozen desserts are somewhat shrouded in mystery, the pairing itself is a classic, evoking feelings of romance and indulgence. Think of elegant cherry cordials or sophisticated chocolate-covered cherries the combination has long been associated with special occasions and moments of pure pleasure. This recipe brings that same level of delight to your own kitchen.
What makes Cherry Chocolate Chunk Ice Cream so irresistible? It’s the perfect balance of flavors and textures. The sweetness of the ice cream is beautifully offset by the slight tang of the cherries, while the dark chocolate chunks provide a satisfying crunch and a deep, complex flavor that complements the fruit perfectly. Plus, making it at home allows you to control the ingredients, ensuring a fresh, high-quality treat that’s far superior to anything you’ll find in the store. Get ready to scoop up some happiness!

Ingredients:
- For the Cherry Infusion:
- 1 pound fresh sweet cherries, pitted and halved
- 1/2 cup granulated sugar
- 1/4 cup water
- 1 tablespoon lemon juice
- For the Chocolate Chunks:
- 6 ounces high-quality dark chocolate (70% cacao or higher), coarsely chopped
- 1 tablespoon unsweetened cocoa powder
- 1/2 teaspoon espresso powder (optional, but enhances the chocolate flavor)
- For the Ice Cream Base:
- 2 cups heavy cream
- 1 cup whole milk
- 3/4 cup granulated sugar
- 1/4 cup light corn syrup (or honey, for a slightly different flavor profile)
- 1/4 teaspoon sea salt
- 1 teaspoon vanilla extract
- 1/4 teaspoon almond extract (optional, complements the cherry flavor)
- Optional Garnishes:
- Fresh cherries, for topping
- Shaved dark chocolate, for topping
- Whipped cream
Preparing the Cherry Infusion:
- Combine Ingredients: In a medium saucepan, combine the pitted and halved cherries, granulated sugar, water, and lemon juice.
- Simmer the Mixture: Place the saucepan over medium heat and bring the mixture to a gentle simmer, stirring occasionally to dissolve the sugar.
- Cook the Cherries: Reduce the heat to low and continue to simmer for about 15-20 minutes, or until the cherries have softened and released their juices. The mixture should thicken slightly into a syrupy consistency. Stir occasionally to prevent sticking.
- Cool Completely: Remove the saucepan from the heat and let the cherry infusion cool completely. This can take about an hour at room temperature, or you can speed up the process by placing it in the refrigerator. Cooling allows the flavors to meld and intensify.
- Strain the Cherries (Optional): For a smoother ice cream, you can strain the cherry infusion through a fine-mesh sieve, pressing gently on the cherries to extract as much juice as possible. Reserve the cherries for adding back into the ice cream later, or use them for another purpose, such as topping yogurt or pancakes. I personally like to leave the cherries in for a more rustic texture.
- Chill the Infusion: Once cooled, transfer the cherry infusion (with or without the cherries) to an airtight container and chill in the refrigerator for at least 2 hours, or preferably overnight. This step is crucial for ensuring that the ice cream base freezes properly.
Preparing the Chocolate Chunks:
- Melt the Chocolate: There are two ways to melt the chocolate: using a double boiler or the microwave.
- Double Boiler Method: Fill a saucepan with about an inch of water and bring it to a simmer. Place a heatproof bowl on top of the saucepan, ensuring that the bottom of the bowl doesn’t touch the water. Add the chopped dark chocolate to the bowl and stir occasionally until it is completely melted and smooth.
- Microwave Method: Place the chopped dark chocolate in a microwave-safe bowl. Microwave in 30-second intervals, stirring after each interval, until the chocolate is melted and smooth. Be careful not to overheat the chocolate, as it can burn easily.
- Add Cocoa and Espresso Powder: Once the chocolate is melted, remove it from the heat (or microwave) and stir in the unsweetened cocoa powder and espresso powder (if using). The cocoa powder will help to create a slightly firmer texture for the chocolate chunks, and the espresso powder will enhance the chocolate flavor.
- Spread and Cool: Line a baking sheet with parchment paper. Pour the melted chocolate mixture onto the parchment paper and spread it into a thin, even layer, about 1/8 inch thick.
- Freeze the Chocolate: Place the baking sheet in the freezer and freeze for at least 30 minutes, or until the chocolate is completely solid.
- Break into Chunks: Once the chocolate is frozen, remove it from the freezer and break it into small, irregular chunks using a knife or your hands. Don’t worry about making them perfectly uniform; the rustic look is part of the charm.
- Store the Chunks: Store the chocolate chunks in an airtight container in the freezer until ready to use. This will prevent them from melting and sticking together.
Preparing the Ice Cream Base:
- Combine Cream, Milk, and Sugar: In a medium saucepan, combine the heavy cream, whole milk, granulated sugar, corn syrup (or honey), and sea salt.
- Heat the Mixture: Place the saucepan over medium heat and stir constantly until the sugar is completely dissolved. The mixture should be warm but not boiling.
- Pasteurize the Base (Optional): For a richer and smoother ice cream, you can pasteurize the base. To do this, heat the mixture to 170°F (77°C), using a candy thermometer to monitor the temperature. Hold the mixture at this temperature for 3 minutes, stirring constantly. This step helps to kill any bacteria and create a more stable emulsion.
- Cool the Base: Remove the saucepan from the heat and let the ice cream base cool slightly for about 15 minutes.
- Add Extracts: Stir in the vanilla extract and almond extract (if using).
- Chill the Base: Pour the ice cream base into an airtight container and chill in the refrigerator for at least 4 hours, or preferably overnight. This step is essential for allowing the flavors to meld and for the base to thicken slightly, which will result in a smoother and creamier ice cream.
Churning and Assembling the Ice Cream:
- Prepare the Ice Cream Maker: Follow the manufacturer’s instructions for your ice cream maker. This usually involves freezing the bowl for at least 24 hours.
- Churn the Ice Cream Base: Pour the chilled ice cream base into the prepared ice cream maker and churn according to the manufacturer’s instructions. This usually takes about 20-30 minutes, or until the ice cream has reached a soft-serve consistency.
- Add the Cherry Infusion and Chocolate Chunks: During the last few minutes of churning, gradually add the chilled cherry infusion (with or without the cherries) and the frozen chocolate chunks to the ice cream maker. Allow the machine to churn for a few more minutes to evenly distribute the cherries and chocolate throughout the ice cream.
- Transfer to a Container: Transfer the churned ice cream to an airtight container. I like to use a freezer-safe container with a tight-fitting lid to prevent freezer burn.
- Harden the Ice Cream: Place the container of ice cream in the freezer and freeze for at least 2-3 hours, or until it has reached a firm, scoopable consistency. This hardening process is important for developing the final texture of the ice cream.
- Serve and Enjoy: Scoop the Cherry Chocolate Chunk Ice Cream into bowls or cones and serve immediately. Garnish with fresh cherries, shaved dark chocolate, or whipped cream, if desired.
Conclusion:
This Cherry Chocolate Chunk Ice Cream isn’t just another dessert; it’s a symphony of flavors and textures that will transport you to ice cream heaven. The sweet, tart cherries perfectly complement the rich, dark chocolate chunks, creating a delightful dance on your palate. The creamy, homemade base elevates this ice cream far beyond anything you can find in the freezer aisle. Trust me, once you taste the difference, you’ll never go back!
Why is this recipe a must-try? Because it’s incredibly easy to make, even if you’re a beginner in the kitchen. It requires minimal ingredients, most of which you probably already have on hand. And the best part? You get to customize it to your liking! Don’t like dark chocolate? Swap it out for milk chocolate or white chocolate. Prefer a different type of cherry? Go for it! This recipe is a blank canvas for your ice cream dreams.
But the real magic lies in the combination of fresh, high-quality ingredients. Using ripe, juicy cherries and premium chocolate makes all the difference in the world. The homemade ice cream base is also crucial for achieving that perfect creamy texture that store-bought ice cream simply can’t replicate. It’s a labor of love, but I promise you, the results are well worth the effort.
Now, let’s talk serving suggestions. This Cherry Chocolate Chunk Ice Cream is delicious on its own, straight from the freezer. But if you want to take it to the next level, try serving it in a waffle cone or a crispy sugar cone. For a more decadent treat, top it with whipped cream, chocolate shavings, and a maraschino cherry. You can also use it to make an incredible ice cream sundae with hot fudge sauce, chopped nuts, and sprinkles.
Here are a few variations to consider:
* Cherry Almond Chocolate Chunk Ice Cream: Add a handful of toasted slivered almonds for a nutty crunch.
* Cherry Chocolate Chip Ice Cream: Substitute the chocolate chunks with mini chocolate chips for a more even distribution of chocolate.
* Boozy Cherry Chocolate Chunk Ice Cream: Add a tablespoon or two of Kirsch (cherry liqueur) to the ice cream base for an extra kick.
* Vegan Cherry Chocolate Chunk Ice Cream: Use a coconut milk-based ice cream recipe and dairy-free chocolate chunks for a vegan-friendly version.
I’m confident that this Cherry Chocolate Chunk Ice Cream will become a new favorite in your household. It’s the perfect treat for a hot summer day, a special occasion, or simply when you need a little pick-me-up. Its a guaranteed crowd-pleaser, and I can already imagine the smiles on your loved ones’ faces as they savor each spoonful.
So, what are you waiting for? Gather your ingredients, dust off your ice cream maker, and get ready to create some ice cream magic. I’m so excited for you to try this recipe and experience the joy of homemade ice cream.
And most importantly, don’t forget to share your experience! I’d love to hear how your Cherry Chocolate Chunk Ice Cream turned out. Did you make any variations? What were your favorite toppings? Share your photos and stories in the comments below. Let’s spread the ice cream love! Happy churning!
Cherry Chocolate Chunk Ice Cream: The Ultimate Indulgent Recipe
Creamy homemade ice cream with sweet cherry infusion and rich dark chocolate chunks. A perfect balance of fruity and decadent flavors.
Ingredients
- 1 pound fresh sweet cherries, pitted and halved
- 1/2 cup granulated sugar
- 1/4 cup water
- 1 tablespoon lemon juice
- 6 ounces high-quality dark chocolate (70% cacao or higher), coarsely chopped
- 1 tablespoon unsweetened cocoa powder
- 1/2 teaspoon espresso powder (optional, but enhances the chocolate flavor)
- 2 cups heavy cream
- 1 cup whole milk
- 3/4 cup granulated sugar
- 1/4 cup light corn syrup (or honey, for a slightly different flavor profile)
- 1/4 teaspoon sea salt
- 1 teaspoon vanilla extract
- 1/4 teaspoon almond extract (optional, complements the cherry flavor)
- Fresh cherries, for topping
- Shaved dark chocolate, for topping
- Whipped cream
Instructions
- Preparing the Cherry Infusion:
- Combine Ingredients: In a medium saucepan, combine the pitted and halved cherries, granulated sugar, water, and lemon juice.
- Simmer the Mixture: Place the saucepan over medium heat and bring the mixture to a gentle simmer, stirring occasionally to dissolve the sugar.
- Cook the Cherries: Reduce the heat to low and continue to simmer for about 15-20 minutes, or until the cherries have softened and released their juices. The mixture should thicken slightly into a syrupy consistency. Stir occasionally to prevent sticking.
- Cool Completely: Remove the saucepan from the heat and let the cherry infusion cool completely. This can take about an hour at room temperature, or you can speed up the process by placing it in the refrigerator. Cooling allows the flavors to meld and intensify.
- Strain the Cherries (Optional): For a smoother ice cream, you can strain the cherry infusion through a fine-mesh sieve, pressing gently on the cherries to extract as much juice as possible. Reserve the cherries for adding back into the ice cream later, or use them for another purpose, such as topping yogurt or pancakes. I personally like to leave the cherries in for a more rustic texture.
- Chill the Infusion: Once cooled, transfer the cherry infusion (with or without the cherries) to an airtight container and chill in the refrigerator for at least 2 hours, or preferably overnight. This step is crucial for ensuring that the ice cream base freezes properly.
- Preparing the Chocolate Chunks:
- Melt the Chocolate: There are two ways to melt the chocolate: using a double boiler or the microwave.
- Double Boiler Method: Fill a saucepan with about an inch of water and bring it to a simmer. Place a heatproof bowl on top of the saucepan, ensuring that the bottom of the bowl doesn’t touch the water. Add the chopped dark chocolate to the bowl and stir occasionally until it is completely melted and smooth.
- Microwave Method: Place the chopped dark chocolate in a microwave-safe bowl. Microwave in 30-second intervals, stirring after each interval, until the chocolate is melted and smooth. Be careful not to overheat the chocolate, as it can burn easily.
- Add Cocoa and Espresso Powder: Once the chocolate is melted, remove it from the heat (or microwave) and stir in the unsweetened cocoa powder and espresso powder (if using). The cocoa powder will help to create a slightly firmer texture for the chocolate chunks, and the espresso powder will enhance the chocolate flavor.
- Spread and Cool: Line a baking sheet with parchment paper. Pour the melted chocolate mixture onto the parchment paper and spread it into a thin, even layer, about 1/8 inch thick.
- Freeze the Chocolate: Place the baking sheet in the freezer and freeze for at least 30 minutes, or until the chocolate is completely solid.
- Break into Chunks: Once the chocolate is frozen, remove it from the freezer and break it into small, irregular chunks using a knife or your hands. Don’t worry about making them perfectly uniform; the rustic look is part of the charm.
- Store the Chunks: Store the chocolate chunks in an airtight container in the freezer until ready to use. This will prevent them from melting and sticking together.
- Preparing the Ice Cream Base:
- Combine Cream, Milk, and Sugar: In a medium saucepan, combine the heavy cream, whole milk, granulated sugar, corn syrup (or honey), and sea salt.
- Heat the Mixture: Place the saucepan over medium heat and stir constantly until the sugar is completely dissolved. The mixture should be warm but not boiling.
- Pasteurize the Base (Optional): For a richer and smoother ice cream, you can pasteurize the base. To do this, heat the mixture to 170°F (77°C), using a candy thermometer to monitor the temperature. Hold the mixture at this temperature for 3 minutes, stirring constantly. This step helps to kill any bacteria and create a more stable emulsion.
- Cool the Base: Remove the saucepan from the heat and let the ice cream base cool slightly for about 15 minutes.
- Add Extracts: Stir in the vanilla extract and almond extract (if using).
- Chill the Base: Pour the ice cream base into an airtight container and chill in the refrigerator for at least 4 hours, or preferably overnight. This step is essential for allowing the flavors to meld and for the base to thicken slightly, which will result in a smoother and creamier ice cream.
- Churning and Assembling the Ice Cream:
- Prepare the Ice Cream Maker: Follow the manufacturer’s instructions for your ice cream maker. This usually involves freezing the bowl for at least 24 hours.
- Churn the Ice Cream Base: Pour the chilled ice cream base into the prepared ice cream maker and churn according to the manufacturer’s instructions. This usually takes about 20-30 minutes, or until the ice cream has reached a soft-serve consistency.
- Add the Cherry Infusion and Chocolate Chunks: During the last few minutes of churning, gradually add the chilled cherry infusion (with or without the cherries) and the frozen chocolate chunks to the ice cream maker. Allow the machine to churn for a few more minutes to evenly distribute the cherries and chocolate throughout the ice cream.
- Transfer to a Container: Transfer the churned ice cream to an airtight container. I like to use a freezer-safe container with a tight-fitting lid to prevent freezer burn.
- Harden the Ice Cream: Place the container of ice cream in the freezer and freeze for at least 2-3 hours, or until it has reached a firm, scoopable consistency. This hardening process is important for developing the final texture of the ice cream.
- Serve and Enjoy: Scoop the Cherry Chocolate Chunk Ice Cream into bowls or cones and serve immediately. Garnish with fresh cherries, shaved dark chocolate, or whipped cream, if desired.
Notes
- For a smoother ice cream, strain the cherry infusion. If you prefer a more rustic texture, leave the cherries in.
- Pasteurizing the ice cream base is optional but recommended for a richer, smoother texture.
- Chilling the cherry infusion and ice cream base thoroughly is crucial for proper freezing and flavor development.
- Use high-quality dark chocolate for the best flavor.
- Adjust the amount of chocolate chunks and cherries to your preference.
- Make sure your ice cream maker bowl is fully frozen before churning.