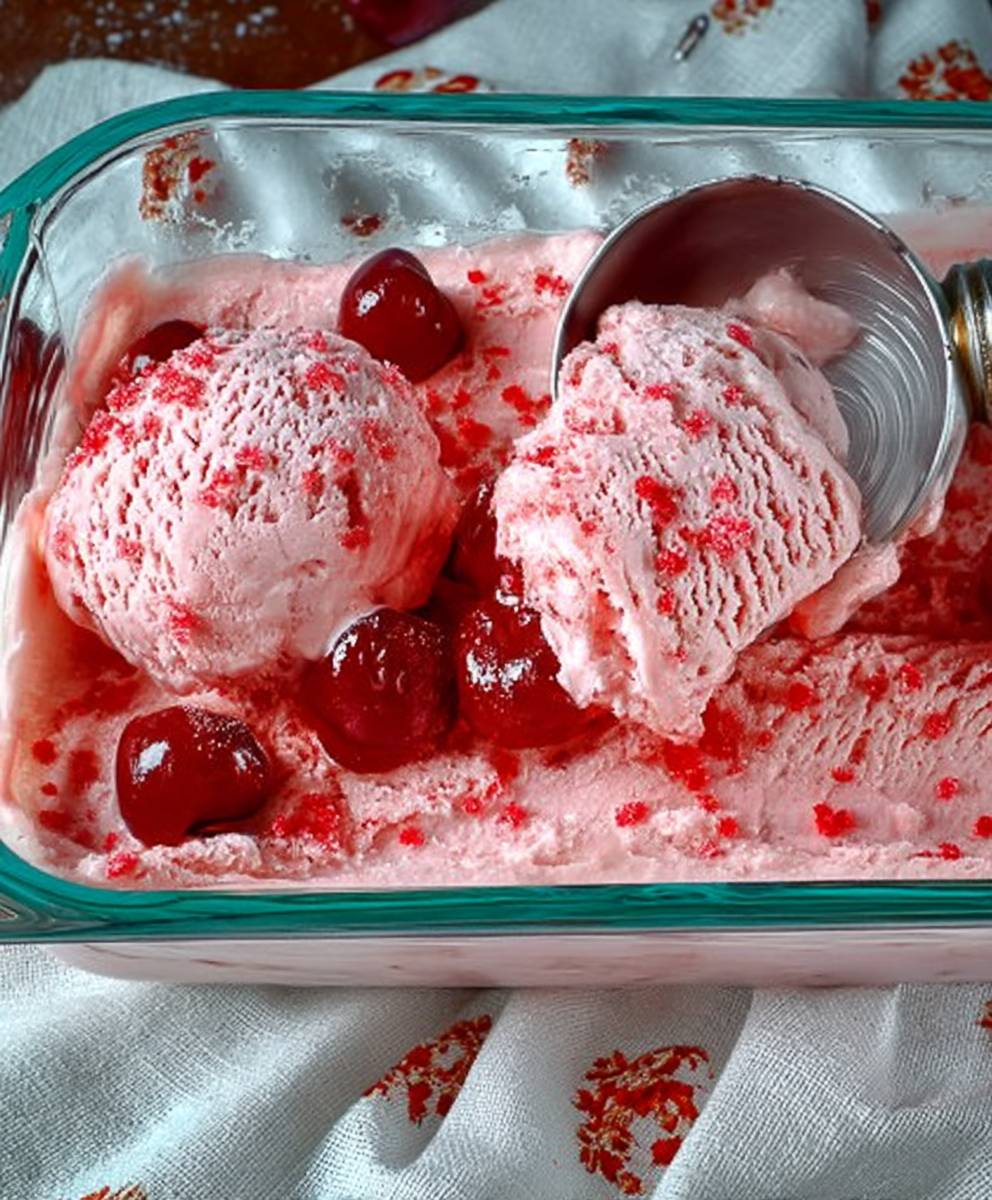
Cherry ice cream, a symphony of sweet and tart, is more than just a frozen dessert; it’s a nostalgic trip to sun-drenched orchards and carefree summer days. Imagine sinking your spoon into a creamy, rosy-hued scoop, bursting with the bright flavor of ripe cherries. Are you ready to experience that bliss in your own kitchen?
While the exact origins of cherry ice cream are somewhat shrouded in the mists of culinary history, the combination of cherries and dairy has been a beloved pairing for centuries. Cherries themselves have been cultivated since ancient times, and the art of preserving them in various forms, including jams and compotes, paved the way for their eventual incorporation into frozen treats. The development of ice cream as we know it provided the perfect canvas to showcase the cherry’s vibrant flavor.
People adore cherry ice cream for its delightful balance of sweetness and acidity. The creamy texture, punctuated by the occasional burst of juicy cherry, creates a truly irresistible experience. It’s a treat that’s both refreshing and comforting, perfect for a hot summer day or a cozy night in. Plus, making it at home allows you to control the ingredients and customize the sweetness to your liking, ensuring a perfect scoop every time. So, let’s dive into this easy-to-follow recipe and create some cherry magic!

Ingredients:
- 1 pound fresh sweet cherries, pitted
- 1 cup granulated sugar, divided
- 2 cups heavy cream
- 1 cup whole milk
- 1 teaspoon vanilla extract
- 1/4 teaspoon almond extract (optional, but highly recommended!)
- Pinch of salt
- 2 tablespoons vodka or other neutral spirit (optional, to prevent ice crystals)
Preparing the Cherry Base:
Okay, let’s get started! The key to amazing cherry ice cream is a fantastic cherry base. We’re going to macerate the cherries to draw out their juices and intensify the flavor.
- Pit the Cherries: This is probably the most tedious part, but trust me, it’s worth it. You’ll need about 1 pound of fresh, sweet cherries. I prefer Bing cherries for their deep color and rich flavor, but Rainier or other sweet varieties will work too. Use a cherry pitter if you have one it’ll save you a ton of time. If not, a paring knife works just fine. Just cut around the pit and twist to remove it.
- Macerate the Cherries: In a medium bowl, combine the pitted cherries with ½ cup of the granulated sugar. Gently stir to coat the cherries evenly. The sugar will draw out the natural juices from the cherries, creating a delicious syrup.
- Let it Sit: Cover the bowl with plastic wrap and refrigerate for at least 2 hours, or even better, overnight. The longer they sit, the more flavorful your ice cream will be. You’ll notice a beautiful, deep red syrup forming at the bottom of the bowl.
- Blend the Cherry Mixture: After the cherries have macerated, transfer the entire mixture (cherries and syrup) to a blender or food processor. Blend until completely smooth. You want a nice, even puree with no chunks of cherries remaining.
- Strain the Cherry Puree (Optional but Recommended): This step is optional, but it will result in a smoother ice cream. Pour the cherry puree through a fine-mesh sieve into a clean bowl. Use a spatula to press the puree against the sieve, extracting as much liquid as possible. Discard the solids left in the sieve. This removes any tough skins or fibers that might detract from the creamy texture of the ice cream.
Creating the Ice Cream Base:
Now that we have our intensely flavored cherry base, let’s move on to creating the creamy ice cream base. This is where the magic happens!
- Combine Dairy and Sugar: In a medium saucepan, combine the heavy cream, whole milk, the remaining ½ cup of granulated sugar, and the pinch of salt. Whisk together until the sugar is mostly dissolved.
- Heat Gently: Place the saucepan over medium heat. We’re not looking to boil the mixture, just to warm it gently and dissolve the sugar completely. Stir frequently to prevent scorching.
- Infuse with Flavor: Once the sugar is dissolved and the mixture is warm (but not simmering), remove the saucepan from the heat. Stir in the vanilla extract and almond extract (if using). The almond extract really complements the cherry flavor, so I highly recommend it!
- Chill the Base: This is a crucial step! Pour the cream mixture into a bowl and cover it tightly with plastic wrap, pressing the plastic wrap directly onto the surface of the cream. This prevents a skin from forming. Refrigerate for at least 4 hours, or preferably overnight. The colder the base, the better the ice cream will churn.
Combining and Churning:
We’re almost there! Now it’s time to combine the cherry base with the cream base and churn it into delicious ice cream.
- Combine the Bases: Once the cream base is thoroughly chilled, remove it from the refrigerator. Pour the chilled cherry puree into the cream base and whisk until well combined. The mixture should be a beautiful, vibrant pink color.
- Add Vodka (Optional): If you’re using vodka (or another neutral spirit), now is the time to add it. The alcohol helps to prevent ice crystals from forming, resulting in a smoother, creamier ice cream. Don’t worry, you won’t taste the alcohol in the finished product.
- Prepare Your Ice Cream Maker: Follow the manufacturer’s instructions for your ice cream maker. If you have a freezer bowl ice cream maker, make sure the bowl is completely frozen (usually at least 24 hours). If you have an ice cream maker that uses ice and salt, prepare it according to the instructions.
- Churn the Ice Cream: Pour the cherry-cream mixture into the prepared ice cream maker. Churn according to the manufacturer’s instructions. The churning time will vary depending on your ice cream maker, but it usually takes around 20-30 minutes. The ice cream is ready when it has a soft-serve consistency.
Freezing and Serving:
The final step is to harden the ice cream in the freezer. This will give it a more scoopable consistency.
- Transfer to a Container: Gently transfer the soft-serve ice cream to an airtight container. I like to use a loaf pan or a freezer-safe container with a tight-fitting lid.
- Harden in the Freezer: Cover the container tightly and freeze for at least 2-3 hours, or preferably overnight, to allow the ice cream to harden completely.
- Scoop and Serve: Once the ice cream is frozen solid, let it sit at room temperature for a few minutes to soften slightly before scooping. This will make it easier to scoop and will improve the texture.
- Enjoy! Serve your homemade cherry ice cream in bowls or cones. You can top it with whipped cream, chocolate shavings, or extra cherries for an extra special treat.
Tips for Success:
- Use High-Quality Ingredients: The better the ingredients, the better the ice cream. Use fresh, ripe cherries and high-quality heavy cream.
- Chill Everything Thoroughly: Make sure the cherry base and the cream base are both thoroughly chilled before churning. This will help the ice cream freeze faster and more evenly.
- Don’t Overchurn: Overchurning can result in grainy ice cream. Churn until the ice cream has a soft-serve consistency, then transfer it to the freezer to harden.
- Experiment with Flavors: Feel free to experiment with different extracts or add-ins. A little bit of Kirsch (cherry liqueur) would also be delicious!
- Storage: Homemade ice cream is best enjoyed within a week or two. Store it in an airtight container in the freezer to prevent freezer burn.
Troubleshooting:
- Ice Cream is Too Icy: This can be caused by not chilling the bases thoroughly enough, overchurning, or not using enough fat. Make sure to chill the bases for at least 4 hours, and don’t overchurn the ice cream. Adding a tablespoon or two of vodka can also help prevent ice crystals.
- Ice Cream is Too Hard: This can be caused by freezing the ice cream for too long. Let the ice cream sit at room temperature for a few minutes before scooping to soften it slightly.
- Ice Cream is Grainy: This can be caused by overchurning or using low-quality ingredients. Make sure to use high-quality ingredients and don’t overchurn the ice cream. Straining the cherry puree can also help prevent graininess.
Conclusion:
This isn’t just another ice cream recipe; it’s a summer memory waiting to happen! The vibrant color, the burst of sweet and tart cherries, and the creamy, dreamy texture all combine to create a truly unforgettable dessert. I wholeheartedly believe this cherry ice cream is a must-try for anyone who appreciates homemade goodness and the simple pleasures of life. It’s the kind of recipe that will have your family and friends begging for more, and trust me, you won’t mind obliging!
But why is it so special? Beyond the obvious deliciousness, it’s the feeling of accomplishment that comes with creating something so beautiful and satisfying from scratch. It’s the knowledge that you’re using fresh, wholesome ingredients to nourish yourself and your loved ones. And it’s the sheer joy of watching their faces light up as they take their first bite. That, my friends, is priceless.
Now, let’s talk about serving suggestions and variations, because the possibilities are endless! For a classic presentation, scoop the cherry ice cream into waffle cones or bowls and top with a dollop of whipped cream and a few extra cherries. If you’re feeling fancy, try serving it alongside a warm slice of cherry pie or a decadent chocolate brownie. The contrast of temperatures and textures is simply divine.
Looking for some fun variations? Consider adding a splash of Kirsch (cherry liqueur) to the ice cream base for an extra layer of flavor. Or, for a more sophisticated twist, stir in some chopped dark chocolate or toasted almonds. If you’re a fan of spice, a pinch of cinnamon or cardamom can add a warm and inviting note. And for those who prefer a vegan option, you can easily substitute the dairy milk and cream with coconut milk and cashew cream. The result will be just as creamy and delicious, with a subtle coconut flavor that complements the cherries beautifully.
Another fantastic idea is to use this cherry ice cream as the base for a milkshake or smoothie. Simply blend it with some milk or yogurt and your favorite toppings for a quick and easy treat. You can even add a scoop to your morning coffee for a decadent iced latte. The possibilities are truly endless!
I’m so excited for you to try this recipe and experience the magic of homemade cherry ice cream for yourself. It’s a labor of love, but trust me, it’s worth every single minute. The satisfaction of creating something so delicious and sharing it with those you care about is truly unparalleled.
So, what are you waiting for? Gather your ingredients, dust off your ice cream maker, and get ready to embark on a culinary adventure. I promise you won’t be disappointed. And when you do, please, please, please share your experience with me! I’d love to hear about your variations, your serving suggestions, and most importantly, the smiles on the faces of those who get to enjoy your homemade creation. Tag me in your photos on social media, leave a comment below, or send me an email. I can’t wait to see what you come up with! Happy ice cream making! I hope you enjoy this cherry ice cream as much as my family and I do.
Cherry Ice Cream: The Ultimate Guide to Homemade Bliss
Rich, creamy homemade cherry ice cream with fresh cherry flavor and a hint of almond. Macerated cherries create an intense taste.
Ingredients
- 1 pound fresh sweet cherries, pitted
- 1 cup granulated sugar, divided
- 2 cups heavy cream
- 1 cup whole milk
- 1 teaspoon vanilla extract
- 1/4 teaspoon almond extract (optional, but highly recommended!)
- Pinch of salt
- 2 tablespoons vodka or other neutral spirit (optional, to prevent ice crystals)
Instructions
- Pit 1 pound of fresh sweet cherries.
- In a medium bowl, combine the pitted cherries with ½ cup of the granulated sugar. Gently stir to coat the cherries evenly.
- Cover the bowl with plastic wrap and refrigerate for at least 2 hours, or overnight.
- Transfer the entire mixture (cherries and syrup) to a blender or food processor. Blend until completely smooth.
- Pour the cherry puree through a fine-mesh sieve into a clean bowl. Use a spatula to press the puree against the sieve, extracting as much liquid as possible. Discard the solids left in the sieve.
- In a medium saucepan, combine the heavy cream, whole milk, the remaining ½ cup of granulated sugar, and the pinch of salt. Whisk together until the sugar is mostly dissolved.
- Place the saucepan over medium heat. Stir frequently to prevent scorching.
- Once the sugar is dissolved and the mixture is warm (but not simmering), remove the saucepan from the heat. Stir in the vanilla extract and almond extract (if using).
- Pour the cream mixture into a bowl and cover it tightly with plastic wrap, pressing the plastic wrap directly onto the surface of the cream. Refrigerate for at least 4 hours, or preferably overnight.
- Once the cream base is thoroughly chilled, remove it from the refrigerator. Pour the chilled cherry puree into the cream base and whisk until well combined.
- If you’re using vodka (or another neutral spirit), now is the time to add it.
- Follow the manufacturer’s instructions for your ice cream maker.
- Pour the cherry-cream mixture into the prepared ice cream maker. Churn according to the manufacturer’s instructions until it has a soft-serve consistency.
- Gently transfer the soft-serve ice cream to an airtight container.
- Cover the container tightly and freeze for at least 2-3 hours, or overnight, to allow the ice cream to harden completely.
- Once the ice cream is frozen solid, let it sit at room temperature for a few minutes to soften slightly before scooping.
- Enjoy! Serve your homemade cherry ice cream in bowls or cones.
Notes
- Use high-quality ingredients for the best flavor.
- Chilling the bases thoroughly is crucial for a smooth texture.
- Don’t overchurn the ice cream.
- Experiment with different extracts or add-ins.
- Homemade ice cream is best enjoyed within a week or two. Store it in an airtight container in the freezer to prevent freezer burn.
- If ice cream is too icy, make sure to chill the bases for at least 4 hours, and don’t overchurn the ice cream. Adding a tablespoon or two of vodka can also help prevent ice crystals.
- If ice cream is too hard, let the ice cream sit at room temperature for a few minutes before scooping to soften it slightly.
- If ice cream is grainy, make sure to use high-quality ingredients and don’t overchurn the ice cream. Straining the cherry puree can also help prevent graininess.