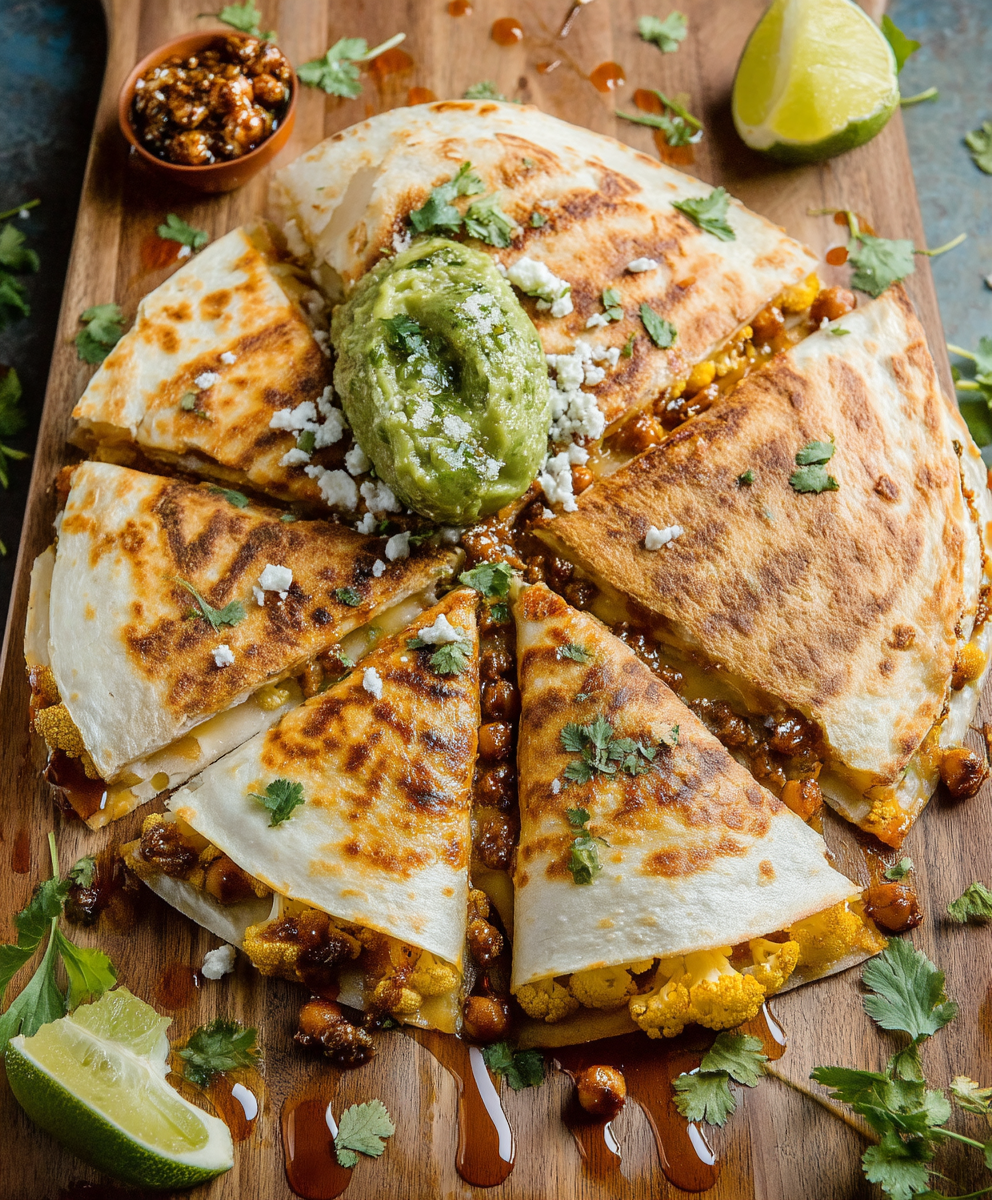
Chickpea cauliflower quesadilla: Prepare to have your taste buds tantalized! Forget everything you thought you knew about quesadillas because this vegetarian delight is about to redefine your lunch and dinner game. Imagine a warm, toasted tortilla overflowing with a savory, spiced chickpea and cauliflower filling, oozing with melted cheese. Sounds incredible, right?
Quesadillas, while often associated with Tex-Mex cuisine, have deep roots in Mexican culinary history. The word “quesadilla” itself comes from the Spanish word for “little cheesy thing.” While traditionally filled with cheese, regional variations have evolved over centuries, incorporating diverse ingredients and flavors. Our chickpea cauliflower quesadilla is a modern twist on this classic, embracing plant-based goodness without sacrificing any of the satisfying flavors and textures we crave.
What makes this particular quesadilla so irresistible? It’s the perfect balance of textures the slight crunch of the cauliflower, the creamy chickpeas, and the gooey cheese, all nestled within a perfectly crisped tortilla. The spices add a warm, comforting depth that elevates the dish beyond the ordinary. Plus, it’s incredibly convenient! Whether you’re looking for a quick weeknight meal or a satisfying lunch, this quesadilla comes together in minutes. Get ready to experience a flavor explosion that will leave you wanting more!

Ingredients:
- For the Chickpea Filling:
- 1 tablespoon olive oil
- 1 medium onion, finely chopped
- 2 cloves garlic, minced
- 1 teaspoon ground cumin
- 1/2 teaspoon chili powder
- 1/4 teaspoon smoked paprika
- 1/4 teaspoon turmeric powder
- 1 (15-ounce) can chickpeas, drained and rinsed
- 1/4 cup vegetable broth
- 1 tablespoon lime juice
- Salt and black pepper to taste
- For the Cauliflower Rice:
- 1 medium head of cauliflower, cut into florets
- 1 tablespoon olive oil
- 1/4 teaspoon salt
- 1/4 teaspoon black pepper
- For the Quesadillas:
- 8 large flour tortillas (whole wheat or gluten-free options work well)
- 2 cups shredded cheddar cheese (or vegan cheese alternative)
- Optional toppings: salsa, sour cream (or vegan sour cream), guacamole, cilantro
Preparing the Cauliflower Rice
- Prepare the Cauliflower: Start by washing the cauliflower florets thoroughly. Pat them dry with a clean kitchen towel. This helps them roast better and not steam.
- Pulse in a Food Processor: Place the cauliflower florets into a food processor. Pulse until the cauliflower is finely chopped and resembles rice. Be careful not to over-process it into a puree. You want distinct, small pieces. If you don’t have a food processor, you can use a box grater to grate the cauliflower into rice-like pieces.
- Sauté the Cauliflower Rice: Heat 1 tablespoon of olive oil in a large skillet over medium heat. Add the cauliflower rice, salt, and pepper. Sauté for about 5-7 minutes, or until the cauliflower rice is tender-crisp. Stir occasionally to prevent burning. You want it to be cooked through but still have a slight bite. Remove from the skillet and set aside.
Making the Chickpea Filling
- Sauté the Aromatics: Heat 1 tablespoon of olive oil in the same skillet over medium heat. Add the chopped onion and cook until softened and translucent, about 5 minutes. Add the minced garlic and cook for another minute until fragrant. Be careful not to burn the garlic, as it can become bitter.
- Add the Spices: Stir in the ground cumin, chili powder, smoked paprika, and turmeric powder. Cook for about 30 seconds, stirring constantly, until the spices are fragrant. This helps to bloom the spices and release their flavors.
- Incorporate the Chickpeas: Add the drained and rinsed chickpeas to the skillet. Mash some of the chickpeas with the back of a spoon or a potato masher. This helps to create a creamy texture in the filling. Don’t mash all of them; you want some whole chickpeas for texture.
- Simmer the Filling: Pour in the vegetable broth and bring the mixture to a simmer. Reduce the heat to low and cook for about 10 minutes, stirring occasionally, until the liquid has reduced and the filling has thickened slightly. This allows the flavors to meld together.
- Season and Finish: Stir in the lime juice, salt, and black pepper to taste. Adjust the seasoning as needed. The lime juice adds a bright, acidic note that balances the spices. Remove from heat and set aside.
Assembling and Cooking the Quesadillas
- Prepare the Tortillas: Lay out the flour tortillas on a clean work surface.
- Add Cheese: Sprinkle about 1/4 cup of shredded cheddar cheese (or vegan cheese) evenly over one half of each tortilla. Make sure to spread it out so that it melts evenly.
- Layer the Filling: Spoon about 1/4 cup of the chickpea filling over the cheese on each tortilla. Spread it out evenly.
- Add Cauliflower Rice: Top the chickpea filling with about 1/4 cup of the sautéed cauliflower rice. Distribute it evenly over the filling.
- More Cheese: Sprinkle another 1/4 cup of shredded cheese over the cauliflower rice. This helps to bind everything together and creates a cheesy, gooey quesadilla.
- Fold the Tortillas: Fold the other half of the tortilla over the filling to create a half-moon shape.
- Cook the Quesadillas: Heat a large skillet or griddle over medium heat. You can lightly grease the skillet with cooking spray or a small amount of olive oil to prevent sticking.
- Grill the Quesadillas: Place one or two quesadillas in the skillet at a time, being careful not to overcrowd the pan. Cook for about 3-4 minutes per side, or until the tortillas are golden brown and the cheese is melted and gooey. Use a spatula to gently press down on the quesadillas while they are cooking to ensure even browning and melting of the cheese.
- Repeat: Repeat the cooking process with the remaining quesadillas.
- Cut and Serve: Once the quesadillas are cooked, remove them from the skillet and place them on a cutting board. Let them cool slightly for a minute or two before cutting them into wedges. This helps prevent the filling from spilling out. Serve immediately with your favorite toppings, such as salsa, sour cream (or vegan sour cream), guacamole, and fresh cilantro.
Tips and Variations
- Spice Level: Adjust the amount of chili powder to control the spice level of the chickpea filling. For a milder flavor, use less chili powder or omit it altogether. For a spicier quesadilla, add a pinch of cayenne pepper or a dash of hot sauce to the filling.
- Cheese Options: Feel free to use your favorite type of cheese in these quesadillas. Monterey Jack, pepper jack, or a Mexican cheese blend would all be delicious. For a vegan option, use a vegan cheese alternative that melts well.
- Vegetable Variations: You can add other vegetables to the chickpea filling, such as diced bell peppers, corn, or black beans. Sauté the vegetables along with the onion and garlic.
- Protein Boost: For an extra boost of protein, add cooked chicken, ground beef, or shredded pork to the quesadillas.
- Make Ahead: The chickpea filling and cauliflower rice can be made ahead of time and stored in the refrigerator for up to 3 days. This makes it easy to assemble the quesadillas quickly when you’re ready to eat.
- Baking Option: If you prefer, you can bake the quesadillas in the oven. Preheat the oven to 375°F (190°C). Place the assembled quesadillas on a baking sheet lined with parchment paper. Bake for 10-12 minutes, or until the tortillas are golden brown and the cheese is melted.
- Serving Suggestions: Serve these chickpea cauliflower quesadillas as a main course for lunch or dinner. They also make a great appetizer or snack. Pair them with a side salad or a bowl of soup for a complete meal.
- Storage: Leftover quesadillas can be stored in the refrigerator for up to 2 days. Reheat them in a skillet or in the microwave until warmed through. They may not be as crispy as when they were freshly made, but they will still be delicious.
Enjoy your homemade Chickpea Cauliflower Quesadillas!
Conclusion:
This Chickpea Cauliflower Quesadilla isn’t just another vegetarian option; it’s a flavor explosion waiting to happen! Seriously, the combination of the subtly sweet roasted cauliflower, the hearty chickpeas, and that melty, cheesy goodness all wrapped in a warm tortilla is something you absolutely have to experience. I know, I know, I’m biased, but trust me on this one. It’s quick, it’s easy, and it’s a fantastic way to sneak in some extra veggies without sacrificing any flavor.
But what truly makes this quesadilla a must-try is its versatility. Feeling adventurous? Add a sprinkle of smoked paprika to the cauliflower before roasting for a deeper, richer flavor. Or, if you’re craving a little heat, a pinch of cayenne pepper or a drizzle of your favorite hot sauce will do the trick. For a truly decadent experience, try using a blend of cheeses Monterey Jack, cheddar, and a touch of pepper jack would be divine!
And the serving possibilities are endless! This quesadilla is perfect as a quick and satisfying lunch, a light dinner, or even a fun appetizer for your next gathering. Serve it with a dollop of sour cream or Greek yogurt, a scoop of guacamole, or a side of your favorite salsa. I personally love it with a simple cilantro-lime crema the bright, fresh flavors perfectly complement the savory filling. You could even cut it into smaller wedges and serve it as a party snack. Imagine the possibilities!
Beyond the basic recipe, consider these variations to truly make it your own. If you’re looking to add some protein, grilled chicken or black beans would be excellent additions. For a vegan version, simply use a plant-based cheese alternative and ensure your tortillas are vegan-friendly. You could also experiment with different vegetables roasted sweet potatoes, bell peppers, or even spinach would all work beautifully. Don’t be afraid to get creative and tailor the recipe to your own taste preferences.
I’ve poured my heart into perfecting this recipe, and I’m so excited for you to try it. I truly believe that this chickpea cauliflower quesadilla will become a new favorite in your household. It’s a simple, satisfying, and incredibly flavorful meal that’s perfect for any occasion.
So, what are you waiting for? Head to the kitchen, gather your ingredients, and get cooking! I promise you won’t be disappointed. And once you’ve had a chance to try it, I’d love to hear what you think! Share your photos and comments on social media using [Your Hashtag Here] I can’t wait to see your creations and hear about your own variations. Did you add a special spice? Did you try a different cheese? Did you serve it with a unique dipping sauce? Let me know! Your feedback is invaluable, and it helps me continue to create and share recipes that you’ll love. Happy cooking!
Chickpea Cauliflower Quesadilla: A Delicious & Healthy Recipe
Savory and satisfying quesadillas filled with spiced chickpeas, tender cauliflower rice, and melted cheese. A delicious and customizable vegetarian meal!
Ingredients
- 1 tablespoon olive oil
- 1 medium onion, finely chopped
- 2 cloves garlic, minced
- 1 teaspoon ground cumin
- 1/2 teaspoon chili powder
- 1/4 teaspoon smoked paprika
- 1/4 teaspoon turmeric powder
- 1 (15-ounce) can chickpeas, drained and rinsed
- 1/4 cup vegetable broth
- 1 tablespoon lime juice
- Salt and black pepper to taste
- 1 medium head of cauliflower, cut into florets
- 1 tablespoon olive oil
- 1/4 teaspoon salt
- 1/4 teaspoon black pepper
- 8 large flour tortillas (whole wheat or gluten-free options work well)
- 2 cups shredded cheddar cheese (or vegan cheese alternative)
- Optional toppings: salsa, sour cream (or vegan sour cream), guacamole, cilantro
Instructions
- Wash the cauliflower florets thoroughly. Pat them dry with a clean kitchen towel.
- Place the cauliflower florets into a food processor. Pulse until the cauliflower is finely chopped and resembles rice. Be careful not to over-process it into a puree. If you don’t have a food processor, you can use a box grater to grate the cauliflower into rice-like pieces.
- Heat 1 tablespoon of olive oil in a large skillet over medium heat. Add the cauliflower rice, salt, and pepper. Sauté for about 5-7 minutes, or until the cauliflower rice is tender-crisp. Stir occasionally to prevent burning. Remove from the skillet and set aside.
- Heat 1 tablespoon of olive oil in the same skillet over medium heat. Add the chopped onion and cook until softened and translucent, about 5 minutes. Add the minced garlic and cook for another minute until fragrant. Be careful not to burn the garlic.
- Stir in the ground cumin, chili powder, smoked paprika, and turmeric powder. Cook for about 30 seconds, stirring constantly, until the spices are fragrant.
- Add the drained and rinsed chickpeas to the skillet. Mash some of the chickpeas with the back of a spoon or a potato masher. Don’t mash all of them; you want some whole chickpeas for texture.
- Pour in the vegetable broth and bring the mixture to a simmer. Reduce the heat to low and cook for about 10 minutes, stirring occasionally, until the liquid has reduced and the filling has thickened slightly.
- Stir in the lime juice, salt, and black pepper to taste. Adjust the seasoning as needed. Remove from heat and set aside.
- Lay out the flour tortillas on a clean work surface.
- Sprinkle about 1/4 cup of shredded cheddar cheese (or vegan cheese) evenly over one half of each tortilla.
- Spoon about 1/4 cup of the chickpea filling over the cheese on each tortilla. Spread it out evenly.
- Top the chickpea filling with about 1/4 cup of the sautéed cauliflower rice. Distribute it evenly over the filling.
- Sprinkle another 1/4 cup of shredded cheese over the cauliflower rice.
- Fold the other half of the tortilla over the filling to create a half-moon shape.
- Heat a large skillet or griddle over medium heat. You can lightly grease the skillet with cooking spray or a small amount of olive oil to prevent sticking.
- Place one or two quesadillas in the skillet at a time, being careful not to overcrowd the pan. Cook for about 3-4 minutes per side, or until the tortillas are golden brown and the cheese is melted and gooey. Use a spatula to gently press down on the quesadillas while they are cooking to ensure even browning and melting of the cheese.
- Repeat the cooking process with the remaining quesadillas.
- Once the quesadillas are cooked, remove them from the skillet and place them on a cutting board. Let them cool slightly for a minute or two before cutting them into wedges. Serve immediately with your favorite toppings, such as salsa, sour cream (or vegan sour cream), guacamole, and fresh cilantro.
Notes
- Spice Level: Adjust the amount of chili powder to control the spice level of the chickpea filling. For a milder flavor, use less chili powder or omit it altogether. For a spicier quesadilla, add a pinch of cayenne pepper or a dash of hot sauce to the filling.
- Cheese Options: Feel free to use your favorite type of cheese in these quesadillas. Monterey Jack, pepper jack, or a Mexican cheese blend would all be delicious. For a vegan option, use a vegan cheese alternative that melts well.
- Vegetable Variations: You can add other vegetables to the chickpea filling, such as diced bell peppers, corn, or black beans. Sauté the vegetables along with the onion and garlic.
- Protein Boost: For an extra boost of protein, add cooked chicken, ground beef, or shredded pork to the quesadillas.
- Make Ahead: The chickpea filling and cauliflower rice can be made ahead of time and stored in the refrigerator for up to 3 days. This makes it easy to assemble the quesadillas quickly when you’re ready to eat.
- Baking Option: If you prefer, you can bake the quesadillas in the oven. Preheat the oven to 375°F (190°C). Place the assembled quesadillas on a baking sheet lined with parchment paper. Bake for 10-12 minutes, or until the tortillas are golden brown and the cheese is melted.
- Serving Suggestions: Serve these chickpea cauliflower quesadillas as a main course for lunch or dinner. They also make a great appetizer or snack. Pair them with a side salad or a bowl of soup for a complete meal.
- Storage: Leftover quesadillas can be stored in the refrigerator for up to 2 days. Reheat them in a skillet or in the microwave until warmed through. They may not be as crispy as when they were freshly made, but they will still be delicious.