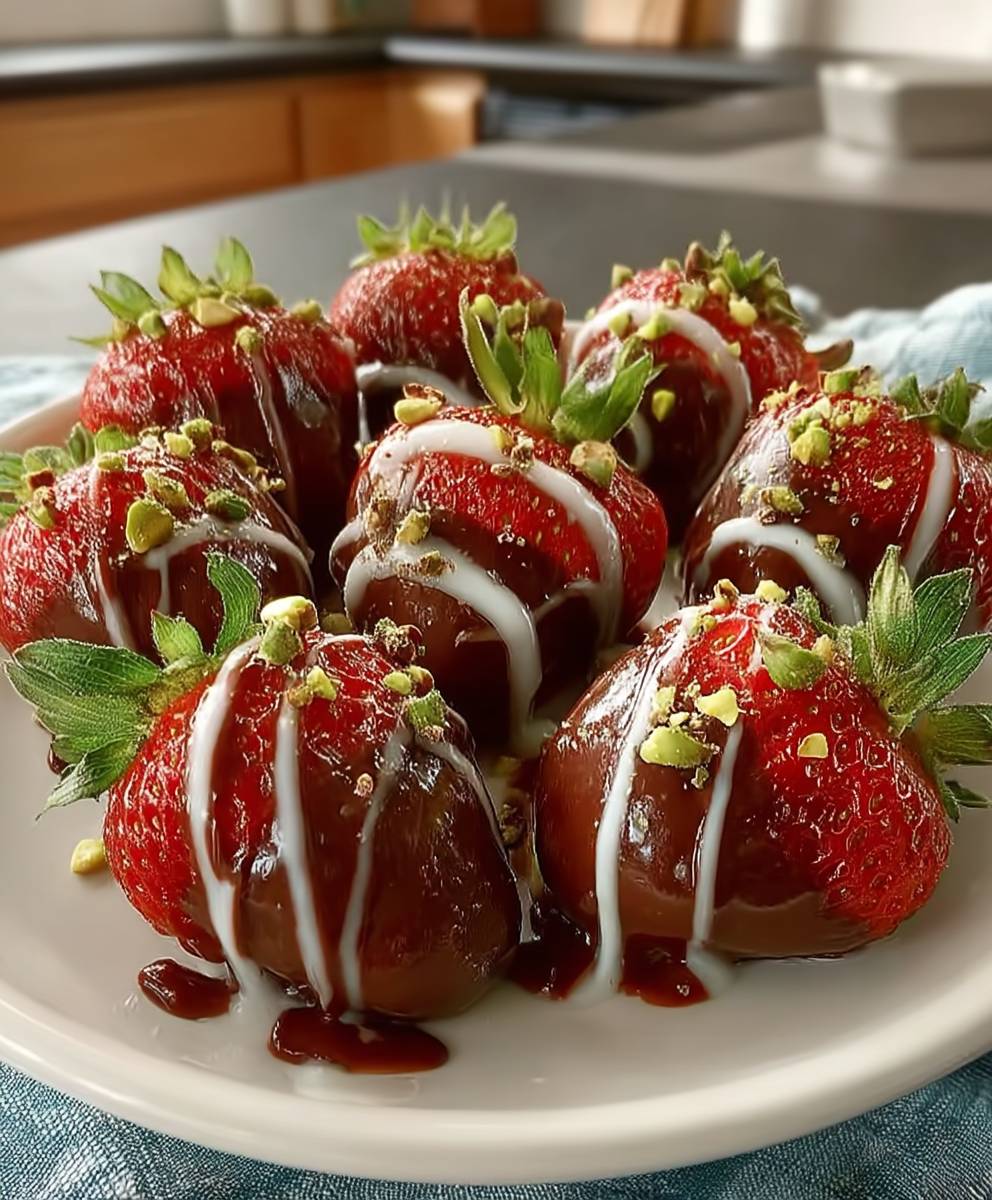
Chocolate Dipped Strawberries: Is there anything more romantic, more decadent, or simply more delightful than biting into a juicy, ripe strawberry encased in a shell of rich, smooth chocolate? I think not! These elegant treats are surprisingly easy to make at home, transforming ordinary strawberries into extraordinary indulgences.
While the exact origins of chocolate dipped strawberries are somewhat shrouded in mystery, their popularity exploded in the latter half of the 20th century, becoming a staple for Valentine’s Day, anniversaries, and other special occasions. The combination is a match made in culinary heaven, a perfect balance of sweet and slightly tart, creamy and crisp.
People adore this simple yet sophisticated dessert for so many reasons. The contrasting textures the snap of the chocolate against the soft, yielding fruit are incredibly satisfying. The flavor profile is universally appealing, and let’s be honest, they look absolutely stunning! Plus, they are incredibly versatile. You can customize them with different types of chocolate (dark, milk, white), add sprinkles, nuts, or even a drizzle of caramel for an extra touch of flair. Whether you’re looking for a show-stopping dessert to impress your guests or a quick and easy treat to satisfy your sweet tooth, chocolate dipped strawberries are always a winning choice. So, let’s get started and create some magic in the kitchen!

Ingredients:
- 1 pound fresh strawberries, preferably large and ripe
- 12 ounces high-quality chocolate (dark, milk, or white your choice!), chopped
- 1 tablespoon vegetable shortening or coconut oil (optional, for smoother chocolate)
- Optional toppings: chopped nuts, sprinkles, shredded coconut, sea salt, mini chocolate chips
Preparing the Chocolate:
- Choose Your Chocolate Wisely: The quality of your chocolate will significantly impact the final taste. I recommend using a good quality chocolate bar instead of chocolate chips, as they tend to melt more smoothly. Dark chocolate offers a rich, intense flavor, milk chocolate provides a classic sweetness, and white chocolate adds a creamy, delicate touch.
- Chop the Chocolate: Finely chop the chocolate into small, even pieces. This ensures that it melts evenly and quickly, preventing burning. I find that using a serrated knife works best for this.
- Melt the Chocolate Using a Double Boiler (My Preferred Method): Fill a saucepan with about an inch or two of water and bring it to a simmer over medium heat. Place a heat-safe bowl (glass or stainless steel) on top of the saucepan, ensuring that the bottom of the bowl doesn’t touch the water. Add the chopped chocolate to the bowl.
- Stir Gently and Patiently: As the chocolate begins to melt, stir it gently and continuously with a rubber spatula. Be patient and avoid the temptation to increase the heat, as this can cause the chocolate to seize up and become grainy.
- Add Shortening (Optional): Once the chocolate is almost completely melted, add the vegetable shortening or coconut oil. This will help to thin the chocolate slightly and give it a smoother, glossier finish. Stir until the shortening is fully incorporated.
- Remove from Heat: Once the chocolate is completely melted and smooth, remove the bowl from the heat and set it aside. Be careful not to get any water in the chocolate, as this can also cause it to seize.
Melting the Chocolate in the Microwave (Alternative Method):
- Microwave in Short Bursts: Place the chopped chocolate in a microwave-safe bowl. Microwave in 30-second intervals, stirring well after each interval.
- Stir Thoroughly: It’s crucial to stir the chocolate thoroughly after each interval, even if it doesn’t look like it’s melting yet. This helps to distribute the heat evenly and prevent burning.
- Add Shortening (Optional): Once the chocolate is almost completely melted, add the vegetable shortening or coconut oil. Stir until fully incorporated.
- Be Careful Not to Overheat: Continue microwaving in 15-second intervals, stirring well after each interval, until the chocolate is completely melted and smooth. Be very careful not to overheat the chocolate, as it can burn easily in the microwave.
Preparing the Strawberries:
- Wash and Dry the Strawberries: Gently wash the strawberries under cool running water to remove any dirt or debris. Be careful not to soak them for too long, as they can become waterlogged.
- Dry Thoroughly: This is the most important step! Use paper towels to thoroughly dry the strawberries. Any moisture on the strawberries will prevent the chocolate from adhering properly. I like to lay them out on a clean kitchen towel for a few minutes to air dry as well.
- Leave the Green Hulls On (Optional): You can leave the green hulls (the leafy part at the top) on the strawberries for a decorative touch and to provide a convenient handle for dipping. However, if you prefer, you can remove them. If you remove them, make sure to dry the top of the strawberry very well.
Dipping the Strawberries:
- Prepare Your Work Station: Line a baking sheet with parchment paper or wax paper. This will prevent the dipped strawberries from sticking to the surface.
- Hold the Strawberry by the Hull or Stem: Hold a strawberry by the green hull (if you left it on) or by the stem.
- Dip into the Melted Chocolate: Dip the strawberry into the melted chocolate, swirling it gently to coat it completely or partially, depending on your preference. I like to dip them about two-thirds of the way up.
- Remove Excess Chocolate: Gently lift the strawberry out of the chocolate and allow any excess chocolate to drip back into the bowl. You can also gently tap the strawberry against the side of the bowl to remove excess chocolate.
- Place on Prepared Baking Sheet: Place the dipped strawberry on the prepared baking sheet.
- Repeat with Remaining Strawberries: Repeat the dipping process with the remaining strawberries.
Adding Toppings (Optional):
- Sprinkle Toppings Immediately: If you want to add toppings, such as chopped nuts, sprinkles, shredded coconut, or sea salt, sprinkle them onto the dipped strawberries immediately after dipping, while the chocolate is still wet.
- Get Creative with Toppings: Don’t be afraid to get creative with your toppings! You can use a variety of different toppings to create a visually appealing and delicious assortment of dipped strawberries.
- Drizzle with Contrasting Chocolate: Another fun option is to drizzle the dipped strawberries with a contrasting color of melted chocolate. For example, you could drizzle dark chocolate-dipped strawberries with white chocolate, or vice versa.
Setting the Chocolate:
- Refrigerate to Set: Place the baking sheet with the dipped strawberries in the refrigerator for about 15-20 minutes, or until the chocolate is firm and set.
- Don’t Over-Chill: Be careful not to over-chill the strawberries, as this can cause the chocolate to become dull and lose its shine.
Serving and Storing:
- Serve Immediately or Store: Serve the chocolate-dipped strawberries immediately for the best taste and texture.
- Store Properly: If you’re not serving them immediately, store them in an airtight container in the refrigerator for up to 24 hours. Keep in mind that the strawberries may release some moisture over time, which can affect the texture of the chocolate.
- Bring to Room Temperature (Optional): Before serving, you can let the strawberries sit at room temperature for a few minutes to soften the chocolate slightly.
Conclusion:
And there you have it! I truly believe these chocolate dipped strawberries are more than just a treat; they’re an experience. From the satisfying snap of the chocolate to the burst of juicy sweetness from the strawberry, every bite is pure bliss. If you’re looking for a simple yet elegant dessert that’s guaranteed to impress, look no further. This recipe is a must-try for so many reasons. First, it’s incredibly easy and quick to make, perfect for those last-minute cravings or when you need a show-stopping dessert without spending hours in the kitchen. Second, it’s endlessly customizable. You can use different types of chocolate dark, milk, white, or even ruby chocolate for a vibrant pink hue and a slightly fruity flavor. You can also experiment with different toppings, from chopped nuts and sprinkles to shredded coconut and sea salt.
But the best reason to try this recipe? It’s simply delicious! The combination of rich, decadent chocolate and fresh, sweet strawberries is a classic for a reason. It’s a crowd-pleaser that’s perfect for any occasion, from romantic date nights to casual gatherings with friends and family.
Serving Suggestions and Variations:
Don’t be afraid to get creative with your chocolate dipped strawberries! Here are a few ideas to get you started:
* Elegant Dessert Platter: Arrange your dipped strawberries on a beautiful platter with other fruits, cheeses, and crackers for a stunning dessert display.
* Romantic Gift: Package them in a decorative box or basket for a thoughtful and delicious gift for your loved one.
* Party Favors: Individually wrap them in cellophane bags and tie with ribbon for elegant party favors.
* Chocolate Variety: Use a combination of dark, milk, and white chocolate for a visually appealing and flavorful assortment.
* Nutty Delight: Dip the strawberries in chopped nuts like almonds, pecans, or walnuts for added texture and flavor.
* Sprinkle Magic: Roll the dipped strawberries in colorful sprinkles for a festive touch.
* Coconut Dream: Coat them in shredded coconut for a tropical twist.
* Sea Salt Sensation: Sprinkle a pinch of sea salt on the chocolate before it sets for a sweet and salty flavor combination.
* Stuffed Strawberries: Core the strawberries before dipping and fill them with cream cheese frosting or Nutella for an extra indulgent treat.
* Boozy Berries: Add a splash of liqueur, such as Grand Marnier or Chambord, to the melted chocolate for a sophisticated flavor.
I’m confident that you’ll love this recipe as much as I do. It’s a simple yet satisfying treat that’s perfect for any occasion. So, gather your ingredients, melt your chocolate, and get ready to create some delicious memories.
I can’t wait to hear about your experience making these chocolate dipped strawberries! Did you try any of the variations I suggested? Did you come up with your own unique toppings? Please share your photos and stories in the comments below. I’m always looking for new and exciting ways to enjoy this classic dessert. Happy dipping! Let me know if you have any questions, and I’ll do my best to help. Enjoy!
Chocolate Dipped Strawberries: The Ultimate Guide to Making Them Perfect
Easy, delicious chocolate-covered strawberries! Perfect for a romantic treat or simple dessert. Customize with your favorite chocolate and toppings.
Ingredients
- 1 pound fresh strawberries, preferably large and ripe
- 12 ounces high-quality chocolate (dark, milk, or white your choice!), chopped
- 1 tablespoon vegetable shortening or coconut oil (optional, for smoother chocolate)
- Optional toppings: chopped nuts, sprinkles, shredded coconut, sea salt, mini chocolate chips
Instructions
- Prepare the Chocolate: Choose high-quality chocolate. Chop finely. Melt using a double boiler (preferred) or microwave. For double boiler: Simmer water in a saucepan, place a heat-safe bowl on top (not touching the water), add chocolate, and stir gently until melted. For microwave: Microwave in 30-second intervals, stirring well after each, until almost melted. Add shortening (optional) for smoother chocolate. Remove from heat when melted and smooth.
- Prepare the Strawberries: Gently wash and thoroughly dry the strawberries. Leave green hulls on for a decorative touch and handle, or remove them. If removing, dry the top of the strawberry very well.
- Dipping the Strawberries: Line a baking sheet with parchment or wax paper. Hold a strawberry by the hull or stem. Dip into the melted chocolate, swirling to coat. Remove excess chocolate by tapping against the bowl. Place on the prepared baking sheet. Repeat with remaining strawberries.
- Adding Toppings (Optional): Sprinkle toppings (nuts, sprinkles, coconut, sea salt, etc.) onto the dipped strawberries immediately after dipping, while the chocolate is still wet.
- Setting the Chocolate: Refrigerate the baking sheet with dipped strawberries for 15-20 minutes, or until the chocolate is firm.
- Serving and Storing: Serve immediately. If storing, keep in an airtight container in the refrigerator for up to 24 hours. Bring to room temperature slightly before serving (optional).
Notes
- The quality of the chocolate significantly impacts the final taste. Use a good quality chocolate bar instead of chocolate chips for smoother melting.
- Thoroughly drying the strawberries is crucial for the chocolate to adhere properly.
- Be careful not to overheat the chocolate, especially in the microwave, as it can burn easily.
- Get creative with toppings to create a visually appealing and delicious assortment.
- Don’t over-chill the strawberries, as this can cause the chocolate to become dull.