Chocolate Milkshake: the quintessential dessert beverage that brings back childhood memories with every sip! Forget complicated recipes and fancy ingredients; we’re diving into the creamy, dreamy world of the perfect chocolate milkshake, a treat so simple, yet so satisfying. Have you ever craved that rich, chocolatey indulgence that instantly transports you to a happy place? Well, look no further!
While the exact origins of the milkshake are debated, its modern form, featuring ice cream, gained popularity in the early 1900s. It quickly became a soda fountain staple, a symbol of American culture, and a beloved treat enjoyed worldwide. The beauty of a chocolate milkshake lies in its versatility. It’s not just a drink; it’s a blank canvas for your creativity. Add a swirl of whipped cream, a sprinkle of chocolate shavings, or a drizzle of caramel for an extra touch of decadence.
People adore chocolate milkshakes for their irresistible combination of flavors and textures. The smooth, cold creaminess, the intense chocolatey sweetness, and the sheer joy of slurping it all up make it a timeless favorite. It’s quick to make, requires minimal effort, and is guaranteed to put a smile on your face. Whether you’re looking for a refreshing summer treat or a comforting indulgence on a chilly evening, the chocolate milkshake is always the answer. So, grab your blender, your favorite ice cream, and let’s whip up some happiness!

Ingredients:
- 1 ½ cups vanilla ice cream, good quality
- ½ cup milk (whole milk recommended for richness, but any kind works)
- ¼ cup chocolate syrup (adjust to taste)
- 2 tablespoons unsweetened cocoa powder (for a deeper chocolate flavor)
- 1 teaspoon vanilla extract
- Pinch of salt (enhances the sweetness)
- Whipped cream, for topping (optional)
- Chocolate shavings or sprinkles, for garnish (optional)
- Maraschino cherry, for garnish (optional)
- Ice cubes (optional, for a thicker shake)
Preparing the Chocolate Milkshake
- Chill Your Glass: Before you even start making the milkshake, pop your serving glass into the freezer for about 10-15 minutes. A cold glass will keep your milkshake colder for longer and prevent it from melting too quickly. This is a simple step that makes a big difference!
- Gather Your Ingredients: Make sure you have all your ingredients measured out and ready to go. This will make the process smoother and prevent you from having to stop mid-shake to search for something. Trust me, it’s worth the extra minute of prep!
- Combine the Ice Cream and Milk: In a blender, add the vanilla ice cream and milk. I like to use a high-powered blender for the smoothest results, but any blender will work. If your ice cream is very hard, let it sit out for a few minutes to soften slightly before adding it to the blender. This will prevent your blender from struggling.
- Add the Chocolate Goodness: Pour in the chocolate syrup and sprinkle in the cocoa powder. Don’t be afraid to experiment with the amount of chocolate syrup to achieve your desired level of sweetness and chocolate intensity. If you prefer a richer, darker chocolate flavor, you can add a bit more cocoa powder.
- Enhance the Flavor: Add the vanilla extract and a pinch of salt. The vanilla extract enhances the overall flavor profile, while the salt helps to balance the sweetness and bring out the chocolate flavor. It might seem counterintuitive to add salt to a sweet treat, but trust me, it works wonders!
- Blend Until Smooth: Secure the lid on your blender and blend until the milkshake is smooth and creamy. Start on a low speed and gradually increase to a higher speed. If the milkshake is too thick, add a little more milk, one tablespoon at a time, until you reach your desired consistency. If it’s too thin, add a few ice cubes and blend again.
- Check the Consistency: Once the milkshake is blended, check the consistency. It should be thick enough to hold its shape but thin enough to drink easily through a straw. If it’s too thick, add a splash more milk. If it’s too thin, add a scoop of ice cream and blend again.
- Taste and Adjust: Give the milkshake a taste and adjust the sweetness or chocolate flavor as needed. If it’s not sweet enough, add a little more chocolate syrup. If it’s not chocolatey enough, add a little more cocoa powder. Remember, you can always add more, but you can’t take it away!
Serving and Garnishing
- Pour into the Chilled Glass: Carefully pour the milkshake into your chilled glass. The cold glass will help to keep the milkshake cold and prevent it from melting too quickly.
- Add Whipped Cream (Optional): If you’re using whipped cream, top the milkshake with a generous dollop. I prefer homemade whipped cream, but store-bought is perfectly fine too.
- Garnish with Chocolate: Sprinkle chocolate shavings or sprinkles over the whipped cream. This adds a touch of elegance and enhances the chocolate flavor. You can use dark chocolate, milk chocolate, or even white chocolate shavings.
- Add a Cherry on Top (Optional): Place a maraschino cherry on top of the whipped cream. This is a classic milkshake garnish that adds a pop of color and a touch of sweetness.
- Serve Immediately: Serve the milkshake immediately and enjoy! Milkshakes are best enjoyed fresh, before they start to melt.
Tips and Variations
- Use High-Quality Ingredients: The quality of your ingredients will directly impact the taste of your milkshake. Use good quality vanilla ice cream, chocolate syrup, and cocoa powder for the best results.
- Adjust the Sweetness: Adjust the amount of chocolate syrup to achieve your desired level of sweetness. If you prefer a less sweet milkshake, use less chocolate syrup. If you prefer a sweeter milkshake, use more chocolate syrup.
- Add a Shot of Espresso: For a mocha milkshake, add a shot of espresso to the blender along with the other ingredients. This will add a boost of caffeine and a rich coffee flavor.
- Make it Vegan: To make a vegan chocolate milkshake, use vegan ice cream and plant-based milk. There are many delicious vegan ice cream options available, such as coconut-based, almond-based, and soy-based ice creams.
- Add Peanut Butter: For a peanut butter chocolate milkshake, add a tablespoon or two of peanut butter to the blender along with the other ingredients. This will add a creamy, nutty flavor that pairs perfectly with chocolate.
- Use Different Flavors of Ice Cream: Experiment with different flavors of ice cream to create unique and exciting milkshake variations. For example, you could use chocolate ice cream for a double chocolate milkshake, or mint chocolate chip ice cream for a mint chocolate milkshake.
- Add a Cookie: Crumble a cookie into the blender for added texture and flavor. Chocolate chip cookies, Oreo cookies, or even peanut butter cookies would all be delicious additions.
- Make it Boozy: For an adult milkshake, add a shot of your favorite liquor to the blender. Chocolate liqueur, rum, or even bourbon would all be delicious additions.
- Get Creative with Garnishes: Don’t be afraid to get creative with your garnishes. Use different types of sprinkles, chocolate chips, or even pieces of candy. You could also drizzle chocolate syrup or caramel sauce over the top of the milkshake.
- Make it a Float: Pour the milkshake into a glass and top with a scoop of ice cream and a splash of soda. Root beer, cola, or even orange soda would all be delicious choices.
- For a Thicker Shake: If you want a really thick milkshake, freeze your ice cream for at least 30 minutes before making the shake. You can also add a few ice cubes to the blender.
- For a Thinner Shake: If you want a thinner milkshake, use more milk. You can also let the milkshake sit out for a few minutes to soften before serving.
- Make it Ahead: You can make the milkshake ahead of time and store it in the freezer. When you’re ready to serve, let it thaw for a few minutes before blending it again.
Troubleshooting
- Milkshake is Too Thick: If your milkshake is too thick, add a little more milk, one tablespoon at a time, until you reach your desired consistency.
- Milkshake is Too Thin: If your milkshake is too thin, add a scoop of ice cream and blend again. You can also add a few ice cubes to the blender.
- Milkshake is Not Sweet Enough: If your milkshake is not sweet enough, add a little more chocolate syrup.
- Milkshake is Not Chocolatey Enough: If your milkshake is not chocolatey enough, add a little more cocoa powder.
- Blender is Struggling: If your blender is struggling to blend the ingredients, try softening the ice cream slightly before adding it to the blender. You can also add a little milk to help the blender along.

Conclusion:
So there you have it! This isn’t just any chocolate milkshake; it’s a decadent, creamy, and utterly irresistible treat that’s guaranteed to satisfy your sweet tooth. I truly believe this is a must-try recipe for anyone who loves chocolate, ice cream, or simply a delicious and refreshing beverage. The rich, intense chocolate flavor combined with the smooth, velvety texture makes it a truly unforgettable experience. But why is this particular recipe so special? It’s all about the quality of the ingredients and the simple, straightforward method. Using high-quality cocoa powder and premium vanilla ice cream makes all the difference in the world. And the best part? It takes only minutes to whip up! Forget those overly sweet, artificial-tasting milkshakes from fast-food restaurants. This homemade version is far superior in every way. Now, let’s talk about serving suggestions and variations because the possibilities are endless! For a truly indulgent experience, top your chocolate milkshake with a generous dollop of whipped cream, a sprinkle of chocolate shavings, and a maraschino cherry. You could also drizzle some chocolate syrup around the inside of the glass before pouring in the milkshake for an extra touch of elegance. Feeling adventurous? Try adding a shot of espresso for a mocha-flavored milkshake that will give you a caffeine boost along with your sugar rush. Or, for a more adult-friendly version, add a splash of your favorite liqueur, such as Kahlua or Baileys Irish Cream. Peanut butter lovers can add a spoonful of peanut butter to the blender for a Reese’s-inspired treat. And if you’re looking for a lighter option, you can substitute the whole milk with almond milk or oat milk. Another fun variation is to add some crushed Oreos to the blender for a cookies and cream milkshake. Or, for a more festive treat, add some peppermint extract and crushed candy canes during the holiday season. The beauty of this recipe is that it’s so versatile and easy to customize to your own personal preferences. Don’t be afraid to experiment and get creative! Try different combinations of flavors and toppings until you find your perfect chocolate milkshake concoction. I’m confident that you’ll be amazed at how easy it is to create a truly exceptional milkshake at home. I’m so excited for you to try this recipe! I know you’re going to love it as much as I do. It’s the perfect treat for a hot summer day, a cozy night in, or any time you’re craving something sweet and satisfying. So, what are you waiting for? Gather your ingredients, dust off your blender, and get ready to indulge in the most delicious chocolate milkshake you’ve ever tasted. And most importantly, don’t forget to share your experience with me! I’d love to hear what you think of the recipe and any variations you try. Leave a comment below and let me know how it turns out. Happy blending! I can’t wait to see your creations and hear all about your chocolate milkshake adventures! Print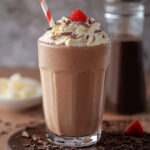
Chocolate Milkshake: The Ultimate Guide to a Perfect Shake
- Total Time: 7 minutes
- Yield: 1 serving 1x
Description
Indulge in a classic, creamy chocolate milkshake! This easy recipe uses simple ingredients to create a rich and satisfying treat, perfect for any occasion. Customize it with your favorite toppings and variations for a truly personalized experience.
Ingredients
- 1 1/2 cups vanilla ice cream, good quality
- 1/2 cup milk (whole milk recommended for richness, but any kind works)
- 1/4 cup chocolate syrup (adjust to taste)
- 2 tablespoons unsweetened cocoa powder (for a deeper chocolate flavor)
- 1 teaspoon vanilla extract
- Pinch of salt (enhances the sweetness)
- Whipped cream, for topping (optional)
- Chocolate shavings or sprinkles, for garnish (optional)
- Maraschino cherry, for garnish (optional)
- Ice cubes (optional, for a thicker shake)
Instructions
- Chill Your Glass: Place your serving glass in the freezer for 10-15 minutes.
- Gather Ingredients: Measure out all ingredients.
- Combine Ice Cream and Milk: In a blender, add vanilla ice cream and milk.
- Add Chocolate Goodness: Pour in chocolate syrup and sprinkle in cocoa powder.
- Enhance the Flavor: Add vanilla extract and a pinch of salt.
- Blend Until Smooth: Secure the lid and blend until smooth and creamy. If too thick, add milk; if too thin, add ice cubes.
- Check Consistency: Adjust with milk or ice cream as needed.
- Taste and Adjust: Add more chocolate syrup or cocoa powder to taste.
- Pour into Chilled Glass: Carefully pour the milkshake into the chilled glass.
- Add Whipped Cream (Optional): Top with whipped cream.
- Garnish with Chocolate: Sprinkle chocolate shavings or sprinkles.
- Add a Cherry on Top (Optional): Place a maraschino cherry on top.
- Serve Immediately: Enjoy!
Notes
- Use high-quality ingredients for the best flavor.
- Adjust the amount of chocolate syrup to your desired sweetness.
- For a mocha milkshake, add a shot of espresso.
- Make it vegan with vegan ice cream and plant-based milk.
- Add peanut butter for a peanut butter chocolate milkshake.
- Experiment with different ice cream flavors.
- Crumble a cookie into the blender for added texture.
- For an adult milkshake, add a shot of your favorite liquor.
- Get creative with garnishes.
- Make it a float by topping with ice cream and soda.
- For a thicker shake, freeze the ice cream beforehand or add ice cubes.
- For a thinner shake, use more milk.
- Make it ahead and store in the freezer.
- Prep Time: 5 minutes
- Cook Time: 2 minutes