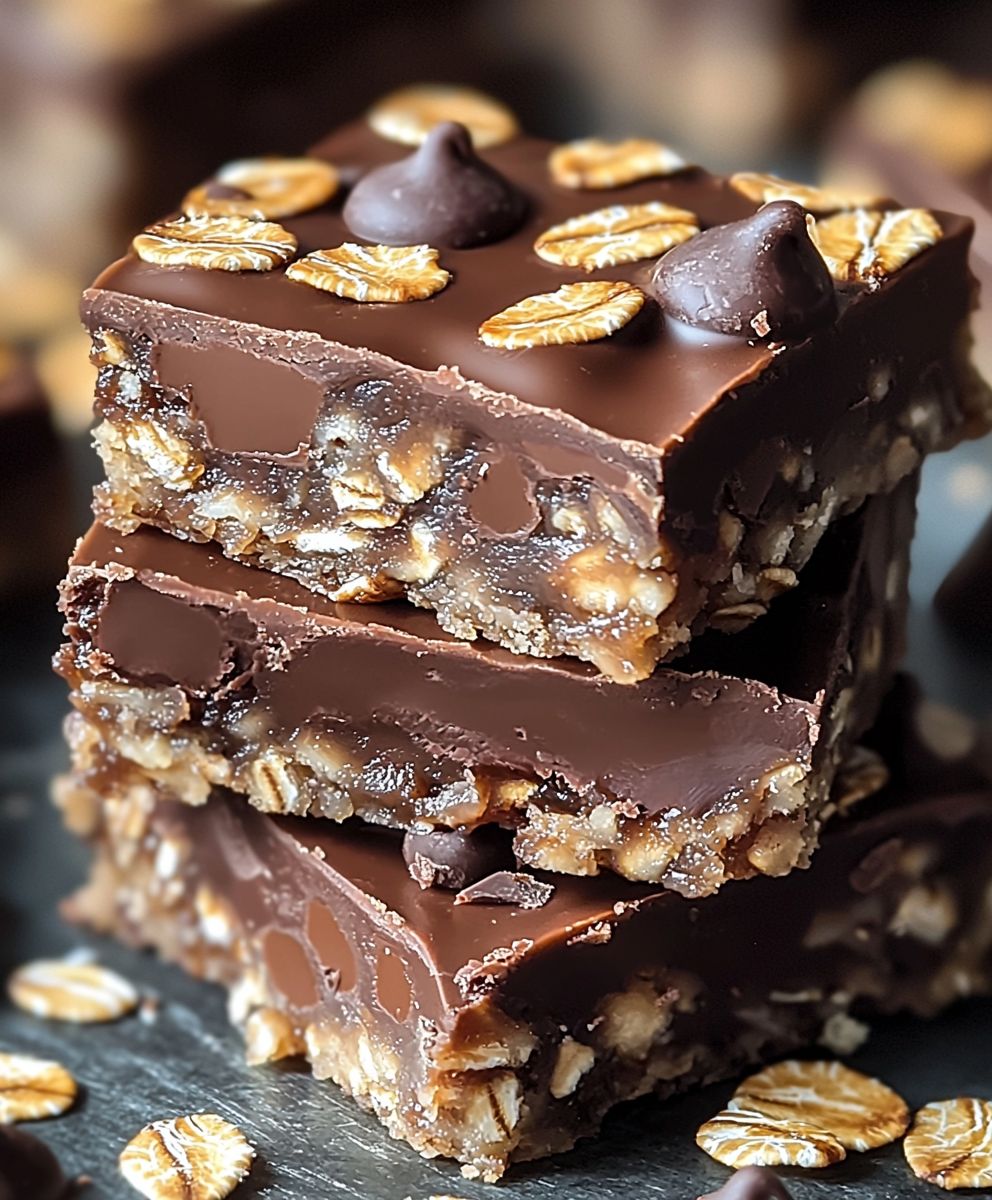
Chocolate Oat Bars: Prepare to be captivated by a symphony of textures and flavors! Imagine sinking your teeth into a chewy, wholesome oat base, perfectly complemented by a rich, decadent layer of chocolate. These aren’t just any bars; they’re a delightful treat that satisfies your sweet cravings while offering a touch of wholesome goodness.
Oat-based desserts have a long and comforting history, often associated with home-baked goodness and simple pleasures. From Scottish oatcakes to American granola bars, oats have consistently proven their versatility in the baking world. These Chocolate Oat Bars build upon that tradition, adding a layer of irresistible chocolate indulgence.
What makes these bars so universally loved? It’s the perfect balance! The hearty, slightly nutty flavor of the oats provides a grounding base, while the smooth, melting chocolate offers a luxurious contrast. The chewy texture is incredibly satisfying, and the bars are conveniently portable, making them ideal for lunchboxes, afternoon snacks, or a quick energy boost on the go. Plus, they’re surprisingly easy to make, requiring minimal ingredients and effort. Get ready to experience a truly delightful treat that will quickly become a family favorite!

Ingredients:
- 1 cup (2 sticks) unsalted butter, softened
- 1 cup packed light brown sugar
- 1/2 cup granulated sugar
- 2 large eggs
- 1 teaspoon vanilla extract
- 1 1/2 cups all-purpose flour
- 1 teaspoon baking soda
- 1/2 teaspoon salt
- 3 cups rolled oats (not instant)
- 1 cup semi-sweet chocolate chips
Preparing the Oat Base:
Okay, let’s get started with the foundation of these delicious Chocolate Oat Bars the oat base! This part is super important because it gives the bars their chewy texture and that classic oat-y flavor we all love.
- Cream the Butter and Sugars: First things first, grab a large mixing bowl. If you have a stand mixer, that’s awesome, but a hand mixer works just as well. Add the softened butter, brown sugar, and granulated sugar to the bowl. Now, cream them together until the mixture is light and fluffy. This usually takes about 3-5 minutes. Don’t rush this step! The fluffier the butter and sugar mixture, the better the texture of your bars will be. You’re looking for a pale, almost whipped consistency. Scrape down the sides of the bowl occasionally to make sure everything is evenly combined.
- Incorporate the Eggs and Vanilla: Once the butter and sugar are nicely creamed, add the eggs one at a time, mixing well after each addition. This ensures that each egg is fully incorporated into the batter. Then, stir in the vanilla extract. The vanilla adds a lovely warmth and enhances the chocolate flavor later on. Give it a good mix until everything is smooth and well combined.
- Combine Dry Ingredients: In a separate medium-sized bowl, whisk together the flour, baking soda, and salt. Whisking is important because it helps to evenly distribute the baking soda and salt throughout the flour, which will ensure that the bars rise properly and have a balanced flavor. If you don’t have a whisk, you can use a fork, just make sure to stir really well.
- Gradually Add Dry Ingredients to Wet Ingredients: Now, slowly add the dry ingredients to the wet ingredients, mixing on low speed until just combined. Be careful not to overmix! Overmixing can develop the gluten in the flour, which will result in tough bars. Mix until you no longer see streaks of flour, but don’t keep mixing after that.
- Stir in the Oats and Chocolate Chips: Finally, gently fold in the rolled oats and chocolate chips. Make sure the oats are evenly distributed throughout the batter. And don’t be shy with the chocolate chips! You want every bite to be chocolaty and delicious. Use a spatula to fold them in, being careful not to overmix.
Baking the Chocolate Oat Bars:
Now comes the fun part baking! This is where the magic happens and all those delicious ingredients transform into golden-brown, chewy Chocolate Oat Bars.
- Prepare the Baking Pan: Preheat your oven to 350°F (175°C). While the oven is preheating, grease a 9×13 inch baking pan. You can use butter, cooking spray, or line the pan with parchment paper. Lining with parchment paper makes it super easy to lift the bars out of the pan after they’ve cooled. If you use parchment paper, leave some overhang on the sides to use as handles.
- Press the Dough into the Pan: Transfer the oat mixture to the prepared baking pan. Use your hands or the back of a spoon to evenly spread the dough across the bottom of the pan. Press it down firmly to create a compact layer. This will help the bars hold their shape and prevent them from crumbling.
- Bake to Golden Perfection: Bake for 25-30 minutes, or until the edges are golden brown and the center is set. The bars should be slightly firm to the touch. Keep a close eye on them, as baking times can vary depending on your oven. If the edges start to brown too quickly, you can tent the pan with foil to prevent them from burning.
- Cool Completely: Once the bars are baked, remove them from the oven and let them cool completely in the pan before cutting. This is crucial! If you try to cut them while they’re still warm, they’ll be too soft and will fall apart. Cooling allows the bars to firm up and makes them much easier to slice. I usually let them cool for at least an hour, or even longer if I have the time.
Cutting and Serving:
Almost there! Now that your Chocolate Oat Bars are cooled, it’s time to cut them into squares and enjoy. This is the best part, right?
- Cut into Squares: Once the bars are completely cool, use a sharp knife to cut them into squares. The size of the squares is up to you! I usually cut them into about 2-inch squares, but you can make them smaller or larger depending on your preference. If you lined the pan with parchment paper, you can simply lift the bars out of the pan using the overhang and then cut them on a cutting board.
- Serve and Enjoy: Serve the Chocolate Oat Bars at room temperature. They’re delicious on their own, but you can also serve them with a scoop of vanilla ice cream or a glass of cold milk. They’re perfect for a snack, dessert, or even a quick breakfast on the go.
- Storage: Store the leftover Chocolate Oat Bars in an airtight container at room temperature for up to 3-4 days. They’ll stay fresh longer if you keep them in a cool, dry place. You can also freeze them for up to 2 months. Just wrap them individually in plastic wrap and then place them in a freezer bag. When you’re ready to eat them, let them thaw at room temperature for a few hours.
Tips and Variations:
Want to take your Chocolate Oat Bars to the next level? Here are a few tips and variations to try:
- Add Nuts: Add 1/2 cup of chopped nuts, such as walnuts, pecans, or almonds, to the batter for added crunch and flavor.
- Use Different Chocolate: Experiment with different types of chocolate chips, such as dark chocolate, milk chocolate, or white chocolate. You can even use a combination of different chocolates.
- Add Dried Fruit: Add 1/2 cup of dried fruit, such as raisins, cranberries, or chopped apricots, to the batter for a chewy and fruity twist.
- Spice it Up: Add 1/2 teaspoon of ground cinnamon or nutmeg to the batter for a warm and cozy flavor.
- Make it Gluten-Free: Use a gluten-free all-purpose flour blend to make these bars gluten-free. Just make sure to use a blend that’s designed for baking.
- Add a Glaze: Drizzle the cooled bars with a simple glaze made from powdered sugar and milk for a sweet and decorative touch.
Troubleshooting:
Sometimes things don’t go exactly as planned in the kitchen. Here are a few common problems and how to fix them:
- Bars are too dry: Make sure you’re using the correct amount of butter and eggs. Also, be careful not to overbake the bars.
- Bars are too crumbly: Make sure you’re pressing the dough firmly into the pan. Also, let the bars cool completely before cutting them.
- Bars are too hard: You may have overmixed the batter. Be careful not to overmix when adding the dry ingredients.
- Bars are not rising: Make sure your baking soda is fresh. Also, be careful not to overmix the batter.
Enjoy!
I hope you enjoy making and eating these delicious Chocolate Oat Bars! They’re a classic treat that’s perfect for any occasion. Happy baking!
Conclusion:
And there you have it! These Chocolate Oat Bars are more than just a dessert; they’re a delightful experience waiting to happen. From the satisfying chewiness of the oats to the rich, decadent chocolate, every bite is a little piece of heaven. I truly believe this recipe is a must-try for anyone who loves a good homemade treat, and here’s why: it’s incredibly easy to make, uses simple ingredients you probably already have in your pantry, and delivers a flavor explosion that will leave you wanting more. But the best part? It’s endlessly adaptable! Feel free to get creative with your serving suggestions and variations. For a truly indulgent experience, try serving these bars warm with a scoop of vanilla ice cream and a drizzle of chocolate sauce. The contrast of the warm, gooey bar with the cold, creamy ice cream is simply divine. Or, if you’re looking for a lighter option, these bars are fantastic on their own with a cup of coffee or tea. They’re also perfect for packing in lunchboxes or taking on picnics. Looking to switch things up? Consider adding a handful of chopped nuts, like walnuts or pecans, to the oat mixture for extra crunch and flavor. A sprinkle of sea salt on top before baking will enhance the sweetness of the chocolate and create a wonderful salty-sweet combination. For a more festive twist, you could even add dried cranberries or cherries. If you’re feeling adventurous, try using different types of chocolate, like dark chocolate or white chocolate chips, to create your own unique flavor profile. You could even swirl in some peanut butter for a chocolate peanut butter dream! The possibilities are truly endless. These Chocolate Oat Bars are also a fantastic way to use up any leftover oats you might have lying around. They’re a great alternative to oatmeal and provide a much more exciting way to enjoy this healthy grain. Plus, they’re a relatively healthy treat, packed with fiber and whole grains. So you can indulge in a little sweetness without feeling too guilty. I’ve poured my heart into perfecting this recipe, and I’m confident that you’ll love it as much as I do. It’s a recipe that’s been passed down through my family for generations, and it always brings a smile to everyone’s face. Now, it’s your turn to create your own memories with these delicious bars. So, what are you waiting for? Gather your ingredients, preheat your oven, and get ready to bake up a batch of these irresistible Chocolate Oat Bars. I promise you won’t regret it! And most importantly, don’t forget to share your experience with me! I’d love to hear how your bars turned out, what variations you tried, and what your family and friends thought of them. Leave a comment below, tag me on social media, or send me an email. I’m always eager to see your creations and hear your feedback. Happy baking! I am sure that this recipe for Chocolate Oat Bars will become a staple in your home, just as it is in mine. Print
Chocolate Oat Bars: The Ultimate Guide to Baking Delicious Treats
- Total Time: 105 minutes
- Yield: 24 bars 1x
Description
Chewy and delicious Chocolate Oat Bars packed with oats and chocolate chips. A perfect treat for any occasion!
Ingredients
- 1 cup (2 sticks) unsalted butter, softened
- 1 cup packed light brown sugar
- 1/2 cup granulated sugar
- 2 large eggs
- 1 teaspoon vanilla extract
- 1 1/2 cups all-purpose flour
- 1 teaspoon baking soda
- 1/2 teaspoon salt
- 3 cups rolled oats (not instant)
- 1 cup semi-sweet chocolate chips
Instructions
- Cream the Butter and Sugars: In a large mixing bowl, cream together the softened butter, brown sugar, and granulated sugar until light and fluffy (3-5 minutes). Scrape down the sides of the bowl as needed.
- Incorporate the Eggs and Vanilla: Add the eggs one at a time, mixing well after each addition. Stir in the vanilla extract until smooth.
- Combine Dry Ingredients: In a separate medium bowl, whisk together the flour, baking soda, and salt.
- Gradually Add Dry Ingredients to Wet Ingredients: Slowly add the dry ingredients to the wet ingredients, mixing on low speed until just combined. Be careful not to overmix.
- Stir in the Oats and Chocolate Chips: Gently fold in the rolled oats and chocolate chips until evenly distributed.
- Prepare the Baking Pan: Preheat oven to 350°F (175°C). Grease a 9×13 inch baking pan (or line with parchment paper).
- Press the Dough into the Pan: Transfer the oat mixture to the prepared baking pan. Use your hands or the back of a spoon to evenly spread the dough across the bottom of the pan. Press it down firmly to create a compact layer.
- Bake to Golden Perfection: Bake for 25-30 minutes, or until the edges are golden brown and the center is set.
- Cool Completely: Remove from oven and let cool completely in the pan before cutting (at least 1 hour).
- Cut into Squares: Once cooled, cut into squares.
- Serve and Enjoy: Serve at room temperature.
Notes
- For best results, use softened butter.
- Do not overmix the batter to avoid tough bars.
- Cooling completely is crucial for easy cutting.
- Store leftovers in an airtight container at room temperature for up to 3-4 days or freeze for up to 2 months.
- Prep Time: 15 minutes
- Cook Time: 25 minutes