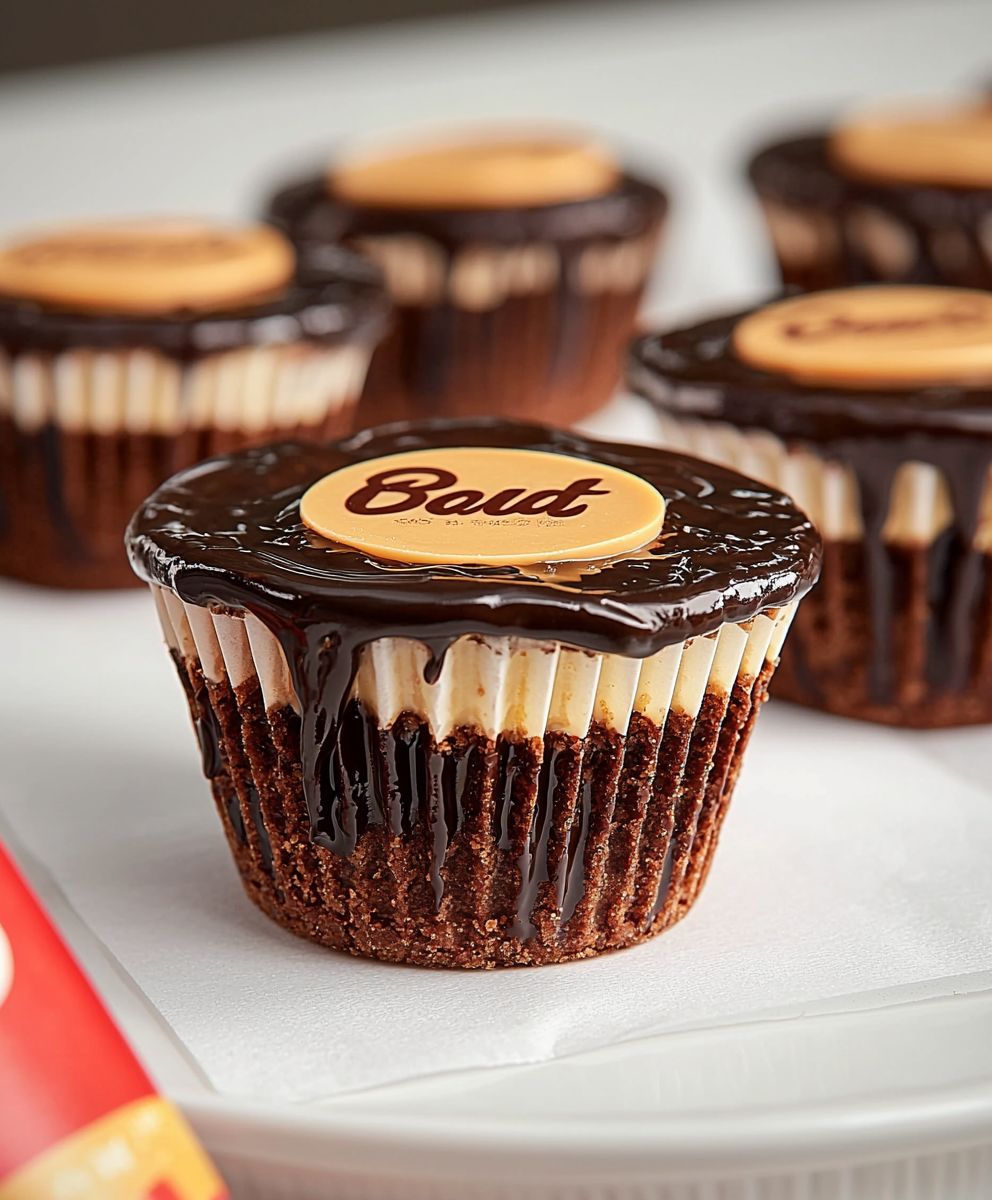
Chocolate peanut butter cups: prepare to enter a world of irresistible indulgence! Forget store-bought versions loaded with preservatives and questionable ingredients. I’m about to share a recipe that will allow you to create the most decadent, melt-in-your-mouth chocolate peanut butter cups you’ve ever tasted, right in your own kitchen.
The combination of chocolate and peanut butter is a classic pairing that has captivated taste buds for generations. While the exact origins are debated, many credit H.B. Reese, a former Hershey employee, with popularizing the treat in the early 20th century. His creation quickly became a beloved American staple, and its appeal has since spread worldwide.
But what makes chocolate peanut butter cups so universally adored? It’s the perfect harmony of sweet and salty, the creamy texture of peanut butter against the rich, smooth chocolate. Plus, they’re incredibly convenient a bite-sized burst of flavor that satisfies any craving. This homemade version elevates the experience, allowing you to control the quality of ingredients and customize the sweetness to your liking. Get ready to experience chocolate peanut butter perfection!

Ingredients:
- 1 cup (2 sticks) unsalted butter, softened
- 1 cup granulated sugar
- 1 cup packed light brown sugar
- 2 large eggs
- 1 teaspoon vanilla extract
- 2 cups all-purpose flour
- 1 cup unsweetened cocoa powder
- 1 teaspoon baking soda
- 1/2 teaspoon salt
- 1 cup creamy peanut butter
- 1/2 cup powdered sugar
- 1/4 cup (1/2 stick) unsalted butter, softened
- 1 teaspoon vanilla extract
- 12 ounces semi-sweet chocolate chips
- 1 tablespoon vegetable shortening
- 36 mini cupcake liners
Preparing the Peanut Butter Filling:
Okay, let’s start with the heart of these delicious treats the peanut butter filling! This is where the magic happens, and it’s surprisingly simple to make. Trust me, you’ll want to sneak a spoonful (or two!) before it goes into the cups.
- In a medium-sized bowl, combine the creamy peanut butter, powdered sugar, softened butter, and vanilla extract.
- Using an electric mixer (handheld or stand mixer), beat the ingredients together on medium speed until they are light and fluffy. This usually takes about 2-3 minutes. Make sure to scrape down the sides of the bowl occasionally to ensure everything is evenly mixed. You don’t want any pockets of powdered sugar hiding in there!
- Once the filling is smooth and creamy, set it aside. If it seems a little too soft, you can pop it in the refrigerator for about 15-20 minutes to firm up slightly. This will make it easier to work with when we assemble the cups.
Making the Chocolate Cookie Base:
Now, for the chocolatey goodness that cradles the peanut butter filling! This cookie base is rich, fudgy, and perfectly complements the sweet and salty filling. Don’t be tempted to skip this step it’s what makes these cups truly special.
- In a large bowl, cream together the softened butter, granulated sugar, and brown sugar until light and fluffy. This is a crucial step for achieving a tender cookie base, so take your time and really let the mixer do its work. It should take about 3-5 minutes.
- Beat in the eggs one at a time, then stir in the vanilla extract. Make sure each egg is fully incorporated before adding the next. This helps to create a smooth and consistent batter.
- In a separate bowl, whisk together the flour, cocoa powder, baking soda, and salt. This ensures that the dry ingredients are evenly distributed throughout the batter, preventing any clumps or pockets of baking soda.
- Gradually add the dry ingredients to the wet ingredients, mixing on low speed until just combined. Be careful not to overmix the batter, as this can result in tough cookies. Mix until you no longer see streaks of flour.
Assembling and Baking the Cups:
Here comes the fun part putting everything together! This is where your chocolate peanut butter cups start to take shape, and the anticipation really builds. Get ready for some deliciousness!
- Preheat your oven to 350°F (175°C). Line a 36-cup mini muffin tin with mini cupcake liners.
- Drop a rounded teaspoon of the chocolate cookie dough into each cupcake liner. Gently press the dough down to create a shallow well in the center. You want enough dough to form a base and come up the sides slightly.
- Bake for 8-10 minutes, or until the edges of the cookies are set and the centers are slightly soft. Be careful not to overbake them, as they will continue to cook as they cool.
- Remove the muffin tin from the oven and let the cookies cool in the tin for about 5 minutes. This allows them to firm up slightly before adding the peanut butter filling.
- While the cookies are still warm (but not too hot!), scoop a rounded teaspoon of the peanut butter filling into the center of each cookie. Gently press the filling down to spread it evenly.
Creating the Chocolate Topping:
The final touch a smooth, glossy chocolate topping that seals in all the goodness! This is what gives these cups their signature look and adds an extra layer of chocolatey indulgence. Get ready to melt some chocolate!
- In a heat-safe bowl set over a saucepan of simmering water (double boiler), combine the semi-sweet chocolate chips and vegetable shortening. Make sure the bottom of the bowl doesn’t touch the water.
- Stir constantly until the chocolate is completely melted and smooth. The vegetable shortening helps to create a glossy and pourable chocolate topping.
- Remove the bowl from the heat and let the chocolate cool slightly for a few minutes. This will help it to thicken up a bit and prevent it from running off the peanut butter filling.
- Spoon a generous teaspoon of the melted chocolate over the peanut butter filling in each cup. Spread the chocolate evenly to cover the filling completely.
Chilling and Setting:
Patience is a virtue, especially when it comes to chocolate peanut butter cups! This final step is crucial for allowing the chocolate to set and the flavors to meld together. Trust me, it’s worth the wait!
- Place the muffin tin in the refrigerator for at least 30 minutes, or until the chocolate is completely set. This will also help the peanut butter filling to firm up even more.
- Once the chocolate is set, carefully remove the chocolate peanut butter cups from the muffin tin.
- Store the cups in an airtight container in the refrigerator for up to a week. They are also delicious frozen!
Tips for Success:
- Use high-quality chocolate: The better the chocolate, the better the flavor of your peanut butter cups.
- Don’t overbake the cookies: Overbaked cookies will be dry and crumbly.
- Let the chocolate cool slightly before pouring: This will prevent it from running off the peanut butter filling.
- Chill the cups completely before serving: This will allow the chocolate to set and the flavors to meld together.
- Get creative with toppings: Sprinkle the chocolate with sea salt, chopped nuts, or sprinkles for an extra touch of flavor and visual appeal.
Variations:
- Dark Chocolate Peanut Butter Cups: Use dark chocolate chips instead of semi-sweet chocolate chips for a richer, more intense flavor.
- White Chocolate Peanut Butter Cups: Use white chocolate chips instead of semi-sweet chocolate chips for a sweeter, creamier treat.
- Reese’s Pieces Peanut Butter Cups: Sprinkle the chocolate topping with Reese’s Pieces for an extra peanut butter boost.
- Pretzel Peanut Butter Cups: Press crushed pretzels into the chocolate topping for a salty and crunchy twist.
- Nutella Peanut Butter Cups: Swirl a spoonful of Nutella into the peanut butter filling for a decadent and hazelnutty treat.
Conclusion:
So there you have it! These homemade chocolate peanut butter cups are truly a must-try for anyone who loves that perfect combination of sweet and salty. Forget the store-bought versions loaded with preservatives and questionable ingredients. This recipe gives you complete control over what goes into your treat, allowing you to create a healthier (well, relatively!), more delicious, and utterly satisfying indulgence.
What makes these cups so irresistible? It’s the creamy, melt-in-your-mouth chocolate paired with the rich, nutty peanut butter filling. The slight hint of saltiness from the peanut butter perfectly balances the sweetness of the chocolate, creating a symphony of flavors that will dance on your taste buds. Plus, the texture is just divine smooth chocolate encasing a soft, decadent peanut butter center. Honestly, what’s not to love?
But the best part? They are incredibly easy to make! You don’t need any fancy equipment or complicated techniques. Just a few simple ingredients and a little bit of patience, and you’ll be rewarded with a batch of these delectable treats. They are perfect for satisfying your own sweet cravings, sharing with friends and family, or even gifting to someone special. Imagine the look on their face when you present them with a box of homemade chocolate peanut butter cups they’ll be so impressed!
Now, let’s talk about serving suggestions and variations. While these cups are amazing on their own, there are plenty of ways to customize them to your liking. For a richer, more intense chocolate flavor, use dark chocolate instead of milk chocolate. If you’re a fan of white chocolate, go ahead and experiment! You can also add a sprinkle of sea salt on top of the chocolate before it sets for an extra burst of flavor.
For the peanut butter filling, you can use smooth or crunchy peanut butter, depending on your preference. If you want to add a little bit of texture, try mixing in some chopped peanuts or pretzels. You could even swirl in some caramel or Nutella for an even more decadent treat.
And don’t forget about dietary restrictions! This recipe can easily be adapted to be vegan or gluten-free. Simply use vegan chocolate and gluten-free graham crackers (if you’re using them in the filling). You can also substitute the peanut butter with other nut butters, such as almond butter or cashew butter, for a different flavor profile.
Serving Suggestions:
* Enjoy them straight from the fridge for a cool and refreshing treat.
* Serve them with a scoop of vanilla ice cream for a decadent dessert.
* Crumble them over brownies or cookies for an extra layer of flavor.
* Pack them in your lunchbox for a sweet afternoon pick-me-up.
* Give them as gifts to friends and family they’ll be so appreciated!
Variations:
* Dark Chocolate Peanut Butter Cups: Use dark chocolate for a richer flavor.
* White Chocolate Peanut Butter Cups: Use white chocolate for a sweeter treat.
* Salted Peanut Butter Cups: Sprinkle sea salt on top of the chocolate.
* Crunchy Peanut Butter Cups: Use crunchy peanut butter for added texture.
* Almond Butter Cups: Substitute peanut butter with almond butter.
* Cashew Butter Cups: Substitute peanut butter with cashew butter.
I truly believe that once you try this recipe, you’ll never go back to store-bought chocolate peanut butter cups again. They are so much better fresher, more flavorful, and made with love. So, what are you waiting for? Gather your ingredients, put on your apron, and get ready to create some magic in the kitchen!
I’m so excited for you to try this recipe and experience the joy of homemade chocolate peanut butter cups. And please, don’t be shy! Share your creations with me. Let me know how they turned out, what variations you tried, and what your friends and family thought. You can leave a comment below, tag me on social media, or send me an email. I can’t wait to hear from you! Happy baking!
Chocolate Peanut Butter Cups: The Ultimate Homemade Recipe
Fudgy mini chocolate peanut butter cups with a chocolate cookie base, creamy peanut butter filling, and smooth chocolate topping.
Ingredients
- 1 cup (2 sticks) unsalted butter, softened
- 1 cup granulated sugar
- 1 cup packed light brown sugar
- 2 large eggs
- 1 teaspoon vanilla extract
- 2 cups all-purpose flour
- 1 cup unsweetened cocoa powder
- 1 teaspoon baking soda
- 1/2 teaspoon salt
- 1 cup creamy peanut butter
- 1/2 cup powdered sugar
- 1/4 cup (1/2 stick) unsalted butter, softened (for filling)
- 1 teaspoon vanilla extract (for filling)
- 12 ounces semi-sweet chocolate chips
- 1 tablespoon vegetable shortening
- 36 mini cupcake liners
Instructions
- Prepare Peanut Butter Filling: In a medium bowl, combine peanut butter, powdered sugar, softened butter (1/4 cup), and vanilla extract. Beat with an electric mixer until light and fluffy (2-3 minutes). Refrigerate for 15-20 minutes if too soft.
- Make Chocolate Cookie Base: In a large bowl, cream together softened butter (1 cup), granulated sugar, and brown sugar until light and fluffy (3-5 minutes). Beat in eggs one at a time, then stir in vanilla extract.
- In a separate bowl, whisk together flour, cocoa powder, baking soda, and salt. Gradually add dry ingredients to wet ingredients, mixing on low speed until just combined.
- Assemble and Bake: Preheat oven to 350°F (175°C). Line a 36-cup mini muffin tin with mini cupcake liners.
- Drop a rounded teaspoon of cookie dough into each liner and press down to create a shallow well.
- Bake for 8-10 minutes, or until edges are set and centers are slightly soft. Let cool in the tin for 5 minutes.
- Scoop a rounded teaspoon of peanut butter filling into the center of each cookie while still warm.
- Create Chocolate Topping: In a heat-safe bowl over simmering water (double boiler), combine chocolate chips and vegetable shortening. Stir until melted and smooth. Let cool slightly.
- Spoon a generous teaspoon of melted chocolate over the peanut butter filling in each cup.
- Chill and Set: Place the muffin tin in the refrigerator for at least 30 minutes, or until the chocolate is completely set.
- Carefully remove the chocolate peanut butter cups from the muffin tin. Store in an airtight container in the refrigerator for up to a week.
Notes
- Use high-quality chocolate for the best flavor.
- Don’t overbake the cookies.
- Let the chocolate cool slightly before pouring to prevent it from running.
- Chill the cups completely before serving.
- Get creative with toppings like sea salt, chopped nuts, or sprinkles.