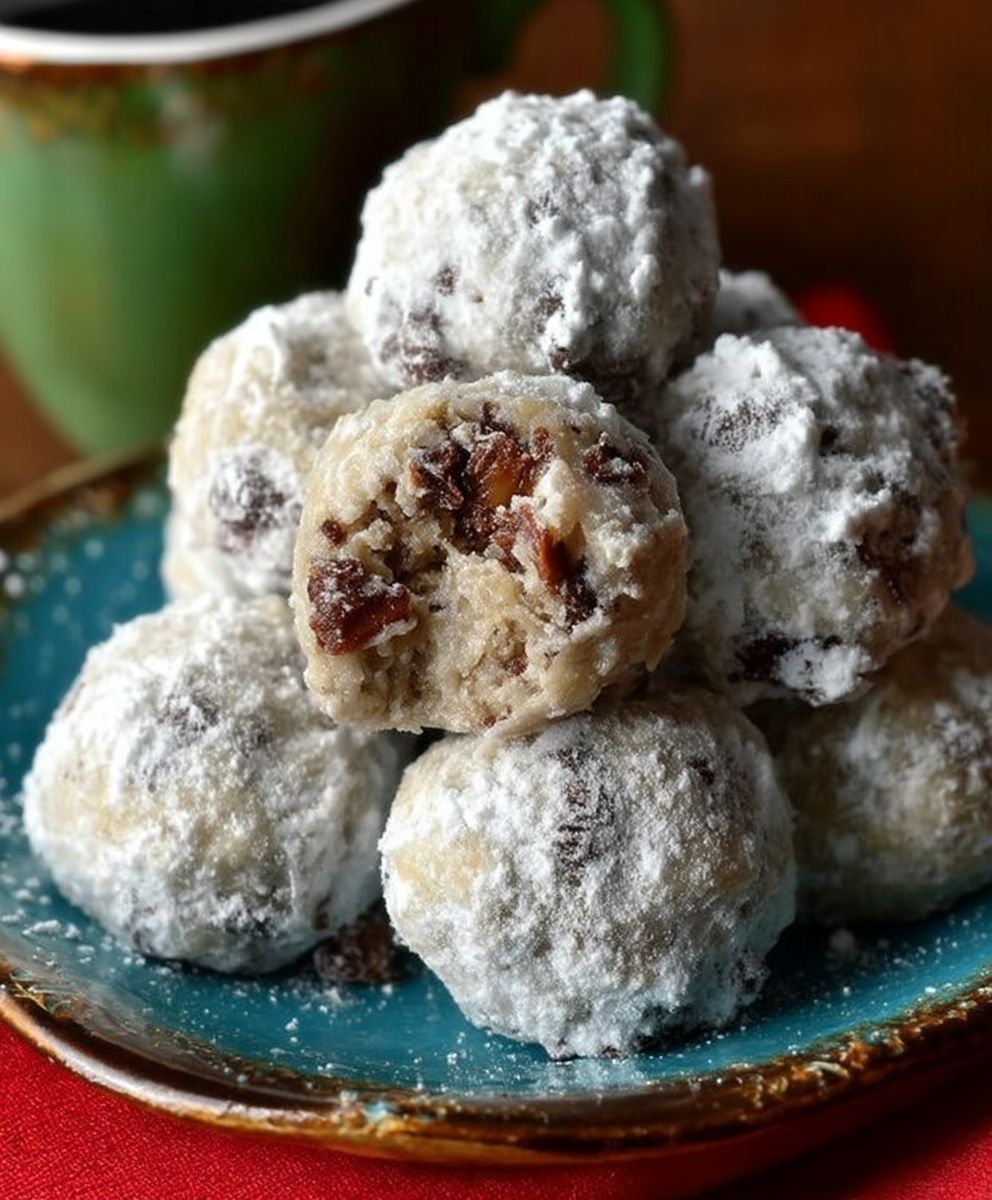
Chocolate Snowballs, those delightful little orbs of cocoa-dusted goodness, are more than just a treat; they’re a miniature winter wonderland on a plate! Imagine biting into a melt-in-your-mouth cookie, its delicate crumb giving way to a rich, nutty flavor, all while being coated in a generous blanket of powdered sugar that resembles freshly fallen snow. Are you ready to experience this delightful confection?
While the exact origins of these cookies are shrouded in a bit of mystery, similar recipes have been passed down through generations, often associated with holiday baking traditions in various European cultures. Some believe they evolved from Russian Tea Cakes, while others see them as a variation of Mexican Wedding Cookies. Regardless of their precise ancestry, these cookies have become a beloved staple in homes around the world, especially during the festive season.
What makes Chocolate Snowballs so irresistible? It’s a combination of factors! Their delicate, almost sandy texture is incredibly satisfying, and the buttery, nutty flavor is perfectly balanced by the sweetness of the powdered sugar. Plus, they’re surprisingly easy to make, requiring just a handful of simple ingredients and minimal effort. Whether you’re looking for a show-stopping dessert for your next holiday gathering or simply craving a comforting treat to enjoy with a cup of coffee, these cookies are guaranteed to please. So, let’s get baking and create some edible snowballs that will bring joy to everyone who tastes them!

Ingredients:
- 1 cup (2 sticks) unsalted butter, softened
- 1/2 cup powdered sugar, plus more for coating
- 1 teaspoon vanilla extract
- 1/4 teaspoon salt
- 2 1/4 cups all-purpose flour
- 1 cup finely chopped walnuts or pecans (optional, but highly recommended!)
- 1/2 cup unsweetened cocoa powder
- 4 ounces bittersweet chocolate, melted and cooled slightly
Preparing the Dough:
- Cream the Butter and Sugar: In a large bowl, or in the bowl of your stand mixer, cream together the softened butter and 1/2 cup of powdered sugar until light and fluffy. This usually takes about 3-5 minutes. Make sure to scrape down the sides of the bowl occasionally to ensure everything is evenly mixed. You don’t want any lumps of butter hiding!
- Add Vanilla and Salt: Stir in the vanilla extract and salt. The vanilla adds a lovely warmth to the cookies, and the salt balances the sweetness perfectly. Don’t skip the salt; it’s essential for flavor!
- Incorporate the Melted Chocolate: Gently fold in the slightly cooled melted bittersweet chocolate. Make sure the chocolate isn’t too hot, or it could melt the butter and affect the texture of your dough. We want a smooth, even distribution of chocolate throughout.
- Combine Dry Ingredients: In a separate bowl, whisk together the flour and cocoa powder. Whisking helps to aerate the flour and cocoa, preventing lumps and ensuring a lighter cookie.
- Gradually Add Dry Ingredients to Wet Ingredients: Gradually add the dry ingredients to the wet ingredients, mixing on low speed until just combined. Be careful not to overmix! Overmixing can develop the gluten in the flour, resulting in tough cookies. Mix until the flour is just incorporated, and then stop.
- Add Nuts (Optional): If you’re using nuts, gently fold them into the dough. I personally love the added texture and flavor that nuts bring to these cookies, but they’re delicious without them too.
- Chill the Dough: Wrap the dough tightly in plastic wrap and chill in the refrigerator for at least 30 minutes, or up to 2 hours. Chilling the dough is crucial! It allows the butter to solidify, which prevents the cookies from spreading too much during baking. It also makes the dough easier to handle.
Forming and Baking the Snowballs:
- Preheat Oven and Prepare Baking Sheets: Preheat your oven to 350°F (175°C). Line baking sheets with parchment paper. Parchment paper prevents the cookies from sticking and makes cleanup a breeze.
- Shape the Dough: Remove the dough from the refrigerator. Using a small cookie scoop or your hands, roll the dough into 1-inch balls. The size doesn’t have to be exact, but try to keep them consistent so they bake evenly.
- Place on Baking Sheets: Place the dough balls onto the prepared baking sheets, leaving about 1 inch of space between each cookie. This allows for proper air circulation and prevents the cookies from sticking together.
- Bake the Cookies: Bake for 10-12 minutes, or until the edges are set and the bottoms are lightly golden brown. Be careful not to overbake! Overbaked cookies will be dry and crumbly. The cookies should still be slightly soft in the center.
- Cool Slightly: Remove the baking sheets from the oven and let the cookies cool on the baking sheets for a few minutes before transferring them to a wire rack to cool completely. This allows the cookies to firm up slightly and prevents them from breaking when you move them.
Coating the Snowballs:
- First Coating: While the cookies are still slightly warm (but not hot!), roll them in powdered sugar. The warmth helps the powdered sugar adhere to the cookies.
- Second Coating: Let the cookies cool completely. Once they are completely cool, roll them in powdered sugar again. This second coating creates that beautiful, snowy effect that gives these cookies their name. The first layer kind of melts into the cookie, and the second layer stays powdery and white.
- Enjoy! Store the cookies in an airtight container at room temperature. They’ll keep for several days, but they’re so delicious, they probably won’t last that long!
Tips for Perfect Chocolate Snowballs:
- Use High-Quality Ingredients: The quality of your ingredients will directly impact the flavor of your cookies. Use good-quality butter, vanilla extract, and chocolate for the best results.
- Don’t Overmix the Dough: Overmixing can lead to tough cookies. Mix until the flour is just incorporated, and then stop.
- Chill the Dough: Chilling the dough is essential for preventing the cookies from spreading too much during baking.
- Don’t Overbake: Overbaked cookies will be dry and crumbly. Bake until the edges are set and the bottoms are lightly golden brown.
- Double Coat with Powdered Sugar: The double coating of powdered sugar is what gives these cookies their signature snowy appearance.
- Variations: Feel free to experiment with different flavors! You can add a pinch of cinnamon or nutmeg to the dough, or use different types of nuts. You could even add chocolate chips!
- Storage: Store the cookies in an airtight container at room temperature. They’ll keep for several days.
- Make Ahead: The dough can be made ahead of time and stored in the refrigerator for up to 2 days. Just bring it to room temperature slightly before rolling into balls.
- Freezing: Baked cookies can be frozen for up to 2 months. Thaw completely before serving. You can also freeze the unbaked dough balls. Place them on a baking sheet and freeze until solid, then transfer them to a freezer bag. Bake from frozen, adding a few extra minutes to the baking time.
Troubleshooting:
- Cookies are spreading too much: Make sure you chilled the dough for long enough. You can also try adding a tablespoon or two of flour to the dough.
- Cookies are dry: Don’t overbake them! Also, make sure you’re using enough butter.
- Powdered sugar isn’t sticking: Make sure the cookies are slightly warm when you roll them in the powdered sugar for the first coating.
Nutritional Information (approximate, per cookie):
- Calories: 120
- Fat: 8g
- Saturated Fat: 5g
- Cholesterol: 20mg
- Sodium: 20mg
- Carbohydrates: 12g
- Sugar: 6g
- Protein: 1g
This recipe is a classic for a reason! They are perfect for holiday baking, gift-giving, or just enjoying with a cup of coffee or tea. I hope you enjoy making and eating these delicious Chocolate Snowballs as much as I do!
Conclusion:
So, there you have it! These Chocolate Snowballs are truly a must-try, especially if you’re looking for a simple, no-bake treat that’s guaranteed to impress. The combination of rich chocolate, crunchy nuts, and that delicate dusting of powdered sugar creates a flavor and texture explosion that’s simply irresistible. I know I’ve made them countless times, and they’re always a hit, whether it’s for a holiday gathering, a potluck, or just a cozy night in.
But what makes these Chocolate Snowballs so special? It’s the ease of preparation, of course! No oven required means you can whip up a batch in no time, even with little helpers in the kitchen. Plus, the ingredients are readily available, so you probably have most of them on hand already. And beyond the simplicity, it’s the sheer deliciousness that keeps people coming back for more. The fudgy center, the satisfying crunch, and the sweet, snowy exterior it’s a perfect trifecta of taste and texture.
Looking for serving suggestions? These Chocolate Snowballs are fantastic on their own, served with a cup of hot cocoa or coffee. They also make a beautiful addition to a dessert platter, adding a touch of elegance and festive cheer. For a more decadent experience, try serving them with a scoop of vanilla ice cream or a dollop of whipped cream. You could even drizzle them with melted chocolate or caramel for an extra touch of indulgence.
And don’t be afraid to get creative with variations! If you’re not a fan of walnuts, feel free to substitute them with pecans, almonds, or even macadamia nuts. For a more intense chocolate flavor, use dark chocolate instead of semi-sweet. You could also add a pinch of cinnamon or a dash of espresso powder to the dough for a unique twist. If you want to make them extra festive, try rolling them in colored sprinkles or edible glitter instead of powdered sugar. The possibilities are endless!
Serving and Variation Ideas:
- Serve with: Hot cocoa, coffee, vanilla ice cream, whipped cream.
- Nut Variations: Pecans, almonds, macadamia nuts.
- Chocolate Variations: Dark chocolate, white chocolate chips.
- Spice Additions: Cinnamon, espresso powder.
- Festive Coatings: Colored sprinkles, edible glitter.
I truly believe that everyone should experience the joy of making and eating these delightful Chocolate Snowballs. They’re the perfect treat for any occasion, and they’re sure to bring a smile to your face. So, what are you waiting for? Gather your ingredients, roll up your sleeves, and get ready to create some magic in the kitchen!
I’m so excited for you to try this recipe! And I would absolutely love to hear about your experience. Did you make any variations? Did you serve them at a party? What did your friends and family think? Please, please, please come back and share your thoughts in the comments below. Your feedback is invaluable, and it helps me to create even better recipes for you in the future. Happy baking (or rather, happy rolling!) and I can’t wait to hear all about your Chocolate Snowball adventures! Let me know if you have any questions, too! I’m always happy to help.
Chocolate Snowballs: A Deliciously Easy Holiday Treat
Rich, melt-in-your-mouth chocolate snowball cookies coated in a generous layer of powdered sugar. Perfect for the holidays or any time you crave a decadent treat!
Ingredients
- 1 cup (2 sticks) unsalted butter, softened
- 1/2 cup powdered sugar, plus more for coating
- 1 teaspoon vanilla extract
- 1/4 teaspoon salt
- 2 1/4 cups all-purpose flour
- 1 cup finely chopped walnuts or pecans (optional)
- 1/2 cup unsweetened cocoa powder
- 4 ounces bittersweet chocolate, melted and cooled slightly
Instructions
- Cream Butter and Sugar: In a large bowl, cream together the softened butter and 1/2 cup of powdered sugar until light and fluffy (3-5 minutes). Scrape down the sides of the bowl as needed.
- Add Vanilla and Salt: Stir in the vanilla extract and salt.
- Incorporate Chocolate: Gently fold in the slightly cooled melted bittersweet chocolate.
- Combine Dry Ingredients: In a separate bowl, whisk together the flour and cocoa powder.
- Add Dry to Wet: Gradually add the dry ingredients to the wet ingredients, mixing on low speed until just combined. Do not overmix.
- Add Nuts (Optional): Gently fold in the chopped nuts, if using.
- Chill Dough: Wrap the dough tightly in plastic wrap and chill in the refrigerator for at least 30 minutes, or up to 2 hours.
- Preheat Oven: Preheat oven to 350°F (175°C). Line baking sheets with parchment paper.
- Shape Dough: Remove the dough from the refrigerator. Roll the dough into 1-inch balls.
- Place on Baking Sheets: Place the dough balls onto the prepared baking sheets, leaving about 1 inch of space between each cookie.
- Bake: Bake for 10-12 minutes, or until the edges are set and the bottoms are lightly golden brown. Do not overbake.
- Cool Slightly: Remove the baking sheets from the oven and let the cookies cool on the baking sheets for a few minutes before transferring them to a wire rack to cool completely.
- First Coating: While the cookies are still slightly warm, roll them in powdered sugar.
- Second Coating: Let the cookies cool completely. Once they are completely cool, roll them in powdered sugar again.
- Enjoy: Store the cookies in an airtight container at room temperature.
Notes
- Use high-quality ingredients for the best flavor.
- Don’t overmix the dough.
- Chilling the dough is essential.
- Don’t overbake the cookies.
- Double coat with powdered sugar for the signature snowy look.
- Variations: Add a pinch of cinnamon or nutmeg, use different nuts, or add chocolate chips.
- Storage: Store in an airtight container at room temperature.
- Make Ahead: Dough can be made 2 days in advance and stored in the refrigerator.
- Freezing: Baked cookies can be frozen for up to 2 months. Freeze unbaked dough balls on a baking sheet until solid, then transfer to a freezer bag. Bake from frozen, adding a few extra minutes to the baking time.
- Troubleshooting:
* Cookies spreading too much: Chill the dough longer or add a tablespoon or two of flour.
* Cookies are dry: Don’t overbake and use enough butter.
* Powdered sugar isn’t sticking: Make sure the cookies are slightly warm for the first coating.