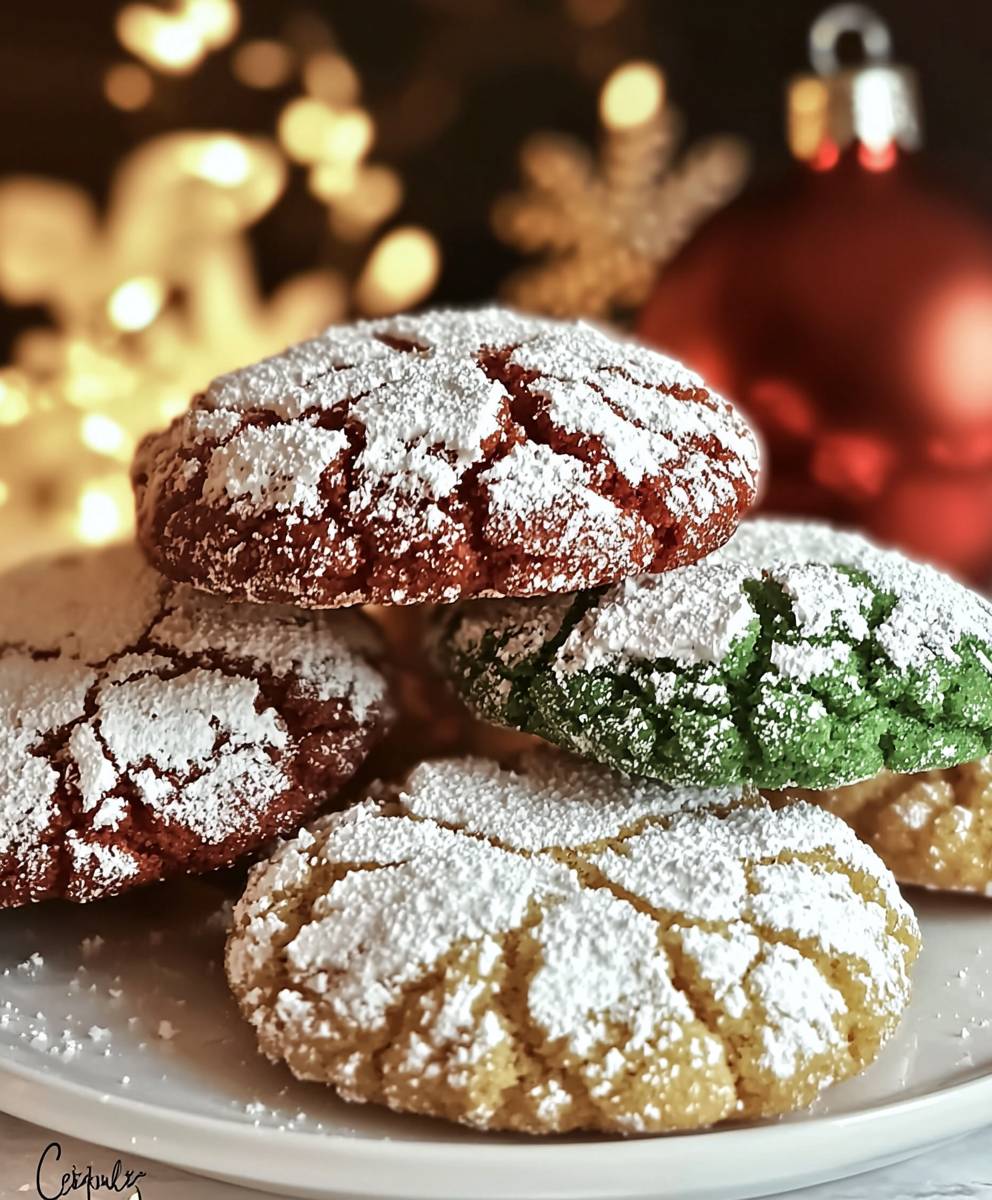
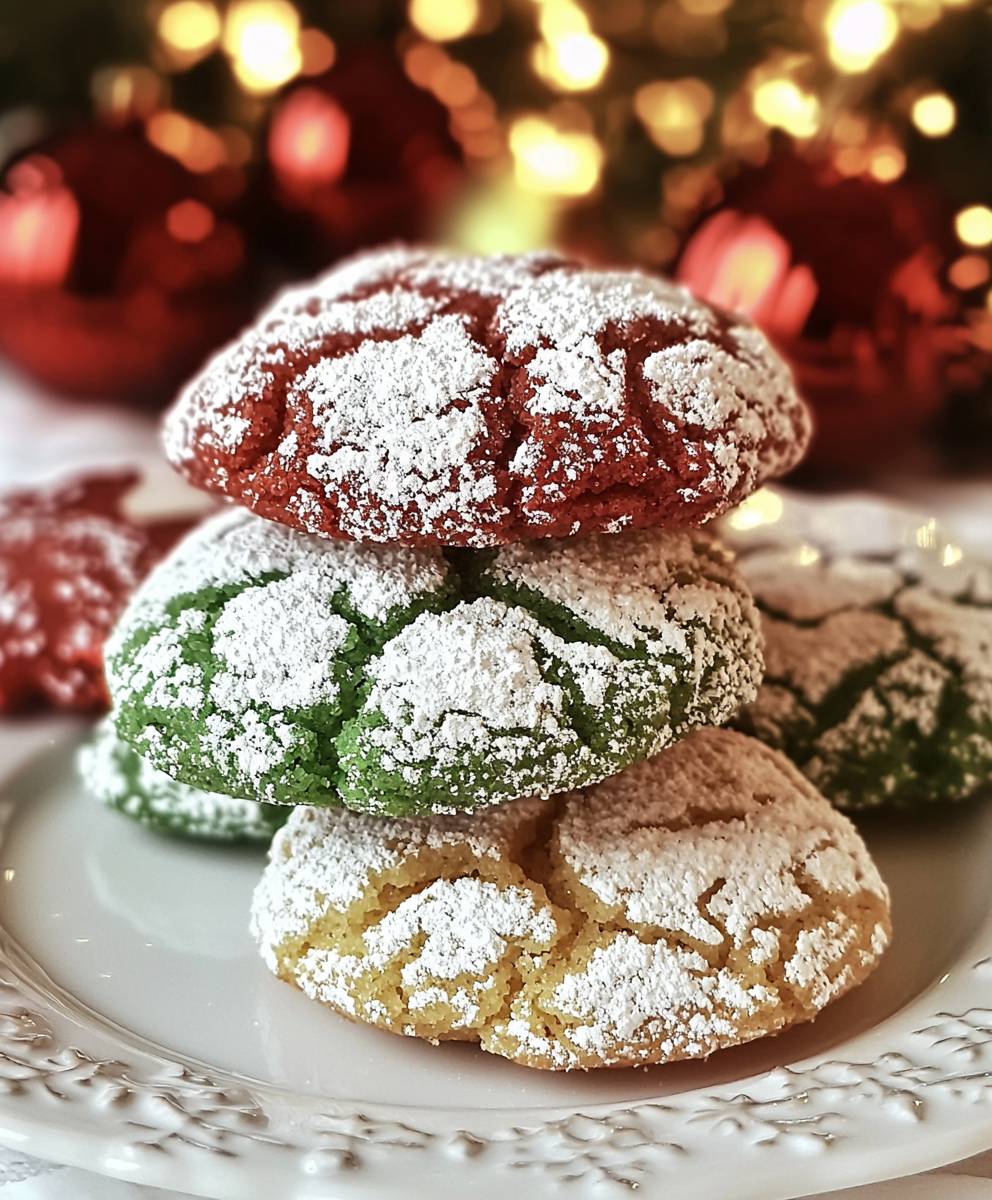
Christmas Crinkle Cookies: Just the name conjures up images of cozy fireplaces, twinkling lights, and the sweet aroma of holiday baking, doesn’t it? I can almost smell them now! These aren’t just any cookies; they’re a festive explosion of chocolatey goodness, rolled in powdered sugar to resemble freshly fallen snow. And let me tell you, they are absolutely irresistible!
While the exact origins of Christmas Crinkle Cookies are a bit of a mystery, their popularity exploded in the mid-20th century, becoming a staple in American holiday baking. Some believe they evolved from traditional German spice cookies, adapted with the addition of cocoa and that signature powdered sugar coating. Regardless of their precise history, they’ve become synonymous with Christmas cheer.
What makes these cookies so beloved? It’s a combination of things! The slightly crisp edges give way to a soft, chewy center, creating a delightful textural contrast. The rich chocolate flavor is perfectly balanced by the sweetness of the powdered sugar. Plus, they’re relatively easy to make, making them a perfect baking project for families to enjoy together. And let’s be honest, who can resist that beautiful, crackled appearance? They’re simply stunning on a holiday cookie platter!
Ingredients:
- For the Dough:
- 2 1/4 cups all-purpose flour
- 1/2 cup unsweetened cocoa powder
- 1 teaspoon baking powder
- 1/2 teaspoon baking soda
- 1/4 teaspoon salt
- 1 cup (2 sticks) unsalted butter, softened
- 1 3/4 cups granulated sugar
- 2 large eggs
- 2 teaspoons vanilla extract
- 1/2 cup vegetable oil
- For Coating:
- 1 cup powdered sugar, for rolling
Preparing the Dough:
- Combine Dry Ingredients: In a medium bowl, whisk together the flour, cocoa powder, baking powder, baking soda, and salt. Make sure everything is evenly distributed so your cookies rise properly and have a consistent flavor. I usually whisk for about 30 seconds to ensure it’s well combined.
- Cream Butter and Sugar: In a large bowl (or the bowl of your stand mixer), cream together the softened butter and granulated sugar until light and fluffy. This usually takes about 3-5 minutes on medium speed. Don’t rush this step! It’s crucial for incorporating air into the dough, which will result in a tender cookie. Scrape down the sides of the bowl occasionally to ensure everything is evenly mixed.
- Add Eggs and Vanilla: Beat in the eggs one at a time, mixing well after each addition. Then, stir in the vanilla extract. The mixture should be smooth and creamy at this point.
- Incorporate Oil: Gradually add the vegetable oil, mixing until just combined. The oil adds moisture and contributes to the cookies’ signature crinkled texture. Be careful not to overmix at this stage.
- Gradually Add Dry Ingredients: Gradually add the dry ingredients to the wet ingredients, mixing on low speed until just combined. Be careful not to overmix the dough, as this can develop the gluten and result in tough cookies. I usually add the dry ingredients in three additions, mixing until just incorporated after each addition. A few streaks of flour are okay at this point.
- Chill the Dough: Cover the bowl with plastic wrap and refrigerate the dough for at least 2 hours, or preferably overnight. This is a crucial step! Chilling the dough allows the butter to solidify, which prevents the cookies from spreading too much during baking. It also allows the flavors to meld together and develop. The dough will be quite sticky before chilling, but it will firm up nicely in the refrigerator.
Forming and Coating the Cookies:
- Preheat Oven and Prepare Baking Sheets: Preheat your oven to 350°F (175°C). Line baking sheets with parchment paper. Parchment paper prevents the cookies from sticking and makes cleanup a breeze.
- Shape the Dough: Remove the chilled dough from the refrigerator. Using a cookie scoop or your hands, roll the dough into 1-inch balls. The dough should be firm enough to handle easily. If it’s still too sticky, you can chill it for another 30 minutes.
- Coat in Powdered Sugar: Place the powdered sugar in a shallow bowl. Roll each dough ball in the powdered sugar, ensuring it’s completely coated. Don’t be shy with the powdered sugar! This is what creates the beautiful crinkled effect.
- Arrange on Baking Sheets: Place the coated dough balls on the prepared baking sheets, spacing them about 2 inches apart. They will spread slightly during baking.
Baking the Cookies:
- Bake: Bake for 10-12 minutes, or until the edges are set and the centers are slightly soft. The cookies will look slightly puffed up when they’re done. Don’t overbake them, as they will become dry.
- Cool: Remove the baking sheets from the oven and let the cookies cool on the baking sheets for a few minutes before transferring them to a wire rack to cool completely. This prevents them from breaking.
Tips and Tricks for Perfect Crinkle Cookies:
- Don’t Overmix: Overmixing the dough develops the gluten, resulting in tough cookies. Mix until just combined.
- Chill Time is Key: Don’t skip the chilling step! It’s essential for preventing the cookies from spreading too much and for developing the flavors.
- Generous Powdered Sugar Coating: Make sure the dough balls are completely coated in powdered sugar. This is what creates the signature crinkled effect.
- Don’t Overbake: Overbaked cookies will be dry and crumbly. Bake until the edges are set and the centers are slightly soft.
- Storage: Store the cooled cookies in an airtight container at room temperature for up to 3-4 days.
- Variations: You can add different extracts to the dough, such as peppermint or almond extract, for a different flavor. You can also add chocolate chips or chopped nuts to the dough.
Troubleshooting:
- Cookies are spreading too much: The dough may not have been chilled long enough, or the oven temperature may be too low. Make sure to chill the dough for at least 2 hours, and check your oven temperature with an oven thermometer.
- Cookies are dry: The cookies may have been overbaked. Bake until the edges are set and the centers are slightly soft.
- Cookies are not crinkling: The dough may not have been coated generously enough in powdered sugar, or the oven temperature may be too high. Make sure to coat the dough balls completely in powdered sugar, and check your oven temperature with an oven thermometer.
- Dough is too sticky to handle: Chill the dough for a longer period of time. If it’s still too sticky, you can add a tablespoon or two of flour to the dough.
Make Ahead Instructions:
You can make the dough ahead of time and store it in the refrigerator for up to 3 days. You can also freeze the dough for up to 2 months. To freeze the dough, wrap it tightly in plastic wrap and then place it in a freezer bag. Thaw the dough in the refrigerator overnight before using.
Serving Suggestions:
These Christmas Crinkle Cookies are perfect for serving at holiday parties, giving as gifts, or simply enjoying with a cup of coffee or tea. They are also a great addition to a cookie exchange. I love to serve them with a glass of cold milk or a scoop of vanilla ice cream.
Nutritional Information (Approximate, per cookie):
Please note that the nutritional information is an estimate and may vary depending on the specific ingredients used.
- Calories: 150
- Fat: 8g
- Saturated Fat: 5g
- Cholesterol: 30mg
- Sodium: 50mg
- Carbohydrates: 20g
- Sugar: 12g
- Protein: 1g
Why This Recipe Works:
This recipe works because it uses a combination of butter and oil, which creates a cookie that is both tender and moist. The chilling step is crucial for preventing the cookies from spreading too much and for developing the flavors. The generous coating of powdered sugar creates the signature crinkled effect. And finally, the baking time is just right to ensure that the cookies are cooked through but not overbaked.
A Little History of Crinkle Cookies:
Crinkle cookies, with their distinctive cracked and powdered sugar-dusted surfaces, have a charming history rooted in American baking traditions. While the exact origins are difficult to pinpoint, they likely emerged in the early to mid-20th century, coinciding with the rise of convenience ingredients and a growing interest in home baking. The use of vegetable oil, a relatively new ingredient at the time, contributed to their unique texture. The crinkled appearance, a happy accident resulting from the contrast between the moist dough and the dry powdered sugar, quickly became a defining characteristic. Over time, crinkle cookies have evolved into a beloved holiday treat, particularly popular during Christmas, where their snowy appearance evokes a festive spirit. Today, countless variations exist, but the classic combination of chocolate, vanilla, or spice flavors with a generous coating of powdered sugar remains a timeless favorite.
Conclusion:
So, there you have it! These Christmas Crinkle Cookies are more than just a recipe; they’re a gateway to holiday cheer, a delicious project for a cozy afternoon, and a guaranteed crowd-pleaser. I truly believe that once you bake a batch of these, they’ll become a staple in your Christmas traditions, just like they have in mine. The combination of the rich, fudgy interior and the delightfully crisp, powdered sugar coating is simply irresistible. The visual appeal alone, with their cracked surfaces and snowy dusting, makes them a standout on any holiday dessert platter.
But the best part? They’re surprisingly easy to make! Don’t let the fancy appearance intimidate you. The recipe is straightforward, and even if you’re not a seasoned baker, you can absolutely nail these. The key is to chill the dough properly that’s what gives them their signature crinkled look. Trust me, the little bit of extra time spent chilling is well worth the effort.
Serving Suggestions and Variations:
While these cookies are divine on their own, there are so many ways to elevate them even further! For a truly decadent experience, try serving them warm with a scoop of vanilla ice cream. The contrast of the warm cookie and the cold ice cream is heavenly. You could also crumble them over a chocolate mousse or use them as a base for a mini cheesecake.
Feeling adventurous? Consider these variations:
- Peppermint Crinkle Cookies: Add a teaspoon of peppermint extract to the dough for a festive, minty twist. You can also crush some candy canes and sprinkle them on top before baking.
- Orange Crinkle Cookies: Zest an orange and add it to the dough for a bright, citrusy flavor. A touch of orange extract would also work wonders.
- Espresso Crinkle Cookies: Add a tablespoon of instant espresso powder to the dry ingredients for a coffee-infused delight. Perfect for coffee lovers!
- Spiced Crinkle Cookies: Incorporate a blend of warm spices like cinnamon, nutmeg, and cloves for a cozy, aromatic cookie.
Don’t be afraid to experiment and put your own spin on this classic recipe! Baking is all about having fun and creating something delicious that you and your loved ones will enjoy.
I’m so excited for you to try these Christmas Crinkle Cookies! I know you’re going to love them. They’re the perfect treat to share with family and friends, to bring to holiday parties, or simply to enjoy by yourself with a cup of hot cocoa. They truly capture the spirit of the season.
A Final Word:
So, what are you waiting for? Preheat your oven, gather your ingredients, and get ready to bake up some holiday magic! I’m confident that these cookies will become a cherished part of your Christmas celebrations. And please, don’t forget to share your creations with me! I’d love to see your photos and hear about your experiences. Tag me on social media using #ChristmasCrinkleCookies or leave a comment below. I can’t wait to see what you bake!
Happy baking, and happy holidays!
Christmas Crinkle Cookies: The Ultimate Holiday Recipe
Rich, fudgy chocolate crinkle cookies coated in powdered sugar for a festive, crackled look. Perfect for holidays or any sweet craving!
Ingredients
- 2 1/4 cups all-purpose flour
- 1/2 cup unsweetened cocoa powder
- 1 teaspoon baking powder
- 1/2 teaspoon baking soda
- 1/4 teaspoon salt
- 1 cup (2 sticks) unsalted butter, softened
- 1 3/4 cups granulated sugar
- 2 large eggs
- 2 teaspoons vanilla extract
- 1/2 cup vegetable oil
- 1 cup powdered sugar, for rolling
Instructions
- Combine Dry Ingredients: In a medium bowl, whisk together the flour, cocoa powder, baking powder, baking soda, and salt.
- Cream Butter and Sugar: In a large bowl (or the bowl of your stand mixer), cream together the softened butter and granulated sugar until light and fluffy (3-5 minutes on medium speed). Scrape down the sides of the bowl occasionally.
- Add Eggs and Vanilla: Beat in the eggs one at a time, mixing well after each addition. Then, stir in the vanilla extract.
- Incorporate Oil: Gradually add the vegetable oil, mixing until just combined. Be careful not to overmix.
- Gradually Add Dry Ingredients: Gradually add the dry ingredients to the wet ingredients, mixing on low speed until just combined. Be careful not to overmix.
- Chill the Dough: Cover the bowl with plastic wrap and refrigerate the dough for at least 2 hours, or preferably overnight.
- Preheat Oven and Prepare Baking Sheets: Preheat your oven to 350°F (175°C). Line baking sheets with parchment paper.
- Shape the Dough: Remove the chilled dough from the refrigerator. Using a cookie scoop or your hands, roll the dough into 1-inch balls.
- Coat in Powdered Sugar: Place the powdered sugar in a shallow bowl. Roll each dough ball in the powdered sugar, ensuring it’s completely coated.
- Arrange on Baking Sheets: Place the coated dough balls on the prepared baking sheets, spacing them about 2 inches apart.
- Bake: Bake for 10-12 minutes, or until the edges are set and the centers are slightly soft.
- Cool: Remove the baking sheets from the oven and let the cookies cool on the baking sheets for a few minutes before transferring them to a wire rack to cool completely.
Notes
- Don’t overmix the dough.
- Chilling the dough is essential.
- Coat generously with powdered sugar.
- Don’t overbake.
- Store in an airtight container at room temperature for up to 3-4 days.
- Dough can be made ahead and stored in the refrigerator for up to 3 days or frozen for up to 2 months.
- You can add different extracts to the dough, such as peppermint or almond extract, for a different flavor. You can also add chocolate chips or chopped nuts to the dough.