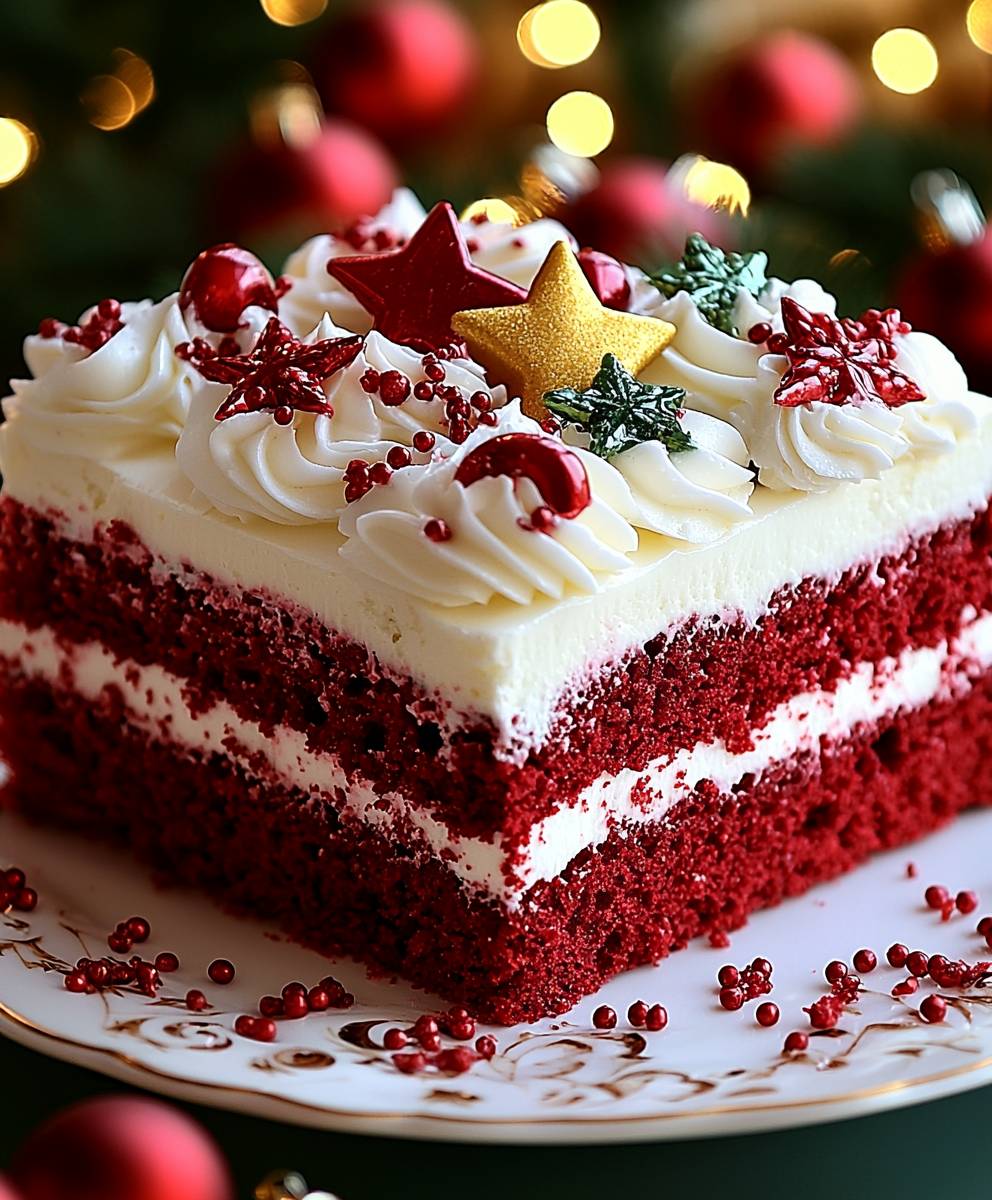
Christmas Red Velvet Cake: just the name conjures up images of festive cheer, doesn’t it? Imagine slicing into a moist, vibrant red cake, the creamy white frosting swirling like freshly fallen snow. This isn’t just dessert; it’s a centerpiece, a conversation starter, and a guaranteed crowd-pleaser for your holiday gathering.
Red Velvet Cake, while now synonymous with celebrations, has a surprisingly intriguing history. Some believe it originated during the Depression era, where cooks used beet juice to enhance the color and moisture of their cakes. Others trace its roots back to the Waldorf-Astoria Hotel in New York City. Regardless of its exact origin, the cake’s distinctive color and velvety texture quickly made it a beloved classic.
But what is it about Christmas Red Velvet Cake that makes it so irresistible? It’s the perfect balance of tangy buttermilk, rich cocoa, and that signature red hue, all topped with a luscious cream cheese frosting. The slight tang cuts through the sweetness, creating a flavor profile that’s both comforting and sophisticated. Plus, let’s be honest, the vibrant color is undeniably festive! This year, skip the stress and bake a cake that’s as beautiful as it is delicious. I promise, this recipe will become a cherished tradition in your family for years to come.

Ingredients:
- For the Cake:
- 2 ½ cups all-purpose flour
- 2 cups granulated sugar
- 1 teaspoon baking soda
- 1 teaspoon baking powder
- 1 teaspoon salt
- 1 ½ cups vegetable oil
- 1 cup buttermilk
- 2 large eggs
- 2 tablespoons unsweetened cocoa powder
- 1 ounce (2 tablespoons) red food coloring
- 1 teaspoon vanilla extract
- 1 cup hot coffee
- For the Cream Cheese Frosting:
- 8 ounces cream cheese, softened
- 1 cup (2 sticks) unsalted butter, softened
- 4 cups powdered sugar
- 1 teaspoon vanilla extract
- Pinch of salt
- For Decoration (Optional):
- Fresh cranberries
- Rosemary sprigs
- Powdered sugar (for dusting)
- White chocolate shavings
Preparing the Red Velvet Cake Batter
- Preheat and Prepare: First things first, preheat your oven to 350°F (175°C). Grease and flour three 9-inch round cake pans. I like to use baking spray with flour already in it it makes life so much easier! You can also line the bottoms with parchment paper circles for extra insurance against sticking.
- Dry Ingredients: In a large bowl, whisk together the flour, sugar, baking soda, baking powder, and salt. Make sure everything is well combined. This ensures that the baking powder and soda are evenly distributed, which is crucial for a good rise.
- Wet Ingredients: In a separate bowl, whisk together the vegetable oil, buttermilk, eggs, cocoa powder, red food coloring, and vanilla extract. Don’t worry if the color looks super intense at this stage; it will mellow out during baking.
- Combine Wet and Dry: Gradually add the wet ingredients to the dry ingredients, mixing on low speed until just combined. Be careful not to overmix! Overmixing develops the gluten in the flour, which can result in a tough cake.
- Add Hot Coffee: Slowly pour in the hot coffee while mixing on low speed. The batter will be thin that’s perfectly normal! The hot coffee helps to bloom the cocoa powder and enhances the red color.
- Divide the Batter: Divide the batter evenly among the prepared cake pans. I like to use a kitchen scale to ensure that each pan has the same amount of batter. This helps the cakes bake evenly.
Baking the Red Velvet Cakes
- Bake: Bake for 25-30 minutes, or until a wooden skewer inserted into the center comes out clean. Keep a close eye on them, as baking times can vary depending on your oven.
- Cool in Pans: Let the cakes cool in the pans for 10 minutes before inverting them onto a wire rack to cool completely. This prevents the cakes from sticking to the pans and allows them to cool evenly.
- Level the Cakes (Optional): Once the cakes are completely cool, use a serrated knife to level the tops if necessary. This will ensure that your cake is perfectly even and stable. I usually just trim off any domes that have formed.
Preparing the Cream Cheese Frosting
- Cream Butter and Cream Cheese: In a large bowl, beat the softened cream cheese and butter together until smooth and creamy. It’s important that both the cream cheese and butter are at room temperature to avoid lumps in your frosting.
- Add Powdered Sugar: Gradually add the powdered sugar, one cup at a time, beating on low speed until combined. Be sure to scrape down the sides of the bowl occasionally to ensure that everything is mixed evenly.
- Add Vanilla and Salt: Stir in the vanilla extract and salt. The salt helps to balance the sweetness of the frosting.
- Beat Until Fluffy: Beat the frosting on medium-high speed for 2-3 minutes, or until light and fluffy. This will incorporate air into the frosting, making it easier to spread.
Assembling the Christmas Red Velvet Cake
- First Layer: Place one cake layer on a serving plate or cake stand. Spread a generous layer of cream cheese frosting over the top.
- Second Layer: Carefully place the second cake layer on top of the frosting. Spread another generous layer of cream cheese frosting over the top.
- Third Layer: Place the final cake layer on top. Frost the entire cake with the remaining cream cheese frosting, creating a smooth and even surface. You can use an offset spatula to achieve a professional look.
- Chill the Cake: Refrigerate the cake for at least 30 minutes to allow the frosting to set. This will make it easier to decorate.
Decorating the Christmas Red Velvet Cake
- Cranberry and Rosemary Decoration: Arrange fresh cranberries and rosemary sprigs on top of the cake in a festive pattern. I like to create a simple wreath or a cascading design.
- Powdered Sugar Dusting: Lightly dust the cake with powdered sugar for a snowy effect. This adds a touch of elegance and complements the red and green decorations.
- White Chocolate Shavings (Optional): Sprinkle white chocolate shavings around the base of the cake for added texture and visual appeal.
- Final Chill: Refrigerate the cake for another 30 minutes before serving to allow the decorations to set.
Tips and Tricks for the Perfect Red Velvet Cake
- Buttermilk is Key: Don’t skip the buttermilk! It adds a tangy flavor and helps to tenderize the cake. If you don’t have buttermilk, you can make a substitute by adding 1 tablespoon of lemon juice or white vinegar to 1 cup of milk. Let it sit for 5 minutes before using.
- Good Quality Food Coloring: Use a good quality red food coloring to achieve the vibrant red color that is characteristic of red velvet cake. Gel food coloring is more concentrated than liquid food coloring, so you’ll need less of it.
- Don’t Overbake: Overbaking will result in a dry cake. Check the cakes for doneness a few minutes before the recommended baking time.
- Room Temperature Ingredients: Using room temperature ingredients, especially the butter and cream cheese for the frosting, is crucial for a smooth and creamy frosting.
- Adjust Sweetness: If you prefer a less sweet frosting, you can reduce the amount of powdered sugar.
- Storage: Store the cake in the refrigerator for up to 3 days. Let it sit at room temperature for about 30 minutes before serving to soften the frosting.
- Make Ahead: You can bake the cake layers a day or two in advance and store them tightly wrapped in plastic wrap in the refrigerator or freezer. The frosting can also be made ahead of time and stored in the refrigerator for up to 3 days.
- Variations: Feel free to experiment with different decorations. You can use chocolate curls, sprinkles, or even edible glitter to personalize your cake.
Troubleshooting Your Red Velvet Cake
- Cake is Dry: This could be due to overbaking. Make sure to check the cakes for doneness a few minutes before the recommended baking time. Also, ensure you’re not using too much flour.
- Cake is Dense: This could be due to overmixing the batter. Mix the wet and dry ingredients until just combined.
- Frosting is Lumpy: This is usually caused by using cold butter or cream cheese. Make sure both ingredients are at room temperature before making the frosting.
- Frosting is Too Soft: This could be due to using too much liquid or not enough powdered sugar. Add more powdered sugar, a tablespoon at a time, until the frosting reaches the desired consistency. You can also chill the frosting for a few minutes to firm it up.
- Cake is Not Red Enough: This could be due to using a low-quality food coloring or not using enough food coloring. Use a good quality gel food coloring and add more until you achieve the desired color. Remember that the color will deepen slightly during baking.
Serving Suggestions
This Christmas Red Velvet Cake is perfect for any holiday gathering. Serve it with a scoop of vanilla ice cream or a dollop of whipped cream for an extra special treat. It also pairs well with a cup of hot coffee or tea.
Enjoy!
I hope you enjoy making and eating this delicious Christmas Red Velvet Cake as much as I do! It’s
Conclusion:
This Christmas Red Velvet Cake is more than just a dessert; it’s a showstopper, a conversation starter, and a guaranteed crowd-pleaser. The moist, tender crumb, the vibrant red hue, and the tangy cream cheese frosting all combine to create a truly unforgettable experience. I know, I know, there are a million red velvet cake recipes out there, but trust me on this one the subtle nuances in the ingredients and the careful attention to detail in the method make all the difference. This isn’t just a cake; it’s a memory in the making.
Why is this a must-try? Because it’s ridiculously delicious, surprisingly easy to make (yes, even for beginner bakers!), and perfectly festive for the holiday season. The slight cocoa flavor complements the tang of the buttermilk beautifully, and the cream cheese frosting adds the perfect amount of sweetness and richness. Plus, let’s be honest, who can resist a slice of gorgeous red cake adorned with festive sprinkles? It’s pure holiday magic on a plate!
But the best part? It’s incredibly versatile! While I’ve presented it as a classic layer cake, feel free to get creative. For a more casual gathering, bake it in a bundt pan and dust it with powdered sugar. Or, for individual servings, make cupcakes and decorate them with festive sprinkles and edible glitter. You could even use the cake layers to make a trifle with layers of whipped cream, berries, and chocolate shavings.
Serving Suggestions and Variations:
* Classic Presentation: Serve chilled with a dollop of whipped cream or a scoop of vanilla ice cream.
* Festive Flair: Decorate with fresh cranberries, rosemary sprigs, or sugared cranberries for a truly Christmassy look.
* Chocolate Lover’s Dream: Add chocolate shavings or a drizzle of chocolate ganache for an extra layer of indulgence.
* Nutty Delight: Sprinkle chopped pecans or walnuts on top of the frosting for added texture and flavor.
* Spice it Up: Add a pinch of cinnamon or nutmeg to the cake batter for a warm, comforting flavor.
* Cream Cheese Frosting Alternatives: While I adore the classic cream cheese frosting, you could also try a Swiss meringue buttercream or a stabilized whipped cream frosting.
I truly believe this Christmas Red Velvet Cake will become a staple in your holiday baking repertoire. It’s the perfect dessert to share with loved ones, to bring to a potluck, or to simply enjoy on a cozy night in. The vibrant color and delicious flavor are guaranteed to brighten up any occasion.
So, what are you waiting for? Gather your ingredients, preheat your oven, and get ready to bake the most delicious and festive cake you’ve ever tasted. I’m confident you’ll love it as much as I do!
And most importantly, I want to hear about your experience! Did you try the recipe? Did you make any variations? What did your family and friends think? Share your photos and stories in the comments below. I can’t wait to see your creations and hear all about your baking adventures. Happy baking, and happy holidays!
Christmas Red Velvet Cake: A Festive Holiday Dessert
A festive and moist red velvet cake with a tangy cream cheese frosting, decorated with fresh cranberries, rosemary, and a dusting of powdered sugar for a beautiful Christmas centerpiece.
Ingredients
- 2 ½ cups all-purpose flour
- 2 cups granulated sugar
- 1 teaspoon baking soda
- 1 teaspoon baking powder
- 1 teaspoon salt
- 1 ½ cups vegetable oil
- 1 cup buttermilk
- 2 large eggs
- 2 tablespoons unsweetened cocoa powder
- 1 ounce (2 tablespoons) red food coloring
- 1 teaspoon vanilla extract
- 1 cup hot coffee
- 8 ounces cream cheese, softened
- 1 cup (2 sticks) unsalted butter, softened
- 4 cups powdered sugar
- 1 teaspoon vanilla extract
- Pinch of salt
- Fresh cranberries
- Rosemary sprigs
- Powdered sugar (for dusting)
- White chocolate shavings
Instructions
- Preheat oven to 350°F (175°C). Grease and flour three 9-inch round cake pans. Line the bottoms with parchment paper circles.
- In a large bowl, whisk together the flour, sugar, baking soda, baking powder, and salt.
- In a separate bowl, whisk together the vegetable oil, buttermilk, eggs, cocoa powder, red food coloring, and vanilla extract.
- Gradually add the wet ingredients to the dry ingredients, mixing on low speed until just combined. Do not overmix.
- Slowly pour in the hot coffee while mixing on low speed. The batter will be thin.
- Divide the batter evenly among the prepared cake pans.
- Bake for 25-30 minutes, or until a wooden skewer inserted into the center comes out clean.
- Let the cakes cool in the pans for 10 minutes before inverting them onto a wire rack to cool completely.
- Once the cakes are completely cool, use a serrated knife to level the tops if necessary.
- In a large bowl, beat the softened cream cheese and butter together until smooth and creamy.
- Gradually add the powdered sugar, one cup at a time, beating on low speed until combined. Scrape down the sides of the bowl occasionally.
- Stir in the vanilla extract and salt.
- Beat the frosting on medium-high speed for 2-3 minutes, or until light and fluffy.
- Place one cake layer on a serving plate or cake stand. Spread a generous layer of cream cheese frosting over the top.
- Carefully place the second cake layer on top of the frosting. Spread another generous layer of cream cheese frosting over the top.
- Place the final cake layer on top. Frost the entire cake with the remaining cream cheese frosting, creating a smooth and even surface.
- Refrigerate the cake for at least 30 minutes to allow the frosting to set.
- Arrange fresh cranberries and rosemary sprigs on top of the cake in a festive pattern.
- Lightly dust the cake with powdered sugar for a snowy effect.
- Sprinkle white chocolate shavings around the base of the cake for added texture and visual appeal.
- Refrigerate the cake for another 30 minutes before serving to allow the decorations to set.
Notes
- Buttermilk adds a tangy flavor and tenderizes the cake.
- Use good quality gel food coloring for a vibrant red color.
- Don’t overbake the cake.
- Use room temperature ingredients for the frosting.
- Adjust sweetness of frosting by reducing powdered sugar.
- Store cake in the refrigerator for up to 3 days.
- Cake layers and frosting can be made ahead of time.
- Experiment with different decorations.
- If cake is dry, check for doneness earlier and avoid overbaking.
- If cake is dense, avoid overmixing the batter.
- If frosting is lumpy, ensure butter and cream cheese are at room temperature.
- If frosting is too soft, add more powdered sugar or chill.
- If cake is not red enough, use good quality gel food coloring and add more.