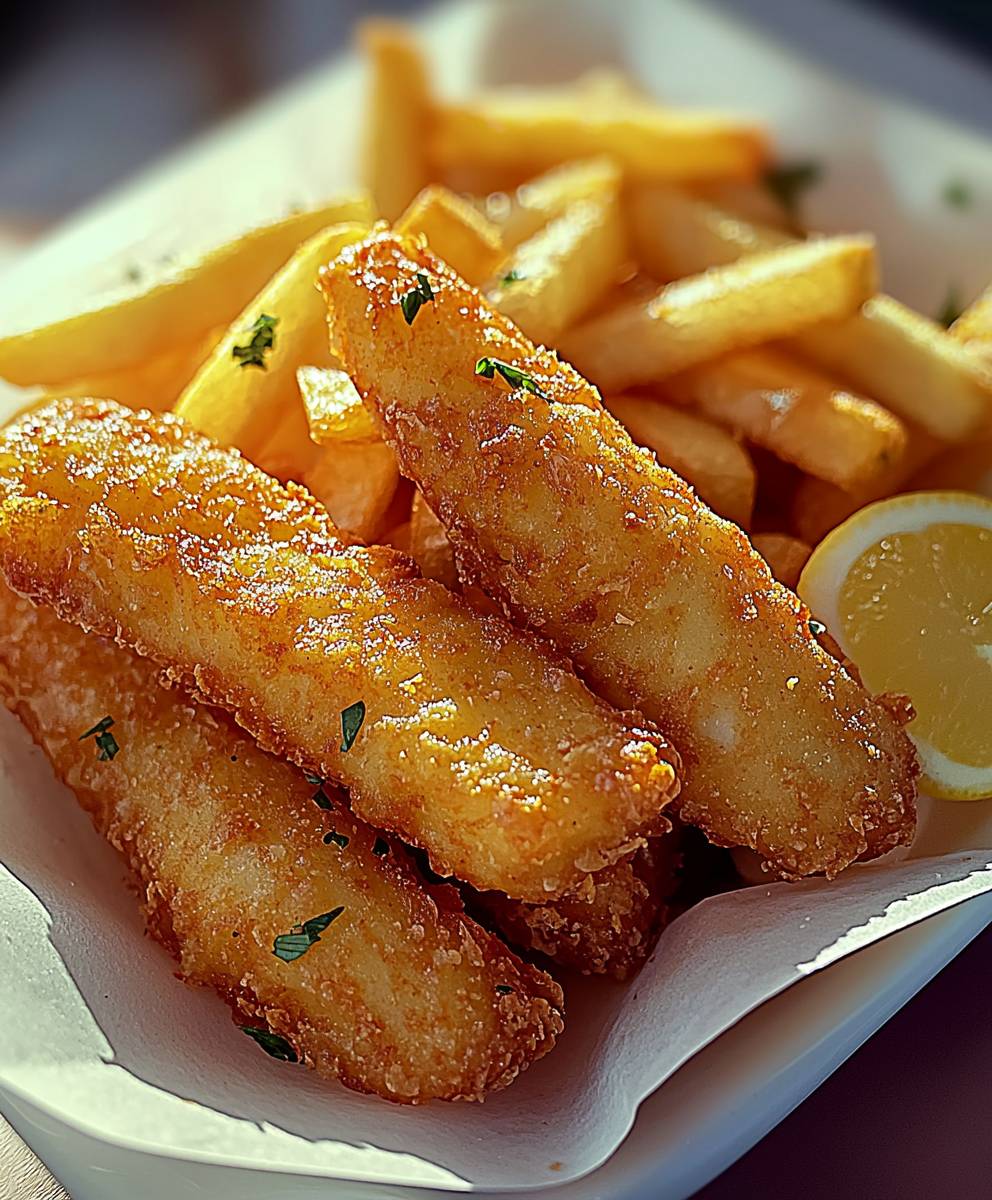
Fish fingers and chips: a culinary classic that evokes childhood memories and satisfies cravings with its simple yet irresistible charm. Who can resist the allure of crispy, golden fish fingers paired with perfectly cooked, fluffy chips? This iconic duo isn’t just a meal; it’s a comforting embrace, a nostalgic trip down memory lane, and a testament to the enduring appeal of uncomplicated deliciousness.
While the exact origins of fish fingers are debated, they gained immense popularity in the mid-20th century as a convenient and affordable way to introduce fish into family meals. The marriage with chips, a British staple, was a natural and inevitable union, creating a dish that quickly became a beloved family favorite across the UK and beyond. It’s a meal that transcends generations, passed down from parents to children, each family adding their own unique twist and creating cherished traditions around it.
What makes fish fingers and chips so universally loved? It’s the delightful combination of textures the satisfying crunch of the breaded fish against the soft, flaky interior, complemented by the fluffy, slightly salty chips. It’s the ease of preparation, making it a perfect weeknight meal for busy families. And, of course, it’s the taste a simple yet satisfying flavor profile that appeals to both young and old. So, let’s dive into this easy-to-follow recipe and rediscover the joy of this timeless classic!

Ingredients:
- For the Fish Fingers:
- 1 lb White Fish Fillets (Cod, Haddock, or Pollock), skinless and boneless
- 1 cup All-Purpose Flour
- 2 large Eggs, beaten
- 1 cup Panko Breadcrumbs
- 1/2 teaspoon Salt
- 1/4 teaspoon Black Pepper
- 1/4 teaspoon Garlic Powder
- 1/4 teaspoon Paprika
- Vegetable Oil, for frying
- For the Chips:
- 2 lbs Russet Potatoes, peeled
- Vegetable Oil, for frying
- Salt, to taste
- Optional Extras:
- Lemon wedges, for serving
- Tartar Sauce, for serving
- Ketchup, for serving
- Malt Vinegar, for serving
- Mushy Peas, for serving
Preparing the Fish Fingers:
- Cut the Fish: First, we need to get our fish into finger shapes! Lay your fish fillets on a cutting board. Using a sharp knife, cut the fillets into strips about 1 inch wide and 3-4 inches long. Try to keep them relatively uniform in size so they cook evenly.
- Prepare the Breading Station: This is key to a smooth breading process. Set up three shallow dishes. In the first dish, place the all-purpose flour. In the second dish, add the beaten eggs. In the third dish, combine the panko breadcrumbs, salt, pepper, garlic powder, and paprika. Mix the breadcrumb mixture well to ensure the spices are evenly distributed.
- Bread the Fish Fingers: Now for the fun part! Take each fish finger and dredge it in the flour, making sure to coat all sides. Shake off any excess flour. Next, dip the floured fish finger into the beaten egg, again ensuring it’s fully coated. Finally, transfer the egg-coated fish finger to the panko breadcrumb mixture. Press the breadcrumbs firmly onto the fish to create a good, even coating. Repeat this process for all the fish fingers.
- Chill the Breaded Fish Fingers (Optional but Recommended): Place the breaded fish fingers on a plate or baking sheet lined with parchment paper. Cover them loosely with plastic wrap and refrigerate for at least 30 minutes. This helps the breading adhere better to the fish and prevents it from falling off during frying. If you’re short on time, you can skip this step, but I highly recommend it for the best results.
Preparing the Chips:
- Prepare the Potatoes: Peel the potatoes and rinse them under cold water. Cut them into chip shapes, about 1/2 inch thick. Try to make them as uniform as possible for even cooking.
- Soak the Potatoes (Important!): Place the cut potatoes in a large bowl and cover them with cold water. Let them soak for at least 30 minutes, or even better, an hour. This helps to remove excess starch, which will result in crispier chips. Change the water a couple of times during the soaking process.
- Dry the Potatoes Thoroughly: After soaking, drain the potatoes and pat them completely dry with paper towels. This is crucial! Any excess moisture will cause the oil to splatter and prevent the chips from getting crispy.
Cooking Process:
- First Fry (for the Chips): Heat about 2-3 inches of vegetable oil in a large, heavy-bottomed pot or deep fryer to 325°F (160°C). Carefully add the potatoes to the hot oil in batches, being careful not to overcrowd the pot. Overcrowding will lower the oil temperature and result in soggy chips. Fry the potatoes for about 5-7 minutes, or until they are softened but not yet browned. They should be slightly pale and flexible.
- Remove and Cool the Chips: Use a slotted spoon or spider to remove the chips from the oil and place them on a wire rack lined with paper towels to drain. Let them cool completely. This is another important step for achieving crispy chips.
- Second Fry (for the Chips): Increase the oil temperature to 375°F (190°C). Once the oil is hot, carefully add the cooled chips back into the oil in batches. Fry for another 2-3 minutes, or until they are golden brown and crispy.
- Drain and Season the Chips: Remove the chips from the oil and place them back on the wire rack lined with paper towels to drain. Immediately season them with salt to taste.
- Fry the Fish Fingers: While the chips are draining, heat about 1 inch of vegetable oil in a large skillet over medium-high heat. The oil should be hot enough that a breadcrumb dropped into it sizzles immediately. Carefully place the breaded fish fingers in the hot oil, being careful not to overcrowd the pan.
- Cook the Fish Fingers: Fry the fish fingers for about 2-3 minutes per side, or until they are golden brown and cooked through. The internal temperature of the fish should reach 145°F (63°C).
- Drain the Fish Fingers: Remove the fish fingers from the skillet and place them on a wire rack lined with paper towels to drain any excess oil.
Serving:
- Plate and Serve: Arrange the crispy chips and golden-brown fish fingers on plates.
- Add Your Favorite Sides: Serve immediately with lemon wedges, tartar sauce, ketchup, malt vinegar, and/or mushy peas, as desired. I personally love a good dollop of tartar sauce with mine!
- Enjoy! Dig in and enjoy your homemade fish fingers and chips! I hope you find this recipe as satisfying and delicious as I do. Don’t be afraid to experiment with different seasonings and sauces to make it your own. Happy cooking!
Conclusion:
So there you have it! This isn’t just your average fish fingers and chips; it’s a nostalgic hug on a plate, elevated with simple techniques that make all the difference. I truly believe this recipe is a must-try because it transforms a childhood classic into a satisfying and genuinely delicious meal that both kids and adults will adore. Forget soggy fish and bland potatoes we’re talking crispy, golden perfection every single time. The secret lies in the details: the double-frying for extra crunch, the perfectly seasoned breadcrumbs, and the fluffy, melt-in-your-mouth potato chips.
But the best part? It’s incredibly versatile! While I’ve outlined my go-to method, feel free to experiment and make it your own. For a healthier twist, you could try baking the fish fingers instead of frying them, or using sweet potato for the chips. Air frying is also a fantastic option for achieving that crispy texture with less oil.
Serving suggestions are endless! Of course, a generous dollop of ketchup or tartar sauce is a classic pairing. But don’t be afraid to get creative! A squeeze of fresh lemon juice brightens up the flavors beautifully. For a more sophisticated touch, try serving with a homemade aioli or a vibrant salsa verde. A side of mushy peas is a traditional accompaniment, but a simple green salad or some roasted vegetables would also work wonders.
And if you’re feeling adventurous, why not turn your fish fingers and chips into a fun and flavorful sandwich? Layer them onto a crusty roll with some lettuce, tomato, and your favorite sauce for a truly satisfying meal. You could even crumble the fish fingers over a salad for a protein-packed lunch.
I’m confident that once you try this recipe, you’ll never look at fish fingers and chips the same way again. It’s quick, easy, and guaranteed to be a crowd-pleaser. Plus, it’s a fantastic way to introduce kids to cooking and get them involved in the kitchen.
This recipe for fish fingers and chips is more than just a meal; it’s an experience. It’s about creating memories, sharing laughter, and enjoying simple pleasures. It’s about taking something familiar and making it extraordinary.
So, what are you waiting for? Grab your ingredients, put on some music, and get cooking! I’m so excited for you to try this recipe and experience the joy of perfectly cooked fish fingers and chips.
I’d absolutely love to hear about your experience! Did you make any variations? What sauces did you use? What did your family think? Please, share your photos and stories in the comments below. Your feedback is invaluable, and it helps me to continue creating recipes that you’ll love. Don’t forget to rate the recipe too! Happy cooking, and I can’t wait to hear from you! Let me know if you have any questions, I’m always happy to help. Enjoy your delicious, homemade fish fingers and chips!
Fish Fingers and Chips: The Ultimate Comfort Food Recipe
Crispy, golden fish fingers paired with perfectly fried chips, a comforting and delicious homemade meal the whole family will love.
Ingredients
- 1 lb White Fish Fillets (Cod, Haddock, or Pollock), skinless and boneless
- 1 cup All-Purpose Flour
- 2 large Eggs, beaten
- 1 cup Panko Breadcrumbs
- 1/2 teaspoon Salt
- 1/4 teaspoon Black Pepper
- 1/4 teaspoon Garlic Powder
- 1/4 teaspoon Paprika
- Vegetable Oil, for frying
- 2 lbs Russet Potatoes, peeled
- Vegetable Oil, for frying
- Salt, to taste
- Lemon wedges, for serving
- Tartar Sauce, for serving
- Ketchup, for serving
- Malt Vinegar, for serving
- Mushy Peas, for serving
Instructions
- Cut the Fish: Lay your fish fillets on a cutting board. Using a sharp knife, cut the fillets into strips about 1 inch wide and 3-4 inches long. Try to keep them relatively uniform in size so they cook evenly.
- Prepare the Breading Station: Set up three shallow dishes. In the first dish, place the all-purpose flour. In the second dish, add the beaten eggs. In the third dish, combine the panko breadcrumbs, salt, pepper, garlic powder, and paprika. Mix the breadcrumb mixture well to ensure the spices are evenly distributed.
- Bread the Fish Fingers: Take each fish finger and dredge it in the flour, making sure to coat all sides. Shake off any excess flour. Next, dip the floured fish finger into the beaten egg, again ensuring it’s fully coated. Finally, transfer the egg-coated fish finger to the panko breadcrumb mixture. Press the breadcrumbs firmly onto the fish to create a good, even coating. Repeat this process for all the fish fingers.
- Chill the Breaded Fish Fingers (Optional but Recommended): Place the breaded fish fingers on a plate or baking sheet lined with parchment paper. Cover them loosely with plastic wrap and refrigerate for at least 30 minutes. This helps the breading adhere better to the fish and prevents it from falling off during frying. If you’re short on time, you can skip this step, but I highly recommend it for the best results.
- Prepare the Potatoes: Peel the potatoes and rinse them under cold water. Cut them into chip shapes, about 1/2 inch thick. Try to make them as uniform as possible for even cooking.
- Soak the Potatoes (Important!): Place the cut potatoes in a large bowl and cover them with cold water. Let them soak for at least 30 minutes, or even better, an hour. This helps to remove excess starch, which will result in crispier chips. Change the water a couple of times during the soaking process.
- Dry the Potatoes Thoroughly: After soaking, drain the potatoes and pat them completely dry with paper towels. This is crucial! Any excess moisture will cause the oil to splatter and prevent the chips from getting crispy.
- First Fry (for the Chips): Heat about 2-3 inches of vegetable oil in a large, heavy-bottomed pot or deep fryer to 325°F (160°C). Carefully add the potatoes to the hot oil in batches, being careful not to overcrowd the pot. Overcrowding will lower the oil temperature and result in soggy chips. Fry the potatoes for about 5-7 minutes, or until they are softened but not yet browned. They should be slightly pale and flexible.
- Remove and Cool the Chips: Use a slotted spoon or spider to remove the chips from the oil and place them on a wire rack lined with paper towels to drain. Let them cool completely. This is another important step for achieving crispy chips.
- Second Fry (for the Chips): Increase the oil temperature to 375°F (190°C). Once the oil is hot, carefully add the cooled chips back into the oil in batches. Fry for another 2-3 minutes, or until they are golden brown and crispy.
- Drain and Season the Chips: Remove the chips from the oil and place them back on the wire rack lined with paper towels to drain. Immediately season them with salt to taste.
- Fry the Fish Fingers: While the chips are draining, heat about 1 inch of vegetable oil in a large skillet over medium-high heat. The oil should be hot enough that a breadcrumb dropped into it sizzles immediately. Carefully place the breaded fish fingers in the hot oil, being careful not to overcrowd the pan.
- Cook the Fish Fingers: Fry the fish fingers for about 2-3 minutes per side, or until they are golden brown and cooked through. The internal temperature of the fish should reach 145°F (63°C).
- Drain the Fish Fingers: Remove the fish fingers from the skillet and place them on a wire rack lined with paper towels to drain any excess oil.
- Plate and Serve: Arrange the crispy chips and golden-brown fish fingers on plates.
- Add Your Favorite Sides: Serve immediately with lemon wedges, tartar sauce, ketchup, malt vinegar, and/or mushy peas, as desired.
- Enjoy!
Notes
- Soaking the potatoes is crucial for crispy chips. Don’t skip this step!
- Chilling the breaded fish fingers helps the breading adhere better.
- Fry the chips in two stages for maximum crispiness.
- Be careful not to overcrowd the pan when frying, as this will lower the oil temperature and result in soggy food.
- Use a thermometer to ensure the oil is at the correct temperature for frying.
- Serve immediately for the best taste and texture.