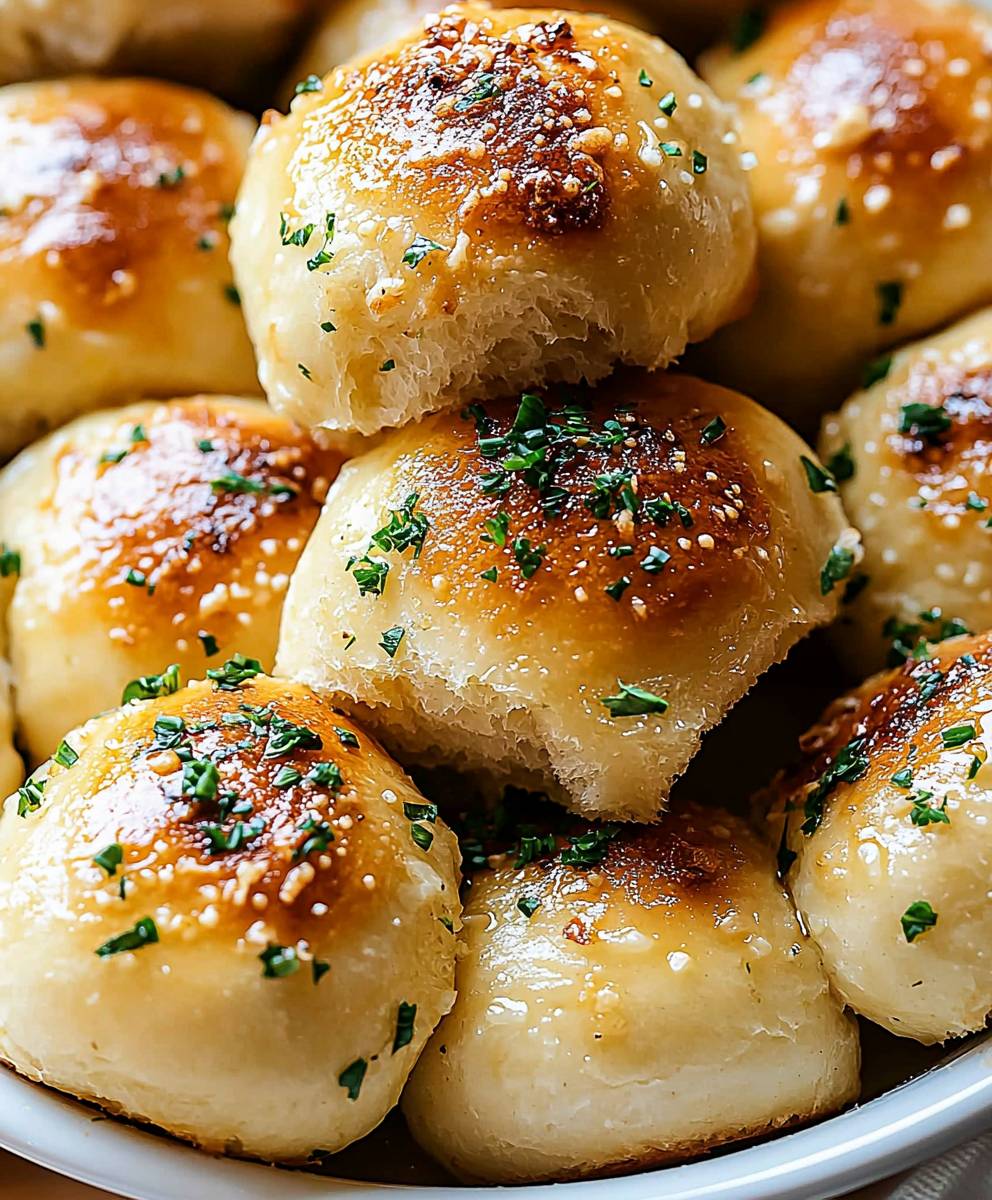
Garlic Bread Rolls: Is there anything quite as comforting and universally loved as the aroma of freshly baked bread mingling with the pungent, savory scent of garlic? I think not! These aren’t just any rolls; they’re a flavor explosion waiting to happen, a delightful side dish, or even a satisfying snack all on their own.
While the exact origins of garlic bread are debated, its popularity soared in the mid-20th century, likely as Italian-American restaurants sought to recreate the flavors of their homeland using readily available ingredients. The simple combination of bread, garlic, and butter proved irresistible, quickly becoming a staple on menus and in homes across the country.
What makes garlic bread rolls so incredibly appealing? It’s the perfect marriage of textures a soft, pillowy interior giving way to a crisp, golden-brown crust. Then there’s the taste: the rich, buttery goodness infused with the bold, unmistakable flavor of garlic. They’re incredibly easy to make, requiring minimal effort for maximum reward, and they’re guaranteed to be a crowd-pleaser at any gathering. Whether you’re serving them alongside a hearty pasta dish, a comforting bowl of soup, or simply enjoying them warm from the oven, these rolls are sure to bring a smile to your face. So, let’s get baking!

Ingredients:
- 1 package (0.25 ounce) active dry yeast
- 1/4 cup warm water (105-115 degrees F)
- 1 cup warm milk (105-115 degrees F)
- 1/4 cup granulated sugar
- 1 teaspoon salt
- 1/4 cup unsalted butter, melted
- 3 1/4 – 3 3/4 cups all-purpose flour, plus more for dusting
Garlic Butter Topping:
- 1/2 cup unsalted butter, softened
- 4 cloves garlic, minced
- 1/4 cup chopped fresh parsley
- 1/4 teaspoon garlic powder
- 1/4 teaspoon salt
- Pinch of red pepper flakes (optional)
Instructions:
Preparing the Dough:
- Activate the Yeast: In a small bowl, dissolve the yeast in the warm water. Let it stand for 5-10 minutes, or until foamy. This indicates that the yeast is active and ready to use. If the yeast doesn’t foam, it’s likely dead, and you’ll need to start with a fresh package.
- Combine Wet Ingredients: In a large mixing bowl (or the bowl of a stand mixer), combine the warm milk, sugar, salt, and melted butter. Stir until the sugar and salt are dissolved.
- Add Yeast Mixture: Pour the activated yeast mixture into the milk mixture and stir gently to combine.
- Gradually Add Flour: Gradually add the flour, one cup at a time, to the wet ingredients. If using a stand mixer, use the dough hook attachment. If mixing by hand, stir with a wooden spoon until a shaggy dough forms.
- Knead the Dough: Turn the dough out onto a lightly floured surface. Knead for 8-10 minutes, or until the dough is smooth and elastic. If using a stand mixer, knead with the dough hook for 6-8 minutes. The dough should be slightly tacky but not sticky. If it’s too sticky, add a little more flour, one tablespoon at a time.
- First Rise: Place the dough in a lightly oiled bowl, turning to coat all sides. Cover the bowl with plastic wrap or a clean kitchen towel. Let the dough rise in a warm place for 1-1.5 hours, or until doubled in size. I usually put mine in a slightly warmed oven (turned off!) to create a cozy environment.
Shaping the Rolls:
- Punch Down the Dough: Once the dough has doubled, gently punch it down to release the air.
- Divide the Dough: Turn the dough out onto a lightly floured surface. Divide the dough into 12 equal pieces. I find it easiest to use a kitchen scale to ensure even rolls, but you can also eyeball it.
- Shape the Rolls: Roll each piece of dough into a smooth ball. You can do this by cupping your hand over the dough and rolling it in a circular motion on the counter.
- Arrange on Baking Sheet: Place the shaped rolls on a baking sheet lined with parchment paper or a silicone baking mat. Leave about 1-2 inches of space between each roll to allow for expansion during the second rise.
Second Rise:
- Second Rise: Cover the baking sheet with plastic wrap or a clean kitchen towel. Let the rolls rise in a warm place for 30-45 minutes, or until they have nearly doubled in size. This second rise is crucial for achieving light and fluffy rolls.
Preparing the Garlic Butter Topping:
- Combine Ingredients: While the rolls are rising for the second time, prepare the garlic butter topping. In a small bowl, combine the softened butter, minced garlic, chopped parsley, garlic powder, salt, and red pepper flakes (if using). Mix well until all ingredients are evenly distributed. Make sure your butter is truly softened, not melted, for the best consistency.
Baking the Rolls:
- Preheat Oven: Preheat your oven to 375 degrees F (190 degrees C).
- Brush with Garlic Butter: Once the rolls have finished their second rise, gently brush the tops of each roll with the garlic butter topping. Be generous!
- Bake: Bake the rolls for 15-20 minutes, or until they are golden brown on top. Keep a close eye on them, as baking times can vary depending on your oven.
- Cool Slightly: Remove the rolls from the oven and let them cool on the baking sheet for a few minutes before transferring them to a wire rack to cool completely.
Serving:
- Serve Warm: These garlic bread rolls are best served warm. They are delicious on their own or as a side dish to pasta, soup, or salad.
- Optional: For an extra touch, you can brush the rolls with a little more melted garlic butter after they come out of the oven. You can also sprinkle them with grated Parmesan cheese.
Tips and Variations:
- Make Ahead: You can prepare the dough ahead of time and store it in the refrigerator for up to 24 hours. Let it come to room temperature before shaping and baking.
- Freezing: Baked rolls can be frozen for up to 2 months. Wrap them tightly in plastic wrap and then in foil. Thaw at room temperature before reheating.
- Herb Variations: Experiment with different herbs in the garlic butter topping. Rosemary, thyme, or oregano would all be delicious additions.
- Cheese: Add shredded cheese (such as mozzarella, Parmesan, or cheddar) to the garlic butter topping or sprinkle it on top of the rolls before baking.
- Spicy: Increase the amount of red pepper flakes in the garlic butter topping for a spicier kick.
- Garlic Lovers: If you’re a garlic fanatic, don’t be afraid to add even more minced garlic to the topping. Roasted garlic would also be a fantastic addition.
- Sweet Rolls: For a sweeter version, reduce the salt in the dough to 1/2 teaspoon and add 1/4 cup of honey or maple syrup. Omit the garlic butter topping and brush the rolls with melted butter and sprinkle with cinnamon sugar after baking.
- Whole Wheat: Substitute up to half of the all-purpose flour with whole wheat flour for a slightly nutty flavor and added fiber.
- Egg Wash: For a shinier crust, brush the rolls with an egg wash (1 egg beaten with 1 tablespoon of water) before baking.
Troubleshooting:
- Dough Not Rising: If your dough isn’t rising, make sure your yeast is fresh and that the water and milk are at the correct temperature (105-115 degrees F). Also, ensure that the room is warm enough.
- Rolls Too Dense: If your rolls are too dense, it could be due to over-kneading or not allowing them to rise long enough. Be sure to follow the instructions carefully and give the dough ample time to rise.
- Rolls Too Brown: If your rolls are browning too quickly, tent them with foil during the last few minutes of baking.
- Garlic Burning: To prevent the garlic from burning, you can add it to the butter after the rolls have been baking for about 10 minutes.
Nutritional Information (Approximate):
Please note that the nutritional information is an estimate and may vary depending on the specific ingredients and portion sizes used.
- Calories: 250-300 per roll
- Fat: 12-15 grams
- Saturated Fat: 7-9 grams
- Cholesterol: 30-40 mg
- Sodium: 300-400 mg
- Carbohydrates: 30-40 grams
- Fiber: 1-2 grams
- Sugar: 5-7 grams
- Protein: 5-7 grams
Enjoy your homemade garlic bread rolls! I hope you find this recipe easy to follow and that the results are delicious. Happy baking!
Conclusion:
These Garlic Bread Rolls are more than just a side dish; they’re an experience! From the intoxicating aroma that fills your kitchen as they bake to the first warm, garlicky bite, this recipe is guaranteed to become a family favorite. I truly believe that everyone deserves to enjoy freshly baked, homemade bread, and this recipe makes that dream incredibly accessible, even for beginner bakers. Why is this a must-try? Because it’s simple, satisfying, and utterly delicious. Forget store-bought rolls that are often dry and lacking in flavor. This recipe uses readily available ingredients and straightforward instructions, ensuring that you can whip up a batch of these golden beauties any time you crave them. The soft, fluffy interior combined with the crispy, garlicky crust is a textural and flavor sensation that’s hard to resist. Plus, the active time is minimal, allowing you to focus on other aspects of your meal or simply relax while the oven works its magic. But the best part? The versatility! These Garlic Bread Rolls are fantastic on their own, but they also pair perfectly with a wide range of dishes. Imagine serving them alongside a hearty bowl of pasta, a comforting soup, or a juicy grilled steak. They’re also incredible dipped in marinara sauce or used to make mini sandwiches.Serving Suggestions and Variations:
* Pizza Rolls: Before baking, sprinkle the tops with shredded mozzarella and pepperoni for a pizza-inspired twist. * Herb Infusion: Add fresh herbs like rosemary, thyme, or oregano to the garlic butter for an extra layer of flavor. * Cheesy Goodness: Incorporate grated Parmesan or Asiago cheese into the dough for a richer, more savory roll. * Spicy Kick: Add a pinch of red pepper flakes to the garlic butter for a subtle heat. * Bruschetta Bites: Slice the baked rolls in half and top with diced tomatoes, basil, and balsamic glaze for a delightful appetizer. * Garlic Knot Variation: Instead of forming rolls, shape the dough into knots before baking for a fun and visually appealing presentation. * Make-Ahead Option: Prepare the dough ahead of time and store it in the refrigerator overnight. Let it come to room temperature before shaping and baking. This allows the flavors to develop even further. I’m confident that you’ll love this recipe as much as I do. It’s a crowd-pleaser that’s perfect for weeknight dinners, special occasions, or simply a cozy weekend treat. The aroma alone is enough to bring a smile to everyone’s face! So, what are you waiting for? Gather your ingredients, preheat your oven, and get ready to experience the joy of homemade Garlic Bread Rolls. I can’t wait to hear about your baking adventures! Please, try this recipe, and don’t hesitate to share your photos and feedback in the comments below. Let me know what variations you tried and how they turned out. Happy baking! I am sure you will enjoy this recipe and it will become a staple in your home. Print
Garlic Bread Rolls: The Ultimate Guide to Baking Delicious Rolls
- Total Time: 165 minutes
- Yield: 12 rolls 1x
Description
Soft, fluffy garlic butter rolls, perfect as a side or snack.
Ingredients
- 1 package (0.25 ounce) active dry yeast
- 1/4 cup warm water (105–115 degrees F)
- 1 cup warm milk (105–115 degrees F)
- 1/4 cup granulated sugar
- 1 teaspoon salt
- 1/4 cup unsalted butter, melted
- 3 1/4 – 3 3/4 cups all-purpose flour, plus more for dusting
- 1/2 cup unsalted butter, softened
- 4 cloves garlic, minced
- 1/4 cup chopped fresh parsley
- 1/4 teaspoon garlic powder
- 1/4 teaspoon salt
- Pinch of red pepper flakes (optional)
Instructions
- Activate the Yeast: In a small bowl, dissolve the yeast in the warm water. Let it stand for 5-10 minutes, or until foamy. This indicates that the yeast is active and ready to use. If the yeast doesn’t foam, it’s likely dead, and you’ll need to start with a fresh package.
- Combine Wet Ingredients: In a large mixing bowl (or the bowl of a stand mixer), combine the warm milk, sugar, salt, and melted butter. Stir until the sugar and salt are dissolved.
- Add Yeast Mixture: Pour the activated yeast mixture into the milk mixture and stir gently to combine.
- Gradually Add Flour: Gradually add the flour, one cup at a time, to the wet ingredients. If using a stand mixer, use the dough hook attachment. If mixing by hand, stir with a wooden spoon until a shaggy dough forms.
- Knead the Dough: Turn the dough out onto a lightly floured surface. Knead for 8-10 minutes, or until the dough is smooth and elastic. If using a stand mixer, knead with the dough hook for 6-8 minutes. The dough should be slightly tacky but not sticky. If it’s too sticky, add a little more flour, one tablespoon at a time.
- First Rise: Place the dough in a lightly oiled bowl, turning to coat all sides. Cover the bowl with plastic wrap or a clean kitchen towel. Let the dough rise in a warm place for 1-1.5 hours, or until doubled in size. I usually put mine in a slightly warmed oven (turned off!) to create a cozy environment.
- Punch Down the Dough: Once the dough has doubled, gently punch it down to release the air.
- Divide the Dough: Turn the dough out onto a lightly floured surface. Divide the dough into 12 equal pieces. I find it easiest to use a kitchen scale to ensure even rolls, but you can also eyeball it.
- Shape the Rolls: Roll each piece of dough into a smooth ball. You can do this by cupping your hand over the dough and rolling it in a circular motion on the counter.
- Arrange on Baking Sheet: Place the shaped rolls on a baking sheet lined with parchment paper or a silicone baking mat. Leave about 1-2 inches of space between each roll to allow for expansion during the second rise.
- Second Rise: Cover the baking sheet with plastic wrap or a clean kitchen towel. Let the rolls rise in a warm place for 30-45 minutes, or until they have nearly doubled in size. This second rise is crucial for achieving light and fluffy rolls.
- Combine Ingredients (Garlic Butter): While the rolls are rising for the second time, prepare the garlic butter topping. In a small bowl, combine the softened butter, minced garlic, chopped parsley, garlic powder, salt, and red pepper flakes (if using). Mix well until all ingredients are evenly distributed. Make sure your butter is truly softened, not melted, for the best consistency.
- Preheat Oven: Preheat your oven to 375 degrees F (190 degrees C).
- Brush with Garlic Butter: Once the rolls have finished their second rise, gently brush the tops of each roll with the garlic butter topping. Be generous!
- Bake: Bake the rolls for 15-20 minutes, or until they are golden brown on top. Keep a close eye on them, as baking times can vary depending on your oven.
- Cool Slightly: Remove the rolls from the oven and let them cool on the baking sheet for a few minutes before transferring them to a wire rack to cool completely.
- Serve Warm: These garlic bread rolls are best served warm. They are delicious on their own or as a side dish to pasta, soup, or salad.
- Optional: For an extra touch, you can brush the rolls with a little more melted garlic butter after they come out of the oven. You can also sprinkle them with grated Parmesan cheese.
Notes
- Make Ahead: You can prepare the dough ahead of time and store it in the refrigerator for up to 24 hours. Let it come to room temperature before shaping and baking.
- Freezing: Baked rolls can be frozen for up to 2 months. Wrap them tightly in plastic wrap and then in foil. Thaw at room temperature before reheating.
- Herb Variations: Experiment with different herbs in the garlic butter topping. Rosemary, thyme, or oregano would all be delicious additions.
- Cheese: Add shredded cheese (such as mozzarella, Parmesan, or cheddar) to the garlic butter topping or sprinkle it on top of the rolls before baking.
- Spicy: Increase the amount of red pepper flakes in the garlic butter topping for a spicier kick.
- Garlic Lovers: If you’re a garlic fanatic, don’t be afraid to add even more minced garlic to the topping. Roasted garlic would also be a fantastic addition.
- Sweet Rolls: For a sweeter version, reduce the salt in the dough to 1/2 teaspoon and add 1/4 cup of honey or maple syrup. Omit the garlic butter topping and brush the rolls with melted butter and sprinkle with cinnamon sugar after baking.
- Whole Wheat: Substitute up to half of the all-purpose flour with whole wheat flour for a slightly nutty flavor and added fiber.
- Egg Wash: For a shinier crust, brush the rolls with an egg wash (1 egg beaten with 1 tablespoon of water) before baking.
- Dough Not Rising: If your dough isn’t rising, make sure your yeast is fresh and that the water and milk are at the correct temperature (105-115 degrees F). Also, ensure that the room is warm enough.
- Rolls Too Dense: If your rolls are too dense, it could be due to over-kneading or not allowing them to rise long enough. Be sure to follow the instructions carefully and give the dough ample time to rise.
- Rolls Too Brown: If your rolls are browning too quickly, tent them with foil during the last few minutes of baking.
- Garlic Burning: To prevent the garlic from burning, you can add it to the butter after the rolls have been baking for about 10 minutes.
- Prep Time: 30 minutes
- Cook Time: 15 minutes