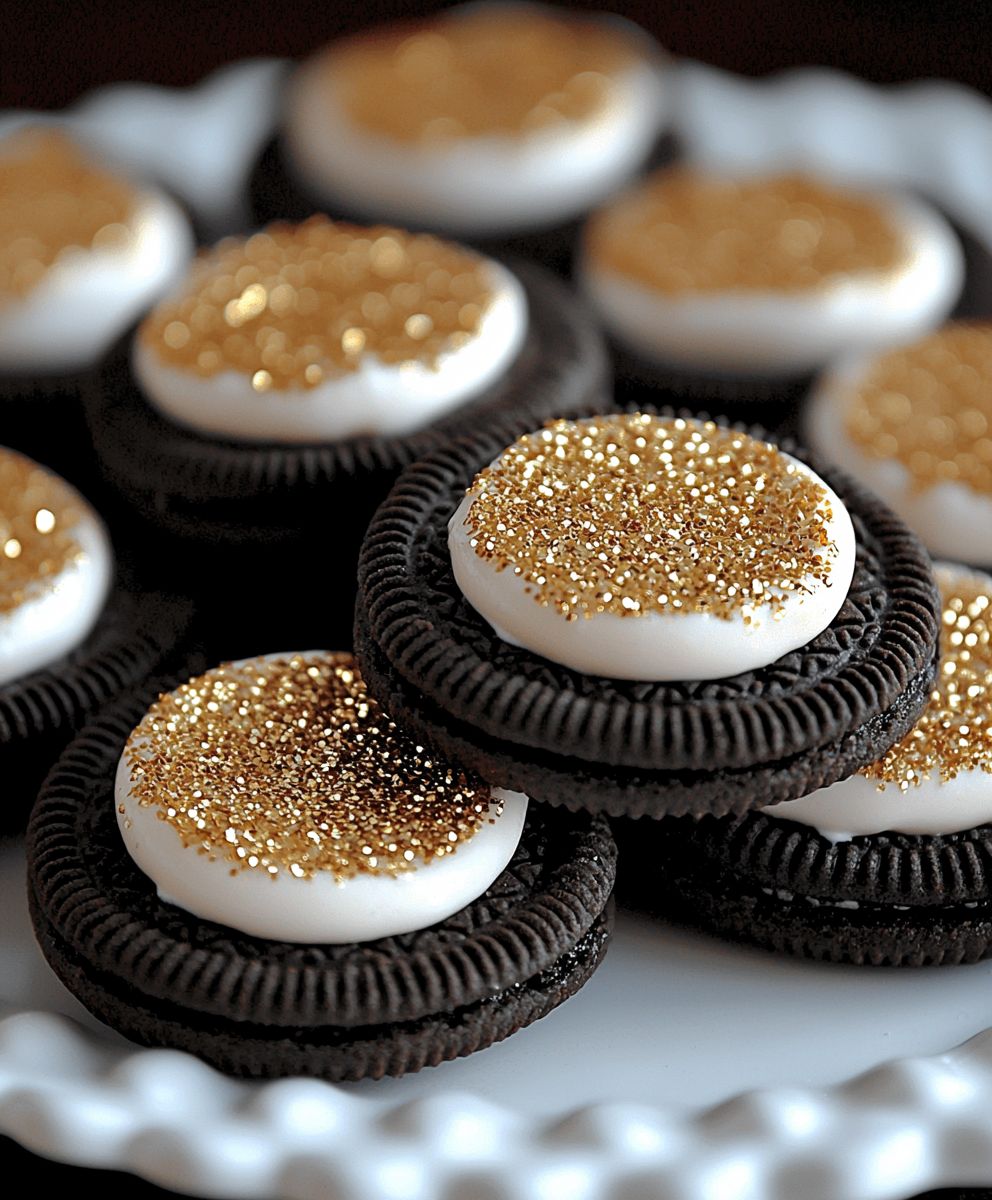
Gold Glitter Peanut Butter Oreos: Prepare to be dazzled! Imagine biting into a classic Oreo, but with a luxurious, shimmering twist. We’re not just talking about any Oreo; we’re talking about a peanut butter-filled delight elevated to a whole new level of decadence with edible gold glitter. These aren’t your average cookies; they’re a statement, a celebration, and a guaranteed conversation starter.
While the Oreo itself boasts a rich history dating back to 1912, this particular iteration the Gold Glitter Peanut Butter Oreos is a modern marvel, a testament to our collective love for all things sparkly and delicious. Peanut butter and chocolate have always been a match made in heaven, a flavor combination that transcends generations and cultures. The addition of edible gold glitter transforms this already beloved treat into something truly special, perfect for holidays, birthdays, or simply adding a touch of magic to your everyday life.
Why do people adore these glittering goodies? It’s simple. The creamy, salty peanut butter filling perfectly complements the rich, dark chocolate cookies. The texture is a delightful contrast of crunchy and smooth, and the edible gold glitter adds a touch of whimsy and elegance. Plus, let’s be honest, who can resist a little sparkle? These cookies are not only delicious but also visually stunning, making them the perfect treat to share (or not!) with friends and family. Get ready to bake up a batch of these unforgettable cookies!

Ingredients:
- 1 package (14.3 ounces) Double Stuffed Oreo Cookies
- 1 cup creamy peanut butter
- 1/2 cup (1 stick) unsalted butter, softened
- 3 cups powdered sugar, sifted
- 1/4 cup milk
- 1 teaspoon vanilla extract
- 1/4 teaspoon salt
- 12 ounces semi-sweet chocolate chips
- 1 tablespoon vegetable shortening
- Edible gold glitter, for decorating
Preparing the Peanut Butter Filling:
Alright, let’s get started with the heart of these decadent treats the peanut butter filling! This is where the magic happens, transforming ordinary Oreos into something truly extraordinary. Don’t be intimidated; it’s a simple process, and I’ll guide you through each step.
- Cream the Butter and Peanut Butter: In a large mixing bowl, combine the softened butter and peanut butter. Make sure your butter is truly softened; otherwise, you’ll end up with a lumpy filling. I like to leave mine out at room temperature for about an hour before starting. Use an electric mixer (either a stand mixer or a hand mixer) to cream the butter and peanut butter together until they are light and fluffy. This usually takes about 2-3 minutes. You want a smooth, homogenous mixture with no visible streaks of butter or peanut butter.
- Add the Powdered Sugar: Gradually add the sifted powdered sugar to the butter and peanut butter mixture. Sifting the powdered sugar is crucial to prevent lumps in your filling. I usually add it in one-cup increments, mixing on low speed after each addition. This prevents a powdered sugar explosion in your kitchen! Mix until just combined. Be careful not to overmix, as this can make the filling tough.
- Incorporate the Milk, Vanilla, and Salt: In a separate small bowl, whisk together the milk, vanilla extract, and salt. This ensures that the vanilla and salt are evenly distributed throughout the filling. Pour the milk mixture into the peanut butter mixture and mix on low speed until everything is well combined. The filling should be smooth, creamy, and spreadable. If it seems too thick, add a tablespoon of milk at a time until you reach the desired consistency. If it’s too thin, add a tablespoon of powdered sugar at a time.
- Taste Test and Adjust: Now comes the fun part the taste test! Use a clean spoon to sample the peanut butter filling. Adjust the sweetness or saltiness to your liking. If you prefer a sweeter filling, add a little more powdered sugar. If you want a more pronounced peanut butter flavor, add a touch more peanut butter. Remember, you’re the chef, so make it your own!
Assembling the Gold Glitter Peanut Butter Oreos:
Now that our peanut butter filling is ready, it’s time to assemble these beauties. This is where the “Gold Glitter Peanut Butter Oreo” transformation truly begins. Get ready to get your hands a little messy it’s all part of the fun!
- Separate the Oreo Cookies: Carefully twist apart each Oreo cookie, separating the chocolate wafers from the original cream filling. Try to keep the wafers intact; we’ll be using both halves. If some break, don’t worry; you can still use them!
- Remove the Original Filling: Using a butter knife or a small offset spatula, gently scrape off the original cream filling from each Oreo wafer. You want to remove as much of the original filling as possible to make room for our delicious peanut butter filling. Don’t throw away the filling! You can save it for another use, like adding it to milkshakes or ice cream.
- Spread the Peanut Butter Filling: Take a generous spoonful of the peanut butter filling and spread it evenly onto one of the Oreo wafers. I like to use a small offset spatula for this, but a butter knife works just as well. Make sure the filling is spread all the way to the edges of the wafer.
- Sandwich the Cookies: Place another Oreo wafer on top of the peanut butter filling, creating a sandwich. Gently press down on the top wafer to help the filling adhere and to create a cohesive cookie. Be careful not to press too hard, or the filling will squish out the sides.
- Repeat the Process: Continue separating, filling, and sandwiching the Oreo cookies until you’ve used all of the peanut butter filling or all of the Oreo cookies.
- Chill the Assembled Cookies: Place the assembled cookies on a baking sheet lined with parchment paper. This will prevent them from sticking. Place the baking sheet in the refrigerator and chill the cookies for at least 30 minutes. This will help the peanut butter filling firm up and make the cookies easier to dip in chocolate.
Chocolate Coating and Gold Glitter Decoration:
The final step is to coat these peanut butter-filled Oreos in a luscious layer of chocolate and then adorn them with edible gold glitter. This is what truly elevates these cookies to a show-stopping dessert. Get ready to unleash your inner artist!
- Melt the Chocolate: In a heat-safe bowl, combine the semi-sweet chocolate chips and vegetable shortening. The vegetable shortening helps to thin the chocolate and gives it a smoother, glossier finish. You can melt the chocolate in the microwave or over a double boiler.
- Microwave Method: Microwave the chocolate in 30-second intervals, stirring after each interval, until the chocolate is completely melted and smooth. Be careful not to overheat the chocolate, as it can burn.
- Double Boiler Method: Fill a saucepan with about an inch of water and bring it to a simmer. Place the heat-safe bowl with the chocolate and shortening over the simmering water, making sure the bottom of the bowl doesn’t touch the water. Stir constantly until the chocolate is completely melted and smooth.
- Dip the Cookies: Remove the chilled cookies from the refrigerator. One at a time, dip each cookie into the melted chocolate, making sure to coat it completely. You can use a fork or dipping tools to help with this process. Gently tap off any excess chocolate.
- Decorate with Gold Glitter: While the chocolate is still wet, sprinkle the edible gold glitter generously over the dipped cookies. The glitter will adhere to the wet chocolate, creating a beautiful and festive look. Don’t be shy with the glitter; the more, the merrier!
- Set the Chocolate: Place the decorated cookies back on the parchment-lined baking sheet. Allow the chocolate to set completely. You can speed up the process by placing the baking sheet in the refrigerator for about 15-20 minutes.
- Serve and Enjoy: Once the chocolate is set, the Gold Glitter Peanut Butter Oreos are ready to be served and enjoyed! These cookies are perfect for parties, holidays, or any special occasion. They’re also a great homemade gift for friends and family.
Tips and Variations:
Peanut Butter Variations:
- Crunchy Peanut Butter: For added texture, use crunchy peanut butter in the filling.
- Different Nut Butters: Experiment with other nut butters, such as almond butter or cashew butter.
Chocolate Variations:
- Dark Chocolate: Use dark chocolate for a richer, more intense flavor.
- White Chocolate: Use white chocolate for a sweeter, more delicate flavor.
- Milk Chocolate: Use milk chocolate for a classic, crowd-pleasing flavor.
Decoration Variations:
- Sprinkles: Use other types of sprinkles instead of gold glitter.
- Chopped Nuts: Sprinkle chopped nuts over the chocolate before it sets.
- Sea Salt: Sprinkle a pinch of sea salt over the chocolate for a sweet and salty treat.
Storage Instructions:
Store the Gold Glitter Peanut Butter Oreos in an airtight container at room temperature for up to 3 days or in the refrigerator for up to a week. They can also be frozen for up to 2 months. Thaw in the refrigerator before serving.
Conclusion:
So, there you have it! My take on Gold Glitter Peanut Butter Oreos. I truly believe this recipe is a must-try for anyone who loves a little bit of sparkle and a whole lot of peanut butter and chocolate goodness. It’s more than just a cookie; it’s an experience, a little burst of joy in every bite. The combination of the classic Oreo crunch, the creamy peanut butter filling, and the dazzling gold glitter is simply irresistible. It’s the perfect treat for parties, holidays, or even just a special afternoon pick-me-up.
But why is this recipe so special? It’s the attention to detail, the quality of ingredients, and the sheer fun of creating something beautiful and delicious. The gold glitter elevates these cookies from ordinary to extraordinary, making them a showstopper that will impress your friends and family. Plus, the peanut butter filling is perfectly balanced not too sweet, not too salty, just pure peanut butter bliss. And let’s be honest, who can resist the allure of a homemade Oreo?
Now, let’s talk about serving suggestions and variations. These Gold Glitter Peanut Butter Oreos are fantastic on their own, but you can also get creative with how you serve them. Imagine them arranged on a beautiful platter for a holiday gathering, or tucked into a gift box for a special someone. They’re also delicious crumbled over ice cream or blended into a milkshake for an extra decadent treat. For a fun twist, try dipping them in melted white chocolate and adding even more glitter! Or, if you’re feeling adventurous, experiment with different types of peanut butter crunchy, honey-roasted, or even a flavored peanut butter like chocolate or maple. The possibilities are endless!
Here are a few more ideas to spark your creativity:
- For a festive touch: Use different colored sprinkles or edible glitter to match the occasion. Red and green for Christmas, pastel colors for Easter, or spooky colors for Halloween.
- For a healthier option: Use natural peanut butter and reduce the amount of sugar in the filling. You can also substitute the Oreo cookies with whole-wheat chocolate wafers.
- For a vegan version: Use vegan Oreo cookies and a vegan peanut butter filling. There are plenty of delicious vegan options available in most grocery stores.
- For a gourmet twist: Drizzle the finished cookies with melted dark chocolate and sprinkle with sea salt. The combination of sweet, salty, and bitter is simply divine.
I’m so excited for you to try this recipe and create your own dazzling batch of Gold Glitter Peanut Butter Oreos. I know you’ll love them as much as I do. The process is simple, the ingredients are readily available, and the results are absolutely stunning. Don’t be afraid to get creative and experiment with different variations to make them your own. After all, cooking should be fun and enjoyable!
So, what are you waiting for? Head to the kitchen, gather your ingredients, and let the baking begin! And most importantly, don’t forget to share your creations with me. I’d love to see your photos and hear about your experience. Tag me on social media using #GoldGlitterPeanutButterOreos and let me know what you think. I can’t wait to see your sparkling masterpieces!
Happy baking, and may your cookies always be golden and delicious!
Gold Glitter Peanut Butter Oreos: A Deliciously Decadent Review
Double Stuffed Oreos with creamy peanut butter filling, dipped in chocolate, and sprinkled with edible gold glitter.
Ingredients
- 1 package (14.3 ounces) Double Stuffed Oreo Cookies
- 1 cup creamy peanut butter
- 1/2 cup (1 stick) unsalted butter, softened
- 3 cups powdered sugar, sifted
- 1/4 cup milk
- 1 teaspoon vanilla extract
- 1/4 teaspoon salt
- 12 ounces semi-sweet chocolate chips
- 1 tablespoon vegetable shortening
- Edible gold glitter, for decorating
Instructions
- In a large mixing bowl, cream together the softened butter and peanut butter with an electric mixer until light and fluffy (2-3 minutes).
- Gradually add the sifted powdered sugar to the butter and peanut butter mixture, mixing on low speed after each addition until just combined.
- In a separate small bowl, whisk together the milk, vanilla extract, and salt. Pour the milk mixture into the peanut butter mixture and mix on low speed until well combined. The filling should be smooth, creamy, and spreadable. Adjust consistency with milk or powdered sugar as needed.
- Taste test and adjust sweetness or saltiness to your liking.
- Carefully twist apart each Oreo cookie, separating the chocolate wafers from the original cream filling.
- Using a butter knife or small spatula, gently scrape off the original cream filling from each Oreo wafer.
- Spread a generous spoonful of the peanut butter filling evenly onto one of the Oreo wafers.
- Place another Oreo wafer on top of the peanut butter filling, creating a sandwich. Gently press down.
- Repeat the process until all cookies are assembled.
- Place the assembled cookies on a baking sheet lined with parchment paper and chill in the refrigerator for at least 30 minutes.
- In a heat-safe bowl, combine the semi-sweet chocolate chips and vegetable shortening. Melt in the microwave in 30-second intervals, stirring after each interval, or over a double boiler until completely melted and smooth.
- Remove the chilled cookies from the refrigerator. One at a time, dip each cookie into the melted chocolate, making sure to coat it completely. Gently tap off any excess chocolate.
- While the chocolate is still wet, sprinkle the edible gold glitter generously over the dipped cookies.
- Place the decorated cookies back on the parchment-lined baking sheet. Allow the chocolate to set completely. You can speed up the process by placing the baking sheet in the refrigerator for about 15-20 minutes.
- Serve and enjoy!
Notes
- Peanut Butter Variations: Use crunchy peanut butter or other nut butters like almond or cashew butter.
- Chocolate Variations: Use dark, white, or milk chocolate.
- Decoration Variations: Use sprinkles, chopped nuts, or sea salt.
- Storage: Store in an airtight container at room temperature for up to 3 days, in the refrigerator for up to a week, or freeze for up to 2 months. Thaw in the refrigerator before serving.