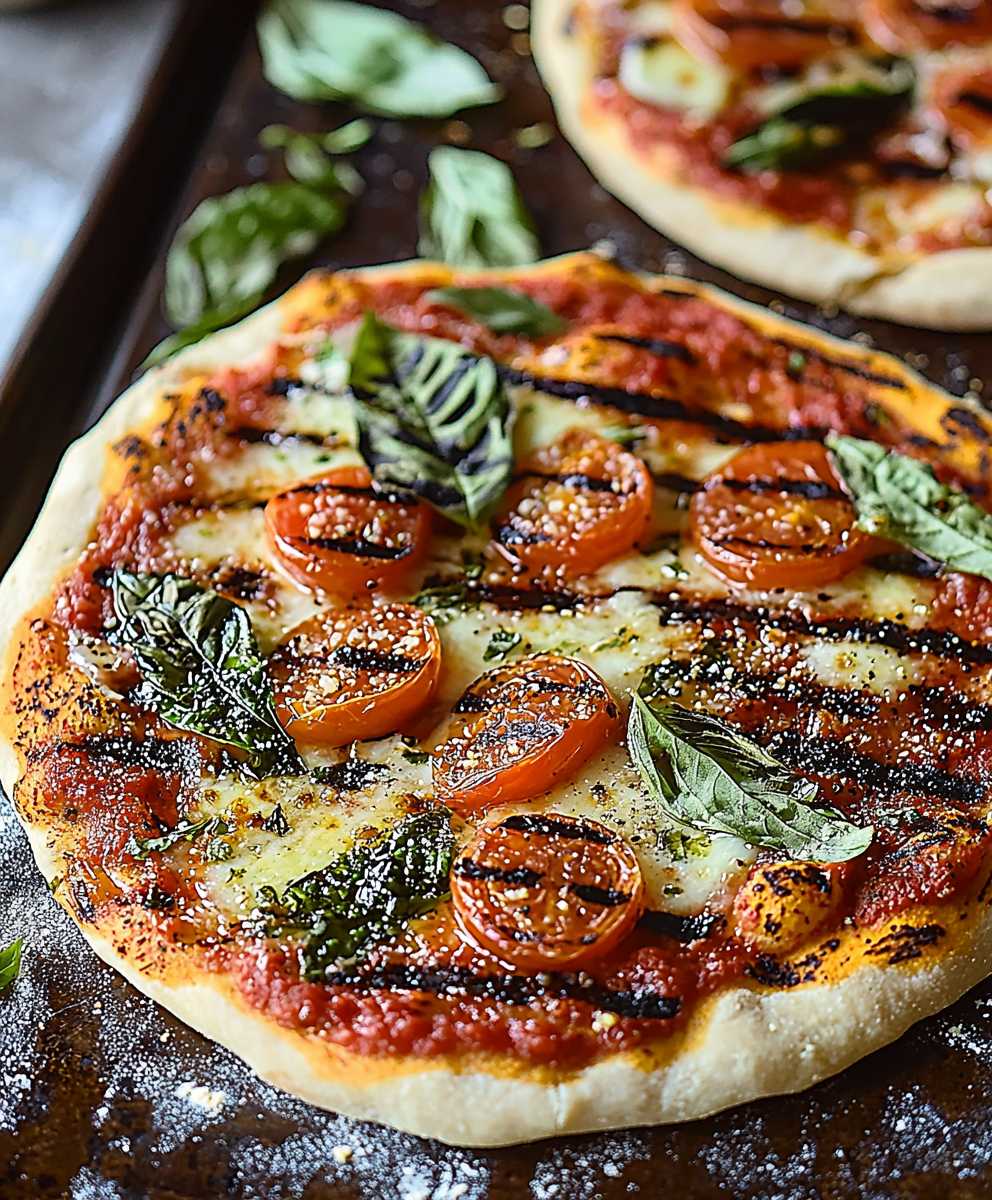
Grilled Pizza: the words alone conjure up images of smoky char, crispy crusts, and melty, bubbly cheese. Forget ordering takeout! I’m about to show you how to create pizza perfection right in your own backyard. Have you ever experienced the magic of grilling pizza? It’s a game-changer, I promise you!
While pizza’s origins trace back to ancient flatbreads, the modern pizza we know and love truly blossomed in Naples, Italy. It quickly became a street food staple, enjoyed by people from all walks of life. The beauty of pizza lies in its simplicity and adaptability. And taking it to the grill? Well, that’s just pure genius!
People adore grilled pizza for so many reasons. The high heat of the grill imparts a unique smoky flavor that you simply can’t achieve in a conventional oven. The crust develops a delightful crispness, with those coveted charred spots that add a touch of rustic charm. Plus, it’s incredibly quick and easy to make, perfect for a casual weeknight dinner or a fun weekend gathering. The interactive nature of grilling also makes it a crowd-pleaser everyone can customize their own slice with their favorite toppings. So, are you ready to ditch the delivery and embrace the deliciousness of homemade grilled pizza? Let’s get started!

Ingredients:
- For the Pizza Dough:
- 3 1/2 cups (420g) all-purpose flour, plus more for dusting
- 1 teaspoon (3g) instant dry yeast
- 2 teaspoons (12g) salt
- 1 1/2 cups (360ml) warm water (105-115°F / 40-46°C)
- 2 tablespoons (30ml) olive oil, plus more for greasing
- For the Pizza Sauce:
- 1 (28 ounce) can crushed tomatoes
- 2 cloves garlic, minced
- 1 teaspoon dried oregano
- 1/2 teaspoon dried basil
- 1/4 teaspoon red pepper flakes (optional)
- 1 tablespoon olive oil
- Salt and black pepper to taste
- For the Toppings (adjust to your preference):
- 8 ounces fresh mozzarella cheese, sliced
- 1/2 cup grated Parmesan cheese
- 1/2 cup pepperoni slices
- 1/2 cup sliced mushrooms
- 1/4 cup sliced red onion
- Fresh basil leaves, for garnish
- Olive oil, for drizzling
Preparing the Pizza Dough:
- Combine Dry Ingredients: In a large bowl, whisk together the flour, instant dry yeast, and salt. Make sure the yeast and salt don’t directly touch each other, as the salt can inhibit the yeast’s activity.
- Add Wet Ingredients: Add the warm water and olive oil to the dry ingredients. Stir with a wooden spoon or spatula until a shaggy dough forms.
- Knead the Dough: Turn the dough out onto a lightly floured surface. Knead for 8-10 minutes, or until the dough is smooth and elastic. If the dough is too sticky, add a little more flour, one tablespoon at a time. Be careful not to add too much flour, as this can make the dough tough. I like to use a stand mixer with a dough hook for this step, it saves a lot of effort!
- First Rise: Lightly grease a large bowl with olive oil. Place the dough in the bowl, turning to coat. Cover the bowl with plastic wrap or a clean kitchen towel. Let the dough rise in a warm place for 1-1.5 hours, or until doubled in size. This is crucial for developing the flavor and texture of the dough. A warm spot in your kitchen, like near the oven, works great.
- Punch Down and Divide: Gently punch down the dough to release the air. Turn the dough out onto a lightly floured surface. Divide the dough in half (or into smaller portions if you prefer smaller pizzas). Shape each portion into a ball.
- Second Rise (Optional): Cover the dough balls with plastic wrap or a clean kitchen towel and let them rest for 15-20 minutes. This allows the gluten to relax, making the dough easier to roll out. This step is optional, but I find it makes a big difference in the final texture.
Making the Pizza Sauce:
- Sauté Garlic: Heat the olive oil in a medium saucepan over medium heat. Add the minced garlic and cook for about 1 minute, or until fragrant. Be careful not to burn the garlic, as this will make the sauce bitter.
- Add Tomatoes and Seasonings: Add the crushed tomatoes, dried oregano, dried basil, and red pepper flakes (if using) to the saucepan. Season with salt and black pepper to taste.
- Simmer the Sauce: Bring the sauce to a simmer, then reduce the heat to low and simmer for 15-20 minutes, stirring occasionally. This allows the flavors to meld together and the sauce to thicken slightly.
- Taste and Adjust: Taste the sauce and adjust the seasonings as needed. You may want to add a pinch of sugar if the sauce is too acidic.
Preparing the Grill:
- Clean and Oil the Grill: Preheat your grill to medium-high heat. Make sure the grill grates are clean. Use a grill brush to remove any debris. Lightly oil the grill grates with cooking oil or a high-heat oil like canola or grapeseed oil. This will prevent the pizza dough from sticking.
- Set Up Zones (Optional): If your grill has multiple burners, consider creating heat zones. Keep one side of the grill at medium-high heat for cooking the pizza and the other side at low heat or off for keeping the cooked pizza warm. This is especially helpful if you’re making multiple pizzas.
Grilling the Pizza:
- Roll Out the Dough: On a lightly floured surface, roll out one of the dough balls into a 12-inch circle (or desired size and shape). You can also stretch the dough by hand if you prefer a more rustic look.
- Brush with Olive Oil: Brush one side of the rolled-out dough with olive oil. This will help prevent the dough from sticking to the grill and give it a nice golden-brown color.
- Grill the First Side: Carefully place the oiled side of the dough onto the hot grill grates. Grill for 2-3 minutes, or until the dough is lightly charred and has grill marks. Watch it closely, as it can burn quickly!
- Flip the Dough: Using tongs or a large spatula, carefully flip the dough over.
- Add Sauce and Toppings: Quickly spread a thin layer of pizza sauce over the grilled side of the dough. Sprinkle with mozzarella cheese, Parmesan cheese, pepperoni, mushrooms, red onion, and any other toppings you desire.
- Close the Grill Lid: Close the grill lid and cook for 3-5 minutes, or until the cheese is melted and bubbly and the bottom of the crust is golden brown. Keep a close eye on the pizza to prevent burning.
- Remove from Grill: Carefully remove the pizza from the grill using a large spatula or pizza peel.
- Garnish and Serve: Garnish with fresh basil leaves and a drizzle of olive oil. Slice the pizza and serve immediately.
- Repeat: Repeat the grilling process with the remaining dough and toppings.
Tips for Grilling Pizza Successfully:
- Don’t Overload the Pizza: Too many toppings can make the pizza soggy and difficult to handle on the grill.
- Use a Pizza Peel: A pizza peel makes it easier to transfer the pizza to and from the grill.
- Keep a Spray Bottle of Water Handy: If the grill flares up, spray a little water onto the flames to control them.
- Adjust Grilling Time: Grilling times may vary depending on your grill and the thickness of the dough. Keep a close eye on the pizza and adjust the grilling time as needed.
- Experiment with Toppings: Get creative with your toppings! Try different cheeses, vegetables, meats, and sauces.
Troubleshooting:
- Dough Sticking to the Grill: Make sure the grill grates are clean and well-oiled. Also, ensure the dough is brushed with olive oil before placing it on the grill.
- Pizza Burning: Reduce the heat of the grill or move the pizza to a cooler part of the grill.
- Toppings Not Melting: Close the grill lid to trap heat and help the toppings melt. You can also use a basting brush to lightly brush the toppings with olive oil to help them cook.
- Soggy Pizza: Don’t overload the pizza with toppings. Also, make sure the grill is hot enough to cook the crust quickly.
This grilled pizza recipe is a fantastic way to enjoy a classic dish with a smoky, charred flavor. The process might seem a little intimidating at first, but with a little practice, you’ll be grilling pizzas like a pro in no time! Remember to adjust the toppings to your liking and have fun experimenting with different flavor combinations. Enjoy!
Conclusion:
So there you have it! This Grilled Pizza recipe isn’t just another pizza recipe; it’s a gateway to summer evenings filled with smoky flavors and crispy crusts that will have everyone begging for more. I truly believe that once you try grilling your pizza, you’ll never want to bake it in the oven again. The char, the slight crispness, the overall depth of flavor it’s simply unmatched.
But why is this recipe a must-try? Beyond the incredible taste, it’s also incredibly versatile and fun! It’s a fantastic way to get the whole family involved in the cooking process. Kids can help assemble their own mini pizzas, and adults can experiment with different toppings and flavor combinations. Plus, it’s a great excuse to fire up the grill and enjoy the beautiful weather.
Serving Suggestions and Variations:
The possibilities are truly endless when it comes to serving and varying this recipe. For a classic experience, stick with traditional toppings like pepperoni, mozzarella, and marinara sauce. But don’t be afraid to get creative!
* Mediterranean Grilled Pizza: Top your pizza with feta cheese, Kalamata olives, sun-dried tomatoes, and a drizzle of olive oil.
* BBQ Chicken Grilled Pizza: Use BBQ sauce as your base, add grilled chicken, red onion, and cilantro.
* Vegetarian Grilled Pizza: Load up your pizza with grilled vegetables like zucchini, bell peppers, and eggplant. A balsamic glaze adds a touch of sweetness.
* Dessert Grilled Pizza: For a sweet treat, grill a pizza dough and top it with Nutella, sliced bananas, and strawberries. A sprinkle of powdered sugar completes the masterpiece.
Consider serving your grilled pizza with a fresh side salad. A simple arugula salad with a lemon vinaigrette is a perfect complement to the richness of the pizza. You could also offer a selection of dipping sauces, such as pesto, ranch, or a spicy marinara.
For a party, set up a pizza bar with a variety of toppings and let your guests create their own personalized pizzas. This is a fun and interactive way to get everyone involved and ensure that everyone gets exactly what they want.
Don’t Forget the Dough!
While you can certainly use store-bought pizza dough, I highly recommend making your own. It’s surprisingly easy, and the flavor is far superior. Plus, you can control the ingredients and ensure that you’re using high-quality flour. If you’re short on time, many local pizzerias will sell you fresh dough.
Time to Get Grilling!
I’m so excited for you to try this recipe and experience the magic of Grilled Pizza for yourself. I promise you won’t be disappointed. The smoky flavor, the crispy crust, and the endless possibilities for toppings make this a recipe that you’ll come back to again and again.
So, fire up your grill, gather your ingredients, and get ready to create some unforgettable pizzas. And most importantly, don’t forget to have fun! Cooking should be an enjoyable experience, so relax, experiment, and savor every bite.
I would absolutely love to hear about your experience with this recipe! Please share your photos and comments on social media using [Your Hashtag Here]. Let me know what toppings you used, what variations you tried, and what your family and friends thought. Your feedback is invaluable, and it helps me to continue creating recipes that you’ll love. Happy grilling!
Grilled Pizza: The Ultimate Guide to Perfecting Your Outdoor Pizza
Delicious grilled pizza with homemade dough, flavorful sauce, and your favorite toppings. Get that smoky, charred flavor for a unique pizza experience!
Ingredients
- 3 1/2 cups (420g) all-purpose flour, plus more for dusting
- 1 teaspoon (3g) instant dry yeast
- 2 teaspoons (12g) salt
- 1 1/2 cups (360ml) warm water (105-115°F / 40-46°C)
- 2 tablespoons (30ml) olive oil, plus more for greasing
- 1 (28 ounce) can crushed tomatoes
- 2 cloves garlic, minced
- 1 teaspoon dried oregano
- 1/2 teaspoon dried basil
- 1/4 teaspoon red pepper flakes (optional)
- 1 tablespoon olive oil
- Salt and black pepper to taste
- 8 ounces fresh mozzarella cheese, sliced
- 1/2 cup grated Parmesan cheese
- 1/2 cup pepperoni slices
- 1/2 cup sliced mushrooms
- 1/4 cup sliced red onion
- Fresh basil leaves, for garnish
- Olive oil, for drizzling
Instructions
- Prepare the Pizza Dough:
- Combine Dry Ingredients: In a large bowl, whisk together the flour, instant dry yeast, and salt. Make sure the yeast and salt don’t directly touch each other.
- Add Wet Ingredients: Add the warm water and olive oil to the dry ingredients. Stir until a shaggy dough forms.
- Knead the Dough: Turn the dough out onto a lightly floured surface. Knead for 8-10 minutes, or until smooth and elastic. Add flour sparingly if needed.
- First Rise: Lightly grease a large bowl with olive oil. Place the dough in the bowl, turning to coat. Cover and let rise in a warm place for 1-1.5 hours, or until doubled.
- Punch Down and Divide: Gently punch down the dough. Turn out onto a lightly floured surface. Divide the dough in half (or smaller portions). Shape each portion into a ball.
- Second Rise (Optional): Cover the dough balls and let them rest for 15-20 minutes.
- Make the Pizza Sauce:
- Sauté Garlic: Heat the olive oil in a medium saucepan over medium heat. Add the minced garlic and cook for about 1 minute, or until fragrant.
- Add Tomatoes and Seasonings: Add the crushed tomatoes, dried oregano, dried basil, and red pepper flakes (if using) to the saucepan. Season with salt and black pepper to taste.
- Simmer the Sauce: Bring the sauce to a simmer, then reduce the heat to low and simmer for 15-20 minutes, stirring occasionally.
- Taste and Adjust: Taste the sauce and adjust the seasonings as needed. You may want to add a pinch of sugar if the sauce is too acidic.
- Prepare the Grill:
- Clean and Oil the Grill: Preheat your grill to medium-high heat. Make sure the grill grates are clean. Lightly oil the grill grates with cooking oil or a high-heat oil like canola or grapeseed oil.
- Set Up Zones (Optional): If your grill has multiple burners, consider creating heat zones. Keep one side of the grill at medium-high heat for cooking the pizza and the other side at low heat or off for keeping the cooked pizza warm.
- Grill the Pizza:
- Roll Out the Dough: On a lightly floured surface, roll out one of the dough balls into a 12-inch circle (or desired size and shape).
- Brush with Olive Oil: Brush one side of the rolled-out dough with olive oil.
- Grill the First Side: Carefully place the oiled side of the dough onto the hot grill grates. Grill for 2-3 minutes, or until the dough is lightly charred and has grill marks. Watch it closely, as it can burn quickly!
- Flip the Dough: Using tongs or a large spatula, carefully flip the dough over.
- Add Sauce and Toppings: Quickly spread a thin layer of pizza sauce over the grilled side of the dough. Sprinkle with mozzarella cheese, Parmesan cheese, pepperoni, mushrooms, red onion, and any other toppings you desire.
- Close the Grill Lid: Close the grill lid and cook for 3-5 minutes, or until the cheese is melted and bubbly and the bottom of the crust is golden brown. Keep a close eye on the pizza to prevent burning.
- Remove from Grill: Carefully remove the pizza from the grill using a large spatula or pizza peel.
- Garnish and Serve: Garnish with fresh basil leaves and a drizzle of olive oil. Slice the pizza and serve immediately.
- Repeat: Repeat the grilling process with the remaining dough and toppings.
Notes
- Don’t Overload the Pizza: Too many toppings can make the pizza soggy and difficult to handle on the grill.
- Use a Pizza Peel: A pizza peel makes it easier to transfer the pizza to and from the grill.
- Keep a Spray Bottle of Water Handy: If the grill flares up, spray a little water onto the flames to control them.
- Adjust Grilling Time: Grilling times may vary depending on your grill and the thickness of the dough. Keep a close eye on the pizza and adjust the grilling time as needed.
- Experiment with Toppings: Get creative with your toppings! Try different cheeses, vegetables, meats, and sauces.
- Dough Sticking to the Grill: Make sure the grill grates are clean and well-oiled. Also, ensure the dough is brushed with olive oil before placing it on the grill.
- Pizza Burning: Reduce the heat of the grill or move the pizza to a cooler part of the grill.
- Toppings Not Melting: Close the grill lid to trap heat and help the toppings melt. You can also use a basting brush to lightly brush the toppings with olive oil to help them cook.
- Soggy Pizza: Don’t overload the pizza with toppings. Also, make sure the grill is hot enough to cook the crust quickly.