Homemade Naan Bread: the very words conjure up images of warm, pillowy flatbread, fresh from the tandoor oven, ready to scoop up fragrant curries and flavorful sauces. Have you ever dreamed of recreating that authentic restaurant experience in your own kitchen? Well, dream no more! This recipe will guide you through the simple steps to making incredibly delicious naan bread at home.
Naan, with its origins tracing back to ancient Persia and India, has been a staple in South Asian cuisine for centuries. Traditionally baked in a scorching hot tandoor oven, the intense heat gives naan its signature blistered texture and slightly smoky flavor. While we might not all have a tandoor at our disposal, this homemade naan bread recipe cleverly adapts the process for your stovetop and oven, ensuring a fantastic result every time.
What’s not to love about naan? Its soft, slightly chewy texture is simply irresistible. The subtle tang from the yogurt in the dough perfectly complements the rich flavors of Indian and Middle Eastern dishes. Plus, making your own naan is surprisingly easy and satisfying. Forget store-bought versions once you taste the difference of freshly made naan, you’ll never go back! So, let’s get started and bring the taste of the tandoor to your table!

Ingredients:
- For the Dough:
- 4 cups (500g) all-purpose flour, plus more for dusting
- 1 teaspoon (5g) active dry yeast
- 1 teaspoon (6g) granulated sugar
- 1 ½ teaspoons (9g) salt
- 1 ½ cups (360ml) warm water (105-115°F / 40-46°C)
- ¼ cup (60ml) plain yogurt, room temperature
- 2 tablespoons (30ml) olive oil, plus more for brushing
- For Garlic Butter (Optional):
- 4 tablespoons (56g) unsalted butter, melted
- 2-3 cloves garlic, minced
- 1 tablespoon chopped fresh cilantro or parsley (optional)
- Pinch of salt
Preparing the Dough:
- Activate the Yeast: In a large bowl, combine the warm water, sugar, and yeast. Stir gently and let it sit for 5-10 minutes, or until foamy. This indicates that the yeast is active and ready to use. If the yeast doesn’t foam, it might be old or the water was too hot/cold, and you’ll need to start over with fresh yeast.
- Combine Wet Ingredients: Add the yogurt and olive oil to the yeast mixture. Whisk until well combined. The yogurt adds a lovely tang and helps to create a soft and pliable dough.
- Add Dry Ingredients: In a separate large bowl, whisk together the flour and salt. This ensures the salt is evenly distributed throughout the flour.
- Combine Wet and Dry: Gradually add the dry ingredients to the wet ingredients, mixing with a wooden spoon or your hands until a shaggy dough forms. Be careful not to add all the flour at once, as you might need slightly more or less depending on the humidity and the type of flour you’re using.
- Knead the Dough: Turn the dough out onto a lightly floured surface. Knead for 8-10 minutes, or until the dough is smooth, elastic, and slightly tacky but not sticky. If the dough is too sticky, add a little more flour, one tablespoon at a time. If it’s too dry, add a teaspoon of water at a time. Kneading develops the gluten, which gives the naan its characteristic chewy texture. You can also use a stand mixer with a dough hook attachment for this step.
- First Rise: Place the dough in a lightly oiled bowl, turning to coat all sides. Cover the bowl with plastic wrap or a clean kitchen towel. Let the dough rise in a warm place for 1-1.5 hours, or until doubled in size. The rising time will depend on the temperature of your environment. A warm spot will help the dough rise faster.
Shaping and Cooking the Naan:
- Punch Down the Dough: Once the dough has doubled, gently punch it down to release the air. Turn it out onto a lightly floured surface.
- Divide the Dough: Divide the dough into 8-10 equal pieces. The number of pieces will depend on how large you want your naan to be.
- Shape the Naan: Roll each piece of dough into a ball. Then, using a rolling pin, roll each ball into an oval or teardrop shape, about ¼ inch thick. Don’t worry about making them perfectly uniform; the rustic shapes add to the charm of homemade naan.
- Heat the Cooking Surface: There are several ways to cook naan. The most traditional method involves using a tandoor oven, but since most home cooks don’t have access to one, we’ll use a cast-iron skillet or a griddle. Heat a cast-iron skillet or griddle over medium-high heat until it’s very hot. You should see a slight shimmer on the surface.
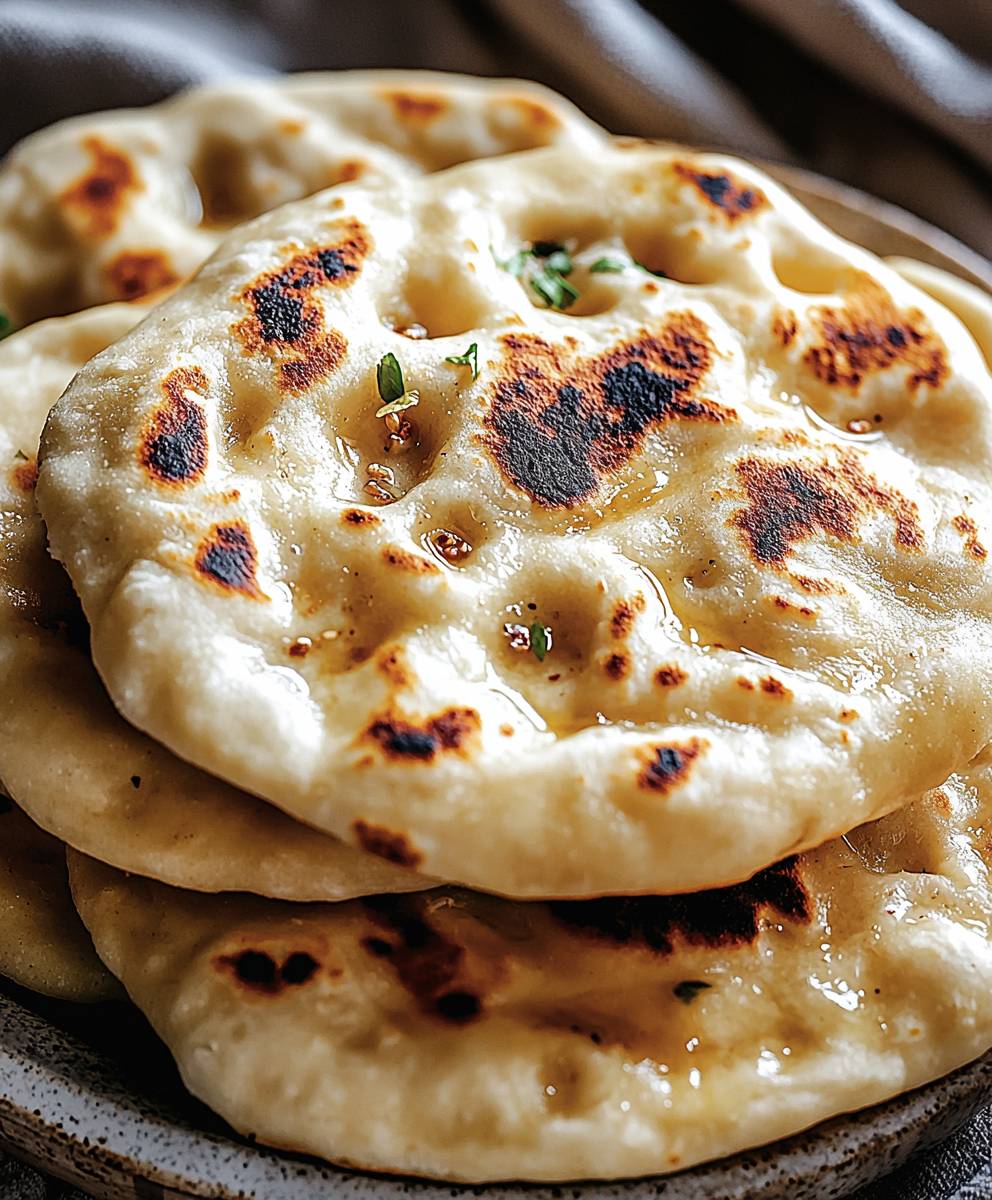
- Cook the Naan: Carefully place one or two naan breads onto the hot skillet (depending on the size of your skillet). Cook for 1-2 minutes per side, or until puffed up and lightly browned with some charred spots. The charred spots are what give naan its distinctive flavor.
- Optional Broiling (for extra puff): For extra puffiness and char, you can transfer the skillet to a preheated broiler for 30-60 seconds after cooking on the stovetop. Watch it carefully to prevent burning!
- Keep Warm: As you cook the naan, stack them on a plate and cover them with a clean kitchen towel to keep them warm and soft.
Garlic Butter (Optional):
- Prepare the Garlic Butter: While the naan is cooking, prepare the garlic butter (if using). In a small bowl, combine the melted butter, minced garlic, salt, and chopped cilantro or parsley (if using).
- Brush with Garlic Butter: As soon as the naan comes off the skillet, brush it generously with the garlic butter. This adds a delicious flavor and keeps the naan soft.
Serving and Storage:
- Serve Immediately: Serve the naan warm, preferably immediately after cooking. It’s best enjoyed with curries, stews, or grilled meats.
- Storage: Leftover naan can be stored in an airtight container at room temperature for up to 2 days, or in the refrigerator for up to 5 days. To reheat, wrap the naan in foil and warm it in a preheated oven at 350°F (175°C) for a few minutes, or microwave it briefly. You can also reheat it in a dry skillet over medium heat.
- Freezing: For longer storage, you can freeze the naan. Let it cool completely, then wrap it tightly in plastic wrap and place it in a freezer bag. Freeze for up to 2 months. To reheat, thaw the naan completely and then warm it in the oven, microwave, or skillet as described above.
Tips for Perfect Naan:
- Use Warm Water: Make sure the water you use to activate the yeast is warm, but not too hot. The ideal temperature is between 105-115°F (40-46°C). Water that is too hot will kill the yeast, while water that is too cold will not activate it.
- Don’t Overknead: Overkneading can result in tough naan. Knead the dough until it is smooth and elastic, but not overly stiff.
- Let the Dough Rise Properly: Allowing the dough to rise properly is crucial for developing the flavor and texture of the naan. Make sure to let it rise in a warm place until it has doubled in size.
- Use a Hot Cooking Surface: A hot cast-iron skillet or griddle is essential for achieving the characteristic charred spots and puffed-up texture of naan.
- Don’t Overcook: Overcooking the naan will make it dry and tough. Cook it for just 1-2 minutes per side, or until it is lightly browned and puffed up.
- Brush with Butter: Brushing the naan with melted butter or garlic butter immediately after cooking will keep it soft and add a delicious flavor.
- Experiment with Flavors: Feel free to experiment with different flavors and toppings. You can add chopped herbs, spices, or even cheese to the dough.
- Yogurt Substitute: If you don’t have yogurt, you can substitute with sour cream or buttermilk. These will provide a similar tang and help to tenderize the dough.
- Make Ahead: The dough can be made ahead of time and stored in the refrigerator for up to 24 hours. Just punch it down before shaping and cooking.
- Gluten-Free Option: While this recipe is for traditional naan, you can try using a gluten-free flour blend to make a gluten-free version. Keep in mind that the texture may be slightly different.
Troubleshooting:
- Dough is too sticky: Add flour, one tablespoon at a time, until the dough is manageable.
- Dough is too dry: Add water, one teaspoon at a time, until the dough is smooth and elastic.
- Naan is not puffing up: Make sure the skillet is hot enough. You can also try adding a little water to the skillet and covering it with a lid for a few seconds to create steam.
- Naan is burning: Reduce the heat slightly and cook for a shorter amount of time.
- Naan is tough: Don’t overknead the dough and don’t overcook the naan.
This homemade
Conclusion:
This isn’t just another bread recipe; it’s an invitation to elevate your meals and experience the sheer joy of creating something truly special in your own kitchen. I wholeheartedly believe this homemade naan bread recipe is a must-try for anyone who appreciates authentic flavors and the satisfaction of baking from scratch. The soft, pillowy texture, the subtle tang of yogurt, and the irresistible aroma that fills your home as it bakes it’s an experience that store-bought naan simply can’t replicate.
But why is it so special? It’s the combination of simple ingredients, the ease of the process (trust me, it’s easier than you think!), and the incredible versatility it offers. This naan isn’t just a side dish; it’s a blank canvas for culinary creativity.
Serving Suggestions and Variations:
Think beyond the usual curry accompaniment! While it’s undeniably perfect for scooping up your favorite Indian dishes like butter chicken, palak paneer, or chana masala, this naan is equally delicious in countless other ways.
* Pizza Naan: Spread with tomato sauce, sprinkle with mozzarella, and add your favorite toppings for a quick and easy pizza night.
* Naan Wraps: Fill it with grilled chicken, hummus, veggies, and a drizzle of tahini for a healthy and satisfying lunch.
* Garlic Naan: Brush with melted garlic butter after baking for an extra layer of flavor.
* Herb Naan: Mix chopped fresh herbs like cilantro, parsley, or dill into the dough before baking.
* Sweet Naan: Sprinkle with cinnamon sugar after baking for a sweet treat.
* Breakfast Naan: Top with a fried egg, avocado, and a sprinkle of chili flakes for a delicious and unique breakfast.
* Naan Croutons: Cut leftover naan into cubes, toss with olive oil and spices, and bake until crispy for a flavorful addition to salads or soups.
The possibilities are truly endless! Don’t be afraid to experiment and find your own favorite ways to enjoy this versatile bread.
I know that trying a new recipe can sometimes feel daunting, but I promise you, this one is worth the effort. The recipe is carefully crafted to be as straightforward as possible, and I’ve included plenty of tips and tricks to help you achieve perfect results every time. Plus, the satisfaction of serving warm, freshly baked naan to your family and friends is simply unmatched.
So, what are you waiting for? Gather your ingredients, preheat your oven, and get ready to embark on a culinary adventure. I’m confident that you’ll fall in love with this homemade naan bread recipe just as much as I have.
And most importantly, I’d love to hear about your experience! Did you try any of the variations I suggested? Did you discover a new and exciting way to enjoy your naan? Please share your photos, comments, and feedback in the comments section below. Your insights and experiences will not only inspire other readers but also help me continue to improve and refine this recipe. Happy baking, and enjoy the deliciousness!
Homemade Naan Bread: The Ultimate Guide to Perfecting Your Recipe
Soft, chewy homemade naan bread, perfect with curries or as flatbread. Includes a simple garlic butter topping.
Ingredients
- 4 cups (500g) all-purpose flour, plus more for dusting
- 1 teaspoon (5g) active dry yeast
- 1 teaspoon (6g) granulated sugar
- 1 ½ teaspoons (9g) salt
- 1 ½ cups (360ml) warm water (105-115°F / 40-46°C)
- ¼ cup (60ml) plain yogurt, room temperature
- 2 tablespoons (30ml) olive oil, plus more for brushing
- 4 tablespoons (56g) unsalted butter, melted
- 2-3 cloves garlic, minced
- 1 tablespoon chopped fresh cilantro or parsley (optional)
- Pinch of salt
Instructions
- Activate the Yeast: In a large bowl, combine the warm water, sugar, and yeast. Stir gently and let it sit for 5-10 minutes, or until foamy.
- Combine Wet Ingredients: Add the yogurt and olive oil to the yeast mixture. Whisk until well combined.
- Add Dry Ingredients: In a separate large bowl, whisk together the flour and salt.
- Combine Wet and Dry: Gradually add the dry ingredients to the wet ingredients, mixing with a wooden spoon or your hands until a shaggy dough forms.
- Knead the Dough: Turn the dough out onto a lightly floured surface. Knead for 8-10 minutes, or until the dough is smooth, elastic, and slightly tacky but not sticky.
- First Rise: Place the dough in a lightly oiled bowl, turning to coat all sides. Cover the bowl with plastic wrap or a clean kitchen towel. Let the dough rise in a warm place for 1-1.5 hours, or until doubled in size.
- Punch Down the Dough: Once the dough has doubled, gently punch it down to release the air. Turn it out onto a lightly floured surface.
- Divide the Dough: Divide the dough into 8-10 equal pieces.
- Shape the Naan: Roll each piece of dough into a ball. Then, using a rolling pin, roll each ball into an oval or teardrop shape, about ¼ inch thick.
- Heat the Cooking Surface: Heat a cast-iron skillet or griddle over medium-high heat until it’s very hot.
- Cook the Naan: Carefully place one or two naan breads onto the hot skillet. Cook for 1-2 minutes per side, or until puffed up and lightly browned with some charred spots.
- Optional Broiling: For extra puffiness and char, you can transfer the skillet to a preheated broiler for 30-60 seconds after cooking on the stovetop. Watch it carefully to prevent burning!
- Keep Warm: As you cook the naan, stack them on a plate and cover them with a clean kitchen towel to keep them warm and soft.
- Prepare Garlic Butter (Optional): While the naan is cooking, prepare the garlic butter (if using). In a small bowl, combine the melted butter, minced garlic, salt, and chopped cilantro or parsley (if using).
- Brush with Garlic Butter: As soon as the naan comes off the skillet, brush it generously with the garlic butter.
- Serve Immediately: Serve the naan warm, preferably immediately after cooking.
Notes
- Use warm water (105-115°F / 40-46°C) to activate the yeast.
- Don’t overknead the dough.
- Let the dough rise properly in a warm place.
- Use a hot cooking surface for best results.
- Don’t overcook the naan.
- Brush with butter or garlic butter immediately after cooking.
- Experiment with different flavors and toppings.
- Yogurt can be substituted with sour cream or buttermilk.
- The dough can be made ahead of time and stored in the refrigerator for up to 24 hours.
- A gluten-free version can be made using a gluten-free flour blend.