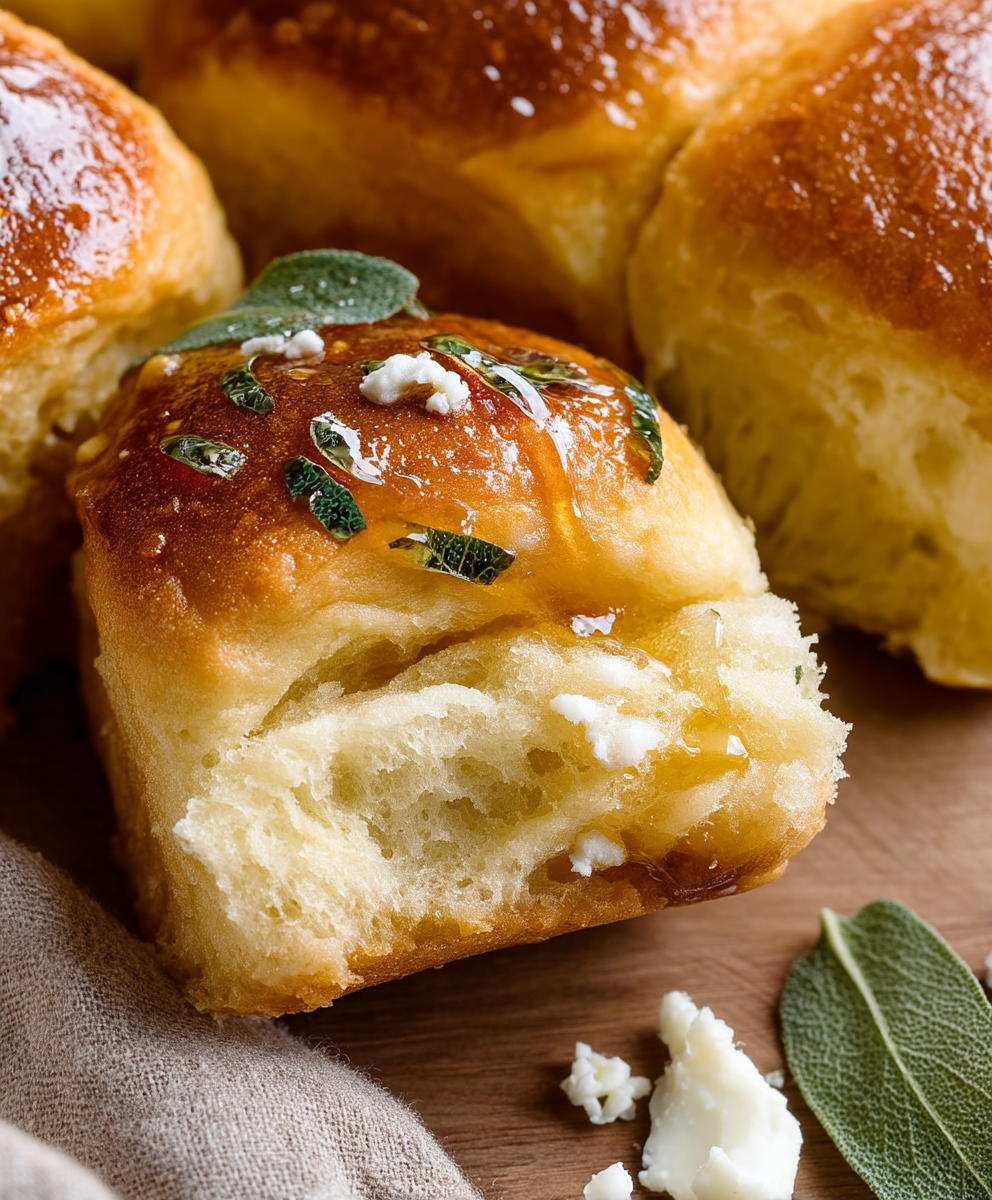
Honey Bread Rolls: Is there anything more comforting than the aroma of freshly baked bread wafting through your home? Imagine that comforting scent, amplified by the sweet, golden notes of honey. These aren’t just any rolls; they’re pillowy clouds of deliciousness, perfect for slathering with butter, dipping in soup, or simply enjoying on their own.
Bread, in its various forms, has been a staple food for millennia, with evidence suggesting its existence dating back to ancient civilizations. The addition of honey, a natural sweetener revered for its medicinal properties and delightful flavor, elevates the humble roll to something truly special. Honey has been used for centuries, not only as a sweetener but also as a symbol of prosperity and good fortune in many cultures.
What makes these honey bread rolls so irresistible? It’s the perfect balance of textures a slightly crisp exterior giving way to a soft, airy interior. The subtle sweetness of the honey complements the yeasty flavor of the bread, creating a symphony of tastes that will tantalize your taste buds. They are incredibly versatile, making them a welcome addition to any meal, from casual family dinners to elegant holiday feasts. Plus, the simple ingredients and straightforward instructions make them surprisingly easy to bake, even for novice bakers. Get ready to experience the joy of homemade bread with this delightful recipe!

Ingredients:
- For the Dough:
- 3 ½ cups (420g) all-purpose flour, plus more for dusting
- ¼ cup (50g) granulated sugar
- 1 teaspoon salt
- 1 packet (2 ¼ teaspoons) active dry yeast
- ¾ cup (180ml) warm milk (105-115°F / 40-46°C)
- ¼ cup (60ml) warm water (105-115°F / 40-46°C)
- ¼ cup (60ml) honey, plus more for brushing
- ¼ cup (60ml) unsalted butter, melted
- 1 large egg, lightly beaten
- For the Honey Butter Glaze:
- ¼ cup (60ml) unsalted butter, melted
- 2 tablespoons honey
- 1/8 teaspoon salt (optional, to taste)
Preparing the Dough:
- Combine Dry Ingredients: In a large bowl, whisk together the flour, sugar, and salt. Make sure everything is evenly distributed. This helps ensure the yeast activates properly and the rolls have a consistent flavor.
- Activate the Yeast: In a separate small bowl, combine the warm milk, warm water, and yeast. Let it stand for 5-10 minutes, or until foamy. This step is crucial to ensure your yeast is alive and active. If it doesn’t foam, your yeast might be old and you’ll need to use a fresh packet.
- Combine Wet and Dry Ingredients: Pour the yeast mixture into the large bowl with the dry ingredients. Add the honey, melted butter, and lightly beaten egg.
- Mix the Dough: Using a wooden spoon or a stand mixer fitted with a dough hook, mix the ingredients until a shaggy dough forms. If using a stand mixer, continue kneading on low speed for 8-10 minutes. If kneading by hand, turn the dough out onto a lightly floured surface and knead for 10-12 minutes, or until the dough is smooth and elastic. The dough should be slightly sticky, but not so sticky that it’s unmanageable. If it’s too sticky, add a tablespoon of flour at a time until it reaches the right consistency.
- First Rise: Place the dough in a lightly oiled bowl, turning to coat all sides. Cover the bowl with plastic wrap or a clean kitchen towel. Let it rise in a warm place for 1-1.5 hours, or until doubled in size. The warmer the environment, the faster the dough will rise. You can place it in a slightly warmed oven (turned off!) or near a sunny window.
Shaping and Second Rise:
- Punch Down the Dough: Gently punch down the risen dough to release the air. Turn it out onto a lightly floured surface.
- Divide the Dough: Divide the dough into 12 equal pieces. I find it easiest to use a kitchen scale to ensure they’re all the same size, but you can also eyeball it.
- Shape the Rolls: Roll each piece of dough into a smooth ball. You can do this by tucking the edges of the dough underneath to create a smooth surface on top.
- Arrange in Baking Pan: Place the dough balls in a greased 9×13 inch baking pan. Make sure they’re evenly spaced, but close enough together so they’ll touch as they rise and bake. This will give them that soft, pull-apart texture we’re looking for.
- Second Rise: Cover the baking pan with plastic wrap or a clean kitchen towel. Let the rolls rise in a warm place for 30-45 minutes, or until they’ve almost doubled in size.
Baking the Rolls:
- Preheat Oven: Preheat your oven to 350°F (175°C). Make sure your oven rack is in the center position.
- Bake the Rolls: Bake the rolls for 20-25 minutes, or until they’re golden brown on top. Keep an eye on them, as oven temperatures can vary. If they start to brown too quickly, you can tent the pan with aluminum foil.
- Prepare Honey Butter Glaze: While the rolls are baking, prepare the honey butter glaze. In a small bowl, whisk together the melted butter, honey, and salt (if using).
- Glaze the Rolls: As soon as the rolls come out of the oven, brush them generously with the honey butter glaze. This will give them a beautiful shine and add extra flavor.
- Cool Slightly: Let the rolls cool in the pan for a few minutes before serving. This will prevent them from being too hot to handle.
Serving and Storage:
- Serve Warm: These honey bread rolls are best served warm, straight from the oven. They’re perfect for breakfast, brunch, or as a side dish with dinner.
- Storage: Store any leftover rolls in an airtight container at room temperature for up to 2 days. You can also freeze them for longer storage. To freeze, wrap the cooled rolls individually in plastic wrap and then place them in a freezer bag. They can be frozen for up to 2 months.
- Reheating: To reheat the rolls, you can microwave them for a few seconds until warmed through. You can also reheat them in the oven at 350°F (175°C) for a few minutes. If reheating from frozen, let them thaw slightly before reheating.
Tips for Perfect Honey Bread Rolls:
- Use Warm Liquids: Make sure your milk and water are warm, but not too hot. The ideal temperature is between 105-115°F (40-46°C). Too hot, and you’ll kill the yeast. Too cold, and the yeast won’t activate properly.
- Don’t Overknead: Overkneading can result in tough rolls. Knead the dough until it’s smooth and elastic, but not overly stiff.
- Proper Rising Time: Allow the dough to rise in a warm place. This will help the yeast do its job and create light and fluffy rolls.
- Don’t Overbake: Overbaking can result in dry rolls. Bake them until they’re golden brown on top, but still soft in the center.
- Generously Glaze: Don’t be shy with the honey butter glaze! It adds so much flavor and moisture to the rolls.
Variations:
- Add Spices: You can add spices like cinnamon, nutmeg, or cardamom to the dough for a warm and comforting flavor.
- Add Nuts: Chopped nuts like pecans or walnuts can be added to the dough or sprinkled on top of the rolls before baking.
- Add Citrus Zest: A little bit of lemon or orange zest can add a bright and refreshing flavor to the rolls.
- Make Cinnamon Rolls: Spread the dough with cinnamon sugar before rolling it up and slicing it into rolls.
- Use Different Flours: You can substitute some of the all-purpose flour with whole wheat flour for a slightly nutty flavor.
Troubleshooting:
- Dough Not Rising: If your dough isn’t rising, it could be due to several factors: old yeast, liquids that are too hot or too cold, or a cold environment. Make sure your yeast is fresh, your liquids are at the correct temperature, and your dough is in a warm place.
- Rolls Too Dense: If your rolls are too dense, it could be due to not enough rising time, overkneading, or using too much flour. Make sure you allow the dough to rise properly, don’t overknead it, and use the correct amount of flour.
- Rolls Too Dry: If your rolls are too dry, it could be due to overbaking or not enough moisture in the dough. Make sure you don’t overbake them and add a little more liquid to the dough if needed.
- Rolls Burning: If your rolls are burning on the bottom, try placing a baking sheet on the rack below the rolls to deflect some of the heat.
I hope you enjoy making these delicious honey bread rolls! They’re a family favorite in my house, and I’m sure they’ll be a hit with your loved ones too. Happy baking!
Conclusion:
And there you have it! These Honey Bread Rolls are more than just a recipe; they’re an experience. From the satisfying kneading of the dough to the intoxicating aroma that fills your kitchen as they bake, and finally, that first, blissful bite of warm, honey-kissed goodness, this is a baking adventure you absolutely don’t want to miss.
Why is this recipe a must-try? Well, beyond the sheer deliciousness, it’s the perfect balance of simplicity and reward. It’s approachable enough for beginner bakers, yet yields results that will impress even seasoned pros. The subtle sweetness of the honey elevates these rolls beyond the ordinary, making them a delightful addition to any meal or a satisfying treat on their own. Plus, let’s be honest, who can resist a freshly baked, golden-brown roll dripping with honey?
But the beauty of this recipe lies in its versatility. Looking for serving suggestions? These Honey Bread Rolls are fantastic alongside a hearty stew, perfect for soaking up every last drop of flavorful broth. They’re also incredible with a simple pat of butter and a sprinkle of sea salt, allowing the honey flavor to truly shine. Imagine them served warm with a creamy bowl of tomato soup on a chilly evening pure comfort food!
And don’t be afraid to experiment! Want to add a little extra something? Try incorporating a handful of chopped walnuts or pecans into the dough for a nutty crunch. A sprinkle of sesame seeds on top before baking adds a lovely visual appeal and a subtle toasted flavor. For a savory twist, consider adding a pinch of dried rosemary or thyme to the dough. You could even brush them with garlic butter after baking for an irresistible garlic-honey combination. The possibilities are endless!
These rolls are also fantastic for making mini sandwiches. Think sliced ham and Swiss cheese, or maybe some roasted turkey and cranberry sauce. They’re the perfect size for little hands, making them a great option for kids’ lunches or snacks. You can even use them to make sliders for your next party everyone will rave about them!
I truly believe that baking these Honey Bread Rolls will bring a little bit of joy into your kitchen and onto your table. It’s a recipe that’s meant to be shared, enjoyed, and adapted to your own personal tastes. So, gather your ingredients, preheat your oven, and get ready to create something truly special.
I’m so excited for you to try this recipe! Once you do, please, please, please come back and share your experience in the comments below. Let me know what variations you tried, what you served them with, and most importantly, how much you loved them! I can’t wait to hear all about your baking adventures. Happy baking, and may your kitchen always be filled with the sweet aroma of freshly baked Honey Bread Rolls! I am sure you will enjoy this recipe as much as I do.
Honey Bread Rolls: The Ultimate Guide to Baking Delicious Treats
Soft, fluffy, and sweet honey bread rolls, perfect for breakfast, brunch, or as a delightful side dish. These homemade rolls are brushed with a luscious honey butter glaze for an irresistible treat.
Ingredients
- 3 ½ cups (420g) all-purpose flour, plus more for dusting
- ¼ cup (50g) granulated sugar
- 1 teaspoon salt
- 1 packet (2 ¼ teaspoons) active dry yeast
- ¾ cup (180ml) warm milk (105-115°F / 40-46°C)
- ¼ cup (60ml) warm water (105-115°F / 40-46°C)
- ¼ cup (60ml) honey, plus more for brushing
- ¼ cup (60ml) unsalted butter, melted
- 1 large egg, lightly beaten
- ¼ cup (60ml) unsalted butter, melted
- 2 tablespoons honey
- 1/8 teaspoon salt (optional, to taste)
Instructions
- Combine Dry Ingredients: In a large bowl, whisk together the flour, sugar, and salt.
- Activate the Yeast: In a separate small bowl, combine the warm milk, warm water, and yeast. Let it stand for 5-10 minutes, or until foamy.
- Combine Wet and Dry Ingredients: Pour the yeast mixture into the large bowl with the dry ingredients. Add the honey, melted butter, and lightly beaten egg.
- Mix the Dough: Using a wooden spoon or a stand mixer fitted with a dough hook, mix the ingredients until a shaggy dough forms. If using a stand mixer, continue kneading on low speed for 8-10 minutes. If kneading by hand, turn the dough out onto a lightly floured surface and knead for 10-12 minutes, or until the dough is smooth and elastic.
- First Rise: Place the dough in a lightly oiled bowl, turning to coat all sides. Cover the bowl with plastic wrap or a clean kitchen towel. Let it rise in a warm place for 1-1.5 hours, or until doubled in size.
- Punch Down the Dough: Gently punch down the risen dough to release the air. Turn it out onto a lightly floured surface.
- Divide the Dough: Divide the dough into 12 equal pieces.
- Shape the Rolls: Roll each piece of dough into a smooth ball.
- Arrange in Baking Pan: Place the dough balls in a greased 9×13 inch baking pan.
- Second Rise: Cover the baking pan with plastic wrap or a clean kitchen towel. Let the rolls rise in a warm place for 30-45 minutes, or until they’ve almost doubled in size.
- Preheat Oven: Preheat your oven to 350°F (175°C).
- Bake the Rolls: Bake the rolls for 20-25 minutes, or until they’re golden brown on top.
- Prepare Honey Butter Glaze: While the rolls are baking, prepare the honey butter glaze. In a small bowl, whisk together the melted butter, honey, and salt (if using).
- Glaze the Rolls: As soon as the rolls come out of the oven, brush them generously with the honey butter glaze.
- Cool Slightly: Let the rolls cool in the pan for a few minutes before serving.
- Serve Warm: These honey bread rolls are best served warm, straight from the oven.
- Storage: Store any leftover rolls in an airtight container at room temperature for up to 2 days. You can also freeze them for longer storage. To freeze, wrap the cooled rolls individually in plastic wrap and then place them in a freezer bag. They can be frozen for up to 2 months.
- Reheating: To reheat the rolls, you can microwave them for a few seconds until warmed through. You can also reheat them in the oven at 350°F (175°C) for a few minutes. If reheating from frozen, let them thaw slightly before reheating.
Notes
- Use warm liquids (105-115°F / 40-46°C) to activate the yeast.
- Don’t overknead the dough.
- Allow proper rising time in a warm place.
- Don’t overbake the rolls.
- Generously glaze the rolls with honey butter.