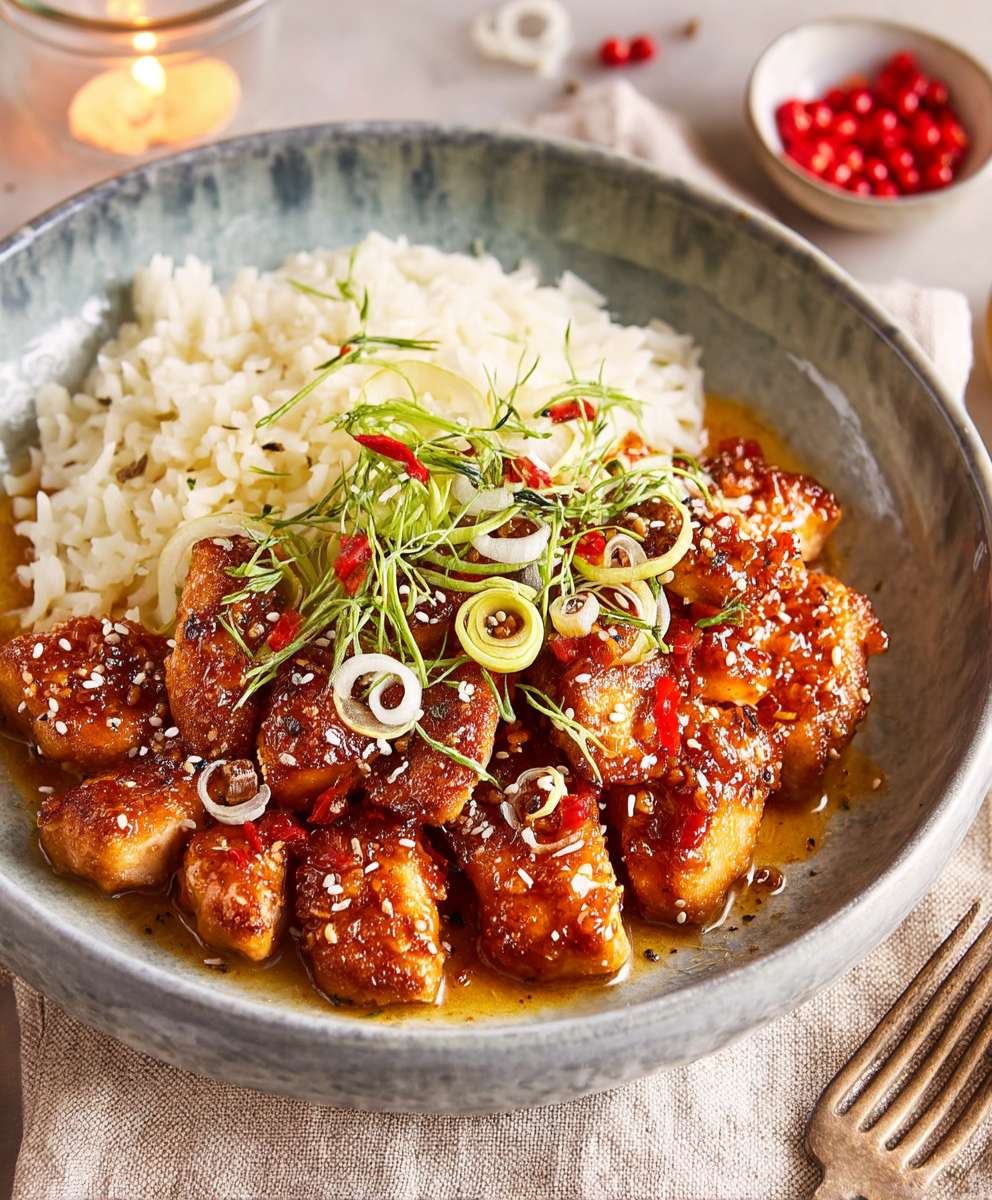
Honey glazed chicken, a dish that sings with sweet and savory notes, is about to become your new weeknight hero. Imagine sinking your teeth into succulent, perfectly cooked chicken, its skin glistening with a luscious, golden glaze. This isn’t just dinner; it’s an experience!
The concept of glazing meats with honey has roots stretching back centuries, with evidence found in ancient civilizations where honey was a prized ingredient. While the exact origins of honey glazed chicken as we know it today are harder to pinpoint, the combination of sweet and savory flavors has resonated across cultures, evolving into countless regional variations. From Asian-inspired teriyaki glazes to Southern-style honey-mustard coatings, the possibilities are endless.
But what makes this dish so universally loved? It’s the perfect balance of flavors, of course! The sweetness of the honey caramelizes beautifully in the oven, creating a sticky, irresistible coating that contrasts perfectly with the savory chicken. The tender, juicy meat inside provides a satisfying textural counterpoint. Beyond the taste, honey glazed chicken is also incredibly versatile. Serve it with rice and steamed vegetables for a complete meal, or slice it up for salads and sandwiches. And the best part? It’s surprisingly easy to make, even on a busy weeknight. So, are you ready to discover the magic of honey glazed chicken? Let’s get cooking!

Ingredients:
- For the Chicken:
- 4 boneless, skinless chicken breasts (about 6-8 ounces each)
- 1 tablespoon olive oil
- 1 teaspoon salt
- 1/2 teaspoon black pepper
- 1/2 teaspoon garlic powder
- 1/4 teaspoon paprika
- For the Honey Glaze:
- 1/4 cup honey
- 2 tablespoons soy sauce (low sodium preferred)
- 1 tablespoon rice vinegar
- 1 tablespoon ketchup
- 1 teaspoon Dijon mustard
- 1 clove garlic, minced
- 1/2 teaspoon ginger, grated (or 1/4 teaspoon ground ginger)
- 1/4 teaspoon red pepper flakes (optional, for a little heat)
- 1 tablespoon water (if needed, to thin the glaze)
- Optional Garnishes:
- Sesame seeds
- Chopped green onions
Preparing the Chicken:
- Prepare the Chicken Breasts: First, I like to make sure my chicken breasts are relatively even in thickness. This helps them cook evenly. You can do this by gently pounding them with a meat mallet to about 1/2-inch thickness. Place the chicken between two sheets of plastic wrap before pounding to prevent splattering. This step is optional, but I find it makes a big difference.
- Season the Chicken: In a small bowl, combine the salt, pepper, garlic powder, and paprika. Sprinkle this mixture evenly over both sides of the chicken breasts. Make sure you get a nice, even coating of the spices.
Making the Honey Glaze:
- Combine the Glaze Ingredients: In a small saucepan, whisk together the honey, soy sauce, rice vinegar, ketchup, Dijon mustard, minced garlic, and grated ginger (or ground ginger). If you’re using red pepper flakes, add them now as well.
- Simmer the Glaze: Place the saucepan over medium heat and bring the glaze to a gentle simmer. Let it simmer for about 5-7 minutes, stirring occasionally, until it thickens slightly. Be careful not to burn the glaze. You want it to be thick enough to coat the chicken nicely.
- Adjust the Consistency (if needed): If the glaze becomes too thick, you can add a tablespoon of water to thin it out. Stir well to combine. Taste the glaze and adjust the seasonings to your liking. You might want to add a little more honey for sweetness, soy sauce for saltiness, or red pepper flakes for heat.
Cooking the Chicken:
- Heat the Olive Oil: Heat the olive oil in a large skillet over medium-high heat. Make sure the skillet is hot before adding the chicken. This will help create a nice sear.
- Sear the Chicken: Carefully place the seasoned chicken breasts in the hot skillet. Don’t overcrowd the pan; you may need to cook the chicken in batches. Sear the chicken for about 4-5 minutes per side, or until it’s nicely browned.
- Glaze the Chicken: Once the chicken is browned on both sides, reduce the heat to medium-low. Pour the honey glaze over the chicken, making sure to coat each breast evenly.
- Simmer in the Glaze: Let the chicken simmer in the glaze for another 5-7 minutes, flipping it occasionally, until the chicken is cooked through and the glaze has thickened and become sticky. The internal temperature of the chicken should reach 165°F (74°C). Use a meat thermometer to check for doneness.
- Ensure Chicken is Cooked Through: It’s crucial to ensure the chicken is cooked through. If the glaze is browning too quickly before the chicken is cooked, you can add a tablespoon or two of water to the pan and cover it with a lid to help steam the chicken and finish cooking it.
Serving the Honey Glazed Chicken:
- Rest the Chicken: Once the chicken is cooked through and nicely glazed, remove it from the skillet and let it rest for a few minutes before slicing. This allows the juices to redistribute, resulting in more tender and flavorful chicken.
- Slice and Serve: Slice the chicken breasts and serve immediately. I love serving this honey glazed chicken with rice, quinoa, or roasted vegetables.
- Garnish (Optional): Garnish with sesame seeds and chopped green onions for added flavor and visual appeal.
Tips and Variations:
- Chicken Thighs: You can also use boneless, skinless chicken thighs for this recipe. They tend to be more flavorful and stay moister than chicken breasts. Adjust the cooking time accordingly, as chicken thighs may take a bit longer to cook through.
- Spice Level: Adjust the amount of red pepper flakes to control the spice level. If you don’t like any heat, you can omit them altogether.
- Glaze Variations: Feel free to experiment with the glaze. You can add a splash of orange juice for a citrusy flavor, or a teaspoon of sriracha for extra heat.
- Marinating: For even more flavor, you can marinate the chicken in the honey glaze for at least 30 minutes (or up to overnight) before cooking. This will allow the flavors to penetrate the chicken and make it even more delicious.
- Oven Baking: If you prefer to bake the chicken, you can sear it in a skillet first, then transfer it to a baking dish, pour the glaze over it, and bake at 375°F (190°C) for about 20-25 minutes, or until the chicken is cooked through.
- Grilling: This recipe also works well on the grill. Grill the chicken over medium heat, brushing it with the honey glaze during the last few minutes of cooking.
- Serving Suggestions: This honey glazed chicken is delicious served with a variety of sides, such as steamed broccoli, roasted asparagus, mashed potatoes, or a simple salad. It’s also great in sandwiches or wraps.
- Storage: Leftover honey glazed chicken can be stored in an airtight container in the refrigerator for up to 3-4 days. Reheat gently in a skillet or microwave before serving.
Troubleshooting:
Glaze is too thick:
If your glaze becomes too thick while simmering, simply add a tablespoon of water at a time until you reach your desired consistency. Stir well after each addition.
Glaze is not thick enough:
If your glaze isn’t thickening up, continue to simmer it for a few more minutes, stirring frequently. You can also add a cornstarch slurry (1 teaspoon cornstarch mixed with 1 tablespoon cold water) to help thicken it. Add the slurry gradually while stirring, and simmer until the glaze reaches the desired consistency.
Chicken is browning too quickly:
If the chicken is browning too quickly before it’s cooked through, reduce the heat to low and cover the skillet with a lid. This will help steam the chicken and prevent it from burning. You can also add a tablespoon or two of water to the pan to create more steam.
Chicken is sticking to the pan:
Make sure your skillet is properly heated before adding the chicken. If the chicken is still sticking, try adding a little more olive oil to the pan. You can also use a non-stick skillet to prevent sticking.
Conclusion:
This honey glazed chicken recipe isn’t just another weeknight dinner option; it’s a flavor explosion waiting to happen! From the tantalizing aroma that fills your kitchen as it bakes to the sticky, sweet, and savory glaze that coats every inch of the chicken, this dish is guaranteed to become a family favorite. I truly believe this recipe is a must-try because it’s incredibly easy to prepare, uses readily available ingredients, and delivers restaurant-quality results without the restaurant price tag. Forget complicated recipes with endless steps; this one is streamlined for maximum flavor with minimal effort.
But the best part? It’s incredibly versatile! Serve this honey glazed chicken over a bed of fluffy rice or quinoa to soak up all that delicious glaze. For a complete meal, pair it with roasted vegetables like broccoli, asparagus, or Brussels sprouts. A simple side salad with a light vinaigrette also complements the richness of the chicken beautifully.
Looking for variations? You’ve got options! For a spicier kick, add a pinch of red pepper flakes to the glaze or a dash of sriracha. If you prefer a tangier flavor, a squeeze of lemon or lime juice will do the trick. You can even experiment with different herbs and spices to customize the flavor profile to your liking. Try adding a touch of ginger, garlic powder, or smoked paprika for a unique twist.
And don’t limit yourself to chicken pieces! This glaze works equally well on chicken breasts, thighs, or even a whole roasted chicken. Just adjust the cooking time accordingly. You can also use it on other proteins like pork chops or salmon for a delightful change of pace. The possibilities are truly endless!
I’ve poured my heart into perfecting this recipe, and I’m confident that you’ll love it as much as I do. It’s the perfect balance of sweet and savory, and it’s sure to impress even the pickiest eaters. Plus, it’s a fantastic way to add some excitement to your weeknight dinner routine.
So, what are you waiting for? Head to your kitchen, gather your ingredients, and get ready to create some culinary magic. I promise you won’t be disappointed. This honey glazed chicken is more than just a recipe; it’s an experience.
I’m so excited for you to try this recipe and experience the deliciousness for yourself! Once you’ve made it, I’d absolutely love to hear about your experience. Did you make any variations? What sides did you serve it with? Share your photos and stories in the comments below! Your feedback is invaluable, and it helps me continue to create recipes that you’ll love. Happy cooking! I can’t wait to see what you create! Let me know if you have any questions, and I’ll do my best to help. Enjoy!
Honey Glazed Chicken: The Ultimate Recipe for Deliciousness
Sweet and savory honey glazed chicken breasts, pan-seared to perfection and simmered in a sticky, flavorful glaze.
Ingredients
- 4 boneless, skinless chicken breasts (about 6-8 ounces each)
- 1 tablespoon olive oil
- 1 teaspoon salt
- 1/2 teaspoon black pepper
- 1/2 teaspoon garlic powder
- 1/4 teaspoon paprika
- 1/4 cup honey
- 2 tablespoons soy sauce (low sodium preferred)
- 1 tablespoon rice vinegar
- 1 tablespoon ketchup
- 1 teaspoon Dijon mustard
- 1 clove garlic, minced
- 1/2 teaspoon ginger, grated (or 1/4 teaspoon ground ginger)
- 1/4 teaspoon red pepper flakes (optional, for a little heat)
- 1 tablespoon water (if needed, to thin the glaze)
- Sesame seeds
- Chopped green onions
Instructions
- Prepare the Chicken Breasts: Ensure chicken breasts are relatively even in thickness (about 1/2-inch). Gently pound them with a meat mallet between two sheets of plastic wrap. (Optional)
- Season the Chicken: In a small bowl, combine salt, pepper, garlic powder, and paprika. Sprinkle evenly over both sides of the chicken breasts.
- Combine the Glaze Ingredients: In a small saucepan, whisk together honey, soy sauce, rice vinegar, ketchup, Dijon mustard, minced garlic, and grated ginger (or ground ginger). Add red pepper flakes, if using.
- Simmer the Glaze: Place the saucepan over medium heat and bring the glaze to a gentle simmer. Let it simmer for about 5-7 minutes, stirring occasionally, until it thickens slightly.
- Adjust the Consistency (if needed): If the glaze becomes too thick, add a tablespoon of water to thin it out. Stir well to combine. Taste and adjust seasonings.
- Heat the Olive Oil: Heat olive oil in a large skillet over medium-high heat.
- Sear the Chicken: Carefully place the seasoned chicken breasts in the hot skillet. Don’t overcrowd the pan; cook in batches if needed. Sear for about 4-5 minutes per side, or until nicely browned.
- Glaze the Chicken: Reduce heat to medium-low. Pour the honey glaze over the chicken, coating each breast evenly.
- Simmer in the Glaze: Let the chicken simmer in the glaze for another 5-7 minutes, flipping occasionally, until the chicken is cooked through and the glaze has thickened and become sticky. The internal temperature of the chicken should reach 165°F (74°C).
- Ensure Chicken is Cooked Through: If the glaze is browning too quickly before the chicken is cooked, add a tablespoon or two of water to the pan and cover it with a lid to help steam the chicken and finish cooking it.
- Rest the Chicken: Remove from the skillet and let it rest for a few minutes before slicing.
- Slice and Serve: Slice the chicken breasts and serve immediately with rice, quinoa, or roasted vegetables.
- Garnish (Optional): Garnish with sesame seeds and chopped green onions.
Notes
- Chicken thighs can be substituted for chicken breasts. Adjust cooking time accordingly.
- Adjust the amount of red pepper flakes to control the spice level.
- Experiment with the glaze by adding orange juice or sriracha.
- Marinate the chicken in the honey glaze for at least 30 minutes (or up to overnight) before cooking for more flavor.
- Oven Baking: Sear chicken, transfer to baking dish, pour glaze over, and bake at 375°F (190°C) for about 20-25 minutes, or until cooked through.
- Grilling: Grill over medium heat, brushing with honey glaze during the last few minutes of cooking.
- Serving Suggestions: Serve with steamed broccoli, roasted asparagus, mashed potatoes, or a simple salad. Great in sandwiches or wraps.
- Storage: Leftover honey glazed chicken can be stored in an airtight container in the refrigerator for up to 3-4 days. Reheat gently in a skillet or microwave before serving.