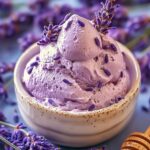
Honey Lavender Dream Cream: Prepare to be transported to a realm of pure culinary bliss with this enchanting dessert! Imagine a velvety smooth cream, infused with the delicate floral notes of lavender and the golden sweetness of honey. It’s not just a dessert; it’s an experience, a whisper of Provence in every spoonful.
Lavender has a rich history, dating back to ancient times, where it was prized for its medicinal and aromatic properties. The Romans used it to scent their baths, and it has long been associated with relaxation and tranquility. Combining it with honey, a natural sweetener revered for centuries, creates a symphony of flavors that is both comforting and sophisticated.
What makes this Honey Lavender Dream Cream so irresistible? It’s the perfect balance of flavors and textures. The creamy base melts in your mouth, while the lavender adds a subtle floral aroma that is both calming and uplifting. The honey provides a natural sweetness that complements the lavender perfectly, creating a dessert that is not too sweet, not too floral, but just right. Plus, it’s incredibly easy to make, requiring minimal ingredients and effort. Whether you’re looking for a simple yet elegant dessert to impress your guests or a comforting treat to enjoy on a quiet evening, this dream cream is sure to delight.
Ingredients:
- For the Lavender Infused Cream:
- 4 cups (960ml) heavy cream, 36% milk fat or higher
- 4 tablespoons culinary grade dried lavender buds
- For the Honey Base:
- 1 cup (240ml) high-quality honey, preferably local
- 1/4 teaspoon sea salt
- For the Custard Base (Optional, but Recommended for Richness):
- 6 large egg yolks
- 1/2 cup (100g) granulated sugar
- For the Final Touches:
- 1 teaspoon vanilla extract (optional, but enhances the flavor)
- Pinch of sea salt (to taste)
- Optional garnishes: fresh lavender sprigs, edible flowers, a drizzle of honey
Lavender Infusion:
- Infuse the Cream: In a medium saucepan, combine the heavy cream and dried lavender buds.
- Gentle Heating: Heat the mixture over medium-low heat, stirring occasionally. You want to warm the cream and lavender, not boil it. The ideal temperature is around 170-180°F (77-82°C). This gentle heating helps release the lavender’s essential oils into the cream.
- Steep and Savor: Once heated, remove the saucepan from the heat and cover it. Let the lavender steep in the cream for at least 30 minutes, or up to 2 hours for a stronger lavender flavor. The longer it steeps, the more pronounced the lavender taste will be. I usually go for an hour to get that perfect balance.
- Strain the Cream: After steeping, strain the lavender-infused cream through a fine-mesh sieve lined with cheesecloth (if available) into a clean bowl. This removes the lavender buds and ensures a smooth, creamy texture. Discard the lavender buds.
- Chill Thoroughly: Cover the strained cream and refrigerate it for at least 4 hours, or preferably overnight. This chilling period is crucial for the cream to whip properly later on. The colder the cream, the better it will whip.
Preparing the Honey Base:
- Gentle Warming (Optional): If your honey is very thick or crystallized, you can gently warm it in a small saucepan over low heat. This will make it easier to incorporate into the cream. Be careful not to overheat the honey, as this can alter its flavor.
- Salt Enhancement: Stir in the sea salt into the honey. The salt enhances the sweetness and adds a subtle complexity to the honey flavor.
- Set Aside: Set the honey base aside to cool slightly while you prepare the custard base (if using).
Creating the Custard Base (Optional):
Note: This step is optional but highly recommended for a richer, more decadent ice cream. The custard base adds a luxurious texture and helps prevent ice crystals from forming.
- Whisk Egg Yolks and Sugar: In a heatproof bowl (stainless steel or glass), whisk together the egg yolks and granulated sugar until the mixture is pale yellow and slightly thickened. This usually takes about 2-3 minutes of vigorous whisking.
- Temper the Egg Yolks: Gradually drizzle about 1/2 cup of the lavender-infused cream into the egg yolk mixture, whisking constantly. This process is called tempering and prevents the egg yolks from scrambling when they come into contact with the hot cream.
- Combine and Cook: Pour the tempered egg yolk mixture back into the saucepan with the remaining lavender-infused cream. Cook over medium-low heat, stirring constantly with a spatula or wooden spoon, until the mixture thickens enough to coat the back of the spoon. This usually takes about 5-8 minutes. Be careful not to let the mixture boil, as this will cause the egg yolks to curdle.
- Check for Doneness: To test for doneness, dip a spoon into the custard and run your finger across the back of the spoon. If the line remains distinct and doesn’t run back together, the custard is ready.
- Strain the Custard: Immediately strain the custard through a fine-mesh sieve into a clean bowl. This removes any cooked egg particles and ensures a smooth, silky texture.
- Cool the Custard: Cover the custard with plastic wrap, pressing the plastic wrap directly onto the surface of the custard to prevent a skin from forming. Refrigerate the custard for at least 4 hours, or preferably overnight, until completely chilled.
Combining and Churning:
- Whisk the Honey and Custard (If Using): If you made the custard base, whisk the chilled custard into the honey base until well combined.
- Whip the Cream: In a large bowl, using an electric mixer (stand mixer or hand mixer), whip the chilled lavender-infused cream until stiff peaks form. Be careful not to overwhip the cream, as this can turn it into butter. You want the cream to be thick and hold its shape, but still be smooth and creamy.
- Gently Fold: Gently fold the honey mixture (with or without the custard) into the whipped cream in two or three additions. Use a spatula to fold the mixture together, being careful not to deflate the whipped cream. You want to maintain the airiness of the cream for a light and fluffy ice cream.
- Add Vanilla and Salt: Stir in the vanilla extract (if using) and a pinch of sea salt to taste.
- Chill Before Churning: For best results, cover the mixture and chill it in the refrigerator for at least 1 hour before churning. This allows the flavors to meld together and ensures that the mixture is cold enough for optimal churning.
- Churn According to Manufacturer’s Instructions: Pour the chilled mixture into your ice cream maker and churn according to the manufacturer’s instructions. Churning time will vary depending on your ice cream maker, but it usually takes about 20-30 minutes. The ice cream is ready when it has a soft-serve consistency.
Freezing and Serving:
- Transfer to a Freezer-Safe Container: Transfer the churned ice cream to a freezer-safe container. I prefer using a container with a tight-fitting lid to prevent freezer burn.
- Firm Up in the Freezer: Press a piece of plastic wrap directly onto the surface of the ice cream to prevent ice crystals from forming. Seal the container tightly and freeze for at least 4 hours, or preferably overnight, to allow the ice cream to firm up completely.
- Scoop and Serve: Before serving, let the ice cream sit at room temperature for a few minutes to soften slightly. This will make it easier to scoop.
- Garnish and Enjoy: Scoop the Honey Lavender Dream Cream into bowls or cones and garnish with fresh lavender sprigs, edible flowers, or a drizzle of honey, if desired. Enjoy your homemade ice cream!

Conclusion:
This Honey Lavender Dream Cream isn’t just another dessert; it’s an experience. The delicate floral notes of lavender dancing with the golden sweetness of honey create a symphony of flavors that will tantalize your taste buds and leave you feeling utterly blissful. I truly believe this recipe is a must-try for anyone looking to elevate their dessert game and impress their friends and family. It’s surprisingly simple to make, yet the results are incredibly sophisticated and memorable. Think of it: the creamy, smooth texture melting in your mouth, the subtle aroma of lavender filling your senses, and the perfect balance of sweetness that isn’t overpowering. Its a dessert thats both comforting and elegant, perfect for a cozy night in or a special occasion. But the beauty of this recipe lies not only in its taste but also in its versatility. While it’s divine on its own, served chilled in elegant glasses, there are countless ways to enjoy this Honey Lavender Dream Cream.Serving Suggestions & Variations:
* As a Topping: Imagine a dollop of this dream cream on top of freshly baked scones, warm apple crumble, or even a simple bowl of berries. It adds a touch of luxury and elevates any dessert to the next level. * With Grilled Fruit: The floral notes of lavender pair beautifully with grilled peaches, nectarines, or pineapple. The warmth of the fruit and the coolness of the cream create a delightful contrast. * In Parfaits: Layer the dream cream with granola, fresh fruit, and a drizzle of honey for a stunning and delicious parfait. It’s a perfect way to start your day or enjoy a light and refreshing dessert. * Frozen Treat: For a refreshing summer treat, try freezing the dream cream in popsicle molds or churning it in an ice cream maker. The result is a creamy, dreamy lavender-infused frozen delight. * Lavender Infusion Intensity: If you prefer a more subtle lavender flavor, start with a smaller amount of lavender buds and adjust to your liking. You can also experiment with different types of honey to find your perfect flavor combination. A dark, rich buckwheat honey will add a deeper, more complex flavor, while a lighter acacia honey will enhance the floral notes of the lavender. * Dairy-Free Option: For a dairy-free version, substitute the heavy cream with full-fat coconut cream. The coconut cream will add a subtle coconut flavor that complements the honey and lavender beautifully. Just be sure to chill the coconut cream overnight and only use the thick, solid part. * Honey Substitute: While honey is the star of the show, you could experiment with other natural sweeteners like maple syrup or agave nectar. Keep in mind that these sweeteners will alter the flavor profile slightly, so adjust the amount to your liking. I’m so excited for you to try this recipe and discover the magic of Honey Lavender Dream Cream for yourself. It’s a dessert that’s sure to become a new favorite in your household. So, go ahead, gather your ingredients, and get ready to create something truly special. Don’t be afraid to experiment with different variations and make it your own. And most importantly, have fun! Once you’ve tried it, I’d love to hear about your experience. Share your photos and comments below, and let me know what variations you tried and how they turned out. I can’t wait to see your creations! Happy baking (or should I say, dreaming?)! Print
Honey Lavender Dream Cream: Your Guide to Sweet, Floral Sleep
- Total Time: 240 minutes
- Yield: 1 quart (4 cups) 1x
Description
Floral and sweet homemade ice cream with lavender and honey. Optional custard base adds richness for an unforgettable dessert.
Ingredients
- 4 cups (960ml) heavy cream, 36% milk fat or higher
- 4 tablespoons culinary grade dried lavender buds
- 1 cup (240ml) high-quality honey, preferably local
- 1/4 teaspoon sea salt
- 6 large egg yolks
- 1/2 cup (100g) granulated sugar
- 1 teaspoon vanilla extract (optional)
- Pinch of sea salt (to taste)
- Optional garnishes: fresh lavender sprigs, edible flowers, a drizzle of honey
Instructions
- In a medium saucepan, combine the heavy cream and dried lavender buds.
- Heat the mixture over medium-low heat, stirring occasionally. Aim for 170-180°F (77-82°C).
- Remove from heat, cover, and let steep for 30 minutes to 2 hours, depending on desired lavender strength.
- Strain the cream through a fine-mesh sieve (lined with cheesecloth if available) into a clean bowl. Discard the lavender buds.
- Cover and refrigerate for at least 4 hours, or preferably overnight.
- If honey is thick, gently warm in a small saucepan over low heat.
- Stir in the sea salt.
- Let cool slightly.
- In a heatproof bowl, whisk egg yolks and sugar until pale yellow and slightly thickened (2-3 minutes).
- Gradually drizzle about 1/2 cup of the lavender-infused cream into the egg yolk mixture, whisking constantly.
- Pour the tempered egg yolk mixture back into the saucepan with the remaining lavender-infused cream. Cook over medium-low heat, stirring constantly, until the mixture thickens enough to coat the back of the spoon (5-8 minutes). Do not boil.
- Dip a spoon into the custard and run your finger across the back of the spoon. If the line remains distinct and doesn’t run back together, the custard is ready.
- Immediately strain the custard through a fine-mesh sieve into a clean bowl.
- Cover with plastic wrap, pressing it directly onto the surface, and refrigerate for at least 4 hours, or preferably overnight, until completely chilled.
- If using custard, whisk the chilled custard into the honey base until well combined.
- In a large bowl, whip the chilled lavender-infused cream until stiff peaks form.
- Gently fold the honey mixture (with or without custard) into the whipped cream in two or three additions.
- Stir in the vanilla extract (if using) and a pinch of sea salt to taste.
- Cover and chill in the refrigerator for at least 1 hour before churning.
- Pour the chilled mixture into your ice cream maker and churn according to the manufacturer’s instructions (usually 20-30 minutes).
- Transfer the churned ice cream to a freezer-safe container.
- Press a piece of plastic wrap directly onto the surface of the ice cream. Seal the container tightly and freeze for at least 4 hours, or preferably overnight.
- Let sit at room temperature for a few minutes to soften slightly before scooping.
- Scoop into bowls or cones and garnish with fresh lavender sprigs, edible flowers, or a drizzle of honey, if desired.
Notes
- Using high-quality ingredients, especially honey and heavy cream, will significantly impact the flavor and texture of the ice cream.
- Culinary grade lavender is essential. Do not use lavender from craft stores or gardens that may have been treated with pesticides.
- Steeping the lavender for a longer time will result in a stronger lavender flavor. Adjust the steeping time to your preference.
- Chilling the cream and custard base thoroughly is crucial for proper whipping and a smooth ice cream texture.
- Be careful not to overwhip the cream, as this can turn it into butter.
- If you don’t have an ice cream maker, you can try the “no-churn” method by freezing the mixture in a container and stirring it every 30 minutes for the first few hours to break up ice crystals. However, the texture will not be as smooth as churned ice cream.
- Prep Time: 30 minutes
- Cook Time: 20 minutes


