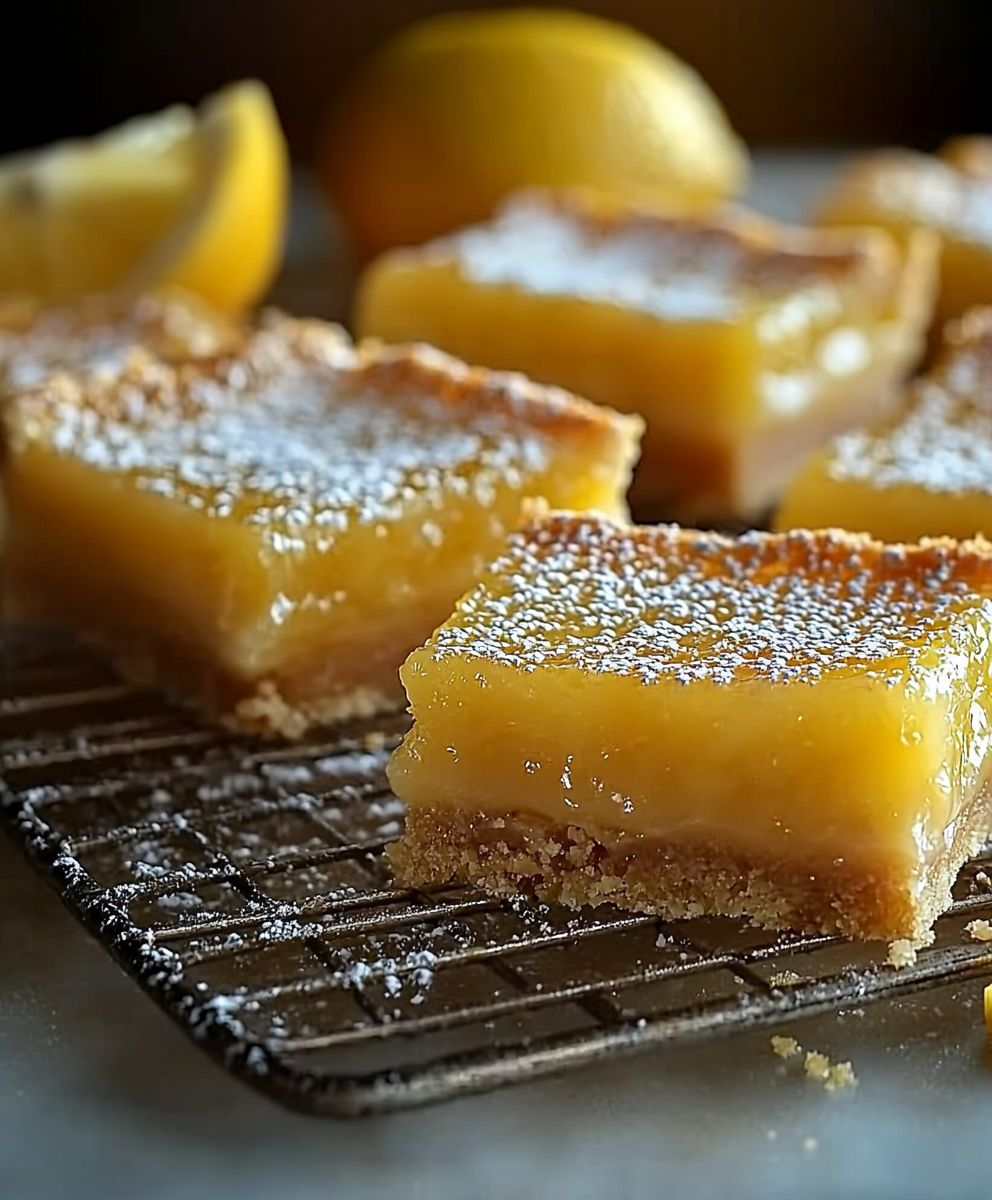
Lemon pie bars, a delightful twist on the classic lemon pie, are about to become your new favorite dessert! Imagine sinking your teeth into a buttery, crumbly shortbread crust, topped with a tangy, sweet, and perfectly smooth lemon filling. It’s sunshine on a plate, and trust me, one bite is never enough.
While the exact origins of lemon pie bars are a bit hazy, they draw inspiration from the time-honored lemon pie, a dessert with roots stretching back to medieval England. Lemons, once a rare and prized ingredient, were incorporated into custards and tarts, eventually evolving into the beloved pie we know today. These bars offer a modern, convenient, and utterly irresistible take on that classic flavor profile.
What makes these bars so universally appealing? It’s the perfect balance of textures and tastes. The buttery shortbread provides a satisfying crunch, contrasting beautifully with the creamy, citrusy filling. They are also incredibly easy to make and transport, making them ideal for potlucks, picnics, or simply enjoying a sweet treat at home. The bright, zesty flavor is a guaranteed mood booster, making them a welcome addition to any occasion. Get ready to experience the joy of lemon in every single bite!

Ingredients:
- For the Crust:
- 1 1/2 cups all-purpose flour
- 1/2 cup (1 stick) cold unsalted butter, cut into cubes
- 1/4 cup powdered sugar
- 1/4 teaspoon salt
- 3-5 tablespoons ice water
- For the Lemon Filling:
- 1 3/4 cups granulated sugar
- 1/4 cup all-purpose flour
- 1/4 teaspoon salt
- 4 large eggs
- 2/3 cup freshly squeezed lemon juice (from about 4-5 lemons)
- 1/4 cup (1/2 stick) unsalted butter, melted
- 1 tablespoon lemon zest
- For the Powdered Sugar Topping (optional):
- Powdered sugar, for dusting
Making the Crust
- Combine Dry Ingredients: In a large bowl, whisk together the flour, powdered sugar, and salt. This ensures the powdered sugar is evenly distributed, preventing any lumps in the crust.
- Cut in the Butter: Add the cold, cubed butter to the flour mixture. Using a pastry blender or your fingertips (work quickly to keep the butter cold!), cut the butter into the flour until the mixture resembles coarse crumbs. You should still see small pieces of butter throughout these are key for creating a flaky crust.
- Add Ice Water: Gradually add the ice water, one tablespoon at a time, mixing gently after each addition. Continue adding water until the dough just comes together. Be careful not to overmix, as this will develop the gluten in the flour and result in a tough crust. The dough should be slightly shaggy but hold together when pressed.
- Form the Dough: Gently gather the dough into a ball. Flatten it into a disc, wrap it tightly in plastic wrap, and refrigerate for at least 30 minutes. This chilling time is crucial as it allows the gluten to relax and the butter to firm up, resulting in a tender and flaky crust. You can chill it for longer, even overnight, if needed.
- Preheat Oven and Prepare Pan: Preheat your oven to 350°F (175°C). Grease and flour a 9×13 inch baking pan. Alternatively, you can line the pan with parchment paper, leaving an overhang on the sides for easy removal of the bars later.
- Roll Out the Dough: On a lightly floured surface, roll out the chilled dough into a rectangle slightly larger than your baking pan. If the dough is sticking, add a little more flour to your rolling surface.
- Transfer to Pan: Carefully transfer the rolled-out dough to the prepared baking pan. Gently press the dough into the bottom and up the sides of the pan. Use a fork to prick the bottom of the crust several times. This will prevent the crust from puffing up during baking.
- Pre-bake the Crust: Bake the crust for 15-20 minutes, or until it is lightly golden brown. This pre-baking step is important because it ensures that the crust is fully cooked and doesn’t become soggy when the lemon filling is added. Keep a close eye on it, as oven temperatures can vary.
Making the Lemon Filling
- Combine Dry Ingredients: In a large bowl, whisk together the granulated sugar, flour, and salt. This ensures that the flour is evenly distributed, preventing any lumps in the filling.
- Add Eggs: Add the eggs to the sugar mixture and whisk until well combined and smooth. Make sure there are no streaks of egg yolk remaining.
- Add Lemon Juice and Zest: Gradually whisk in the fresh lemon juice and lemon zest. The mixture will become slightly thinner. The lemon zest adds a wonderful burst of citrus flavor, so don’t skip it!
- Add Melted Butter: Slowly pour in the melted butter, whisking constantly until the filling is smooth and well combined. The melted butter adds richness and helps to create a creamy texture.
Assembling and Baking the Lemon Pie Bars
- Pour Filling into Crust: Carefully pour the lemon filling over the pre-baked crust. Spread it evenly to ensure that the bars bake uniformly.
- Bake: Bake in the preheated oven for 20-25 minutes, or until the filling is set but still slightly jiggly in the center. The edges should be lightly golden brown. Be careful not to overbake, as this can result in a dry or cracked filling.
- Cool Completely: Remove the bars from the oven and let them cool completely in the pan on a wire rack. This is crucial for the filling to set properly. Don’t be tempted to cut into them while they’re still warm, as the filling will be too soft.
- Chill (Optional but Recommended): For best results, chill the bars in the refrigerator for at least 2 hours, or even overnight. This will allow the filling to firm up completely and make them easier to cut into clean slices.
- Cut and Serve: Once the bars are completely cool and chilled (if desired), cut them into squares or rectangles. Use a sharp knife and wipe it clean between each cut for neat slices.
- Dust with Powdered Sugar (Optional): Before serving, dust the bars with powdered sugar for a beautiful and elegant presentation. This is entirely optional, but it adds a touch of sweetness and visual appeal.
Tips for Success
- Use Fresh Lemon Juice: Freshly squeezed lemon juice is essential for the best flavor. Bottled lemon juice simply doesn’t compare.
- Don’t Overbake: Overbaking the filling will result in a dry and cracked surface. The filling should be set but still slightly jiggly in the center when you remove it from the oven.
- Chill Thoroughly: Chilling the bars completely is crucial for the filling to set properly and for easy cutting.
- Make Ahead: These lemon pie bars are a great make-ahead dessert. You can bake them a day or two in advance and store them in the refrigerator until ready to serve.
- Variations: Feel free to experiment with different flavors. You could add a layer of raspberry jam to the crust before pouring in the lemon filling, or sprinkle the top with toasted coconut flakes before baking.
Storage Instructions
Store leftover lemon pie bars in an airtight container in the refrigerator for up to 3-4 days. They can also be frozen for longer storage. Wrap the bars individually in plastic wrap and then place them in a freezer-safe container. They can be frozen for up to 2 months. Thaw in the refrigerator before serving.
Conclusion:
And there you have it! These lemon pie bars are truly a ray of sunshine on a plate, and I sincerely believe they’re a must-try for anyone who loves a bright, tangy, and utterly satisfying dessert. From the buttery, melt-in-your-mouth crust to the vibrant, zesty lemon filling, every bite is an explosion of flavor that will leave you wanting more. I’ve made these for countless gatherings, and they’re always the first thing to disappear a testament to their irresistible appeal.
But what makes these bars truly special is their versatility. While they’re absolutely divine as is, there are so many ways to customize them to your liking. Feeling adventurous? Try adding a swirl of raspberry jam to the filling before baking for a delightful fruity twist. Or, for a more sophisticated touch, incorporate a hint of lavender into the crust the floral aroma pairs beautifully with the lemon.
Serving Suggestions and Variations:
* Classic Presentation: Simply dust the cooled bars with powdered sugar for an elegant and timeless look.
* Berry Bliss: Top each bar with fresh raspberries, blueberries, or strawberries for a burst of color and added sweetness.
* Whipped Cream Dream: Serve with a dollop of freshly whipped cream or a scoop of vanilla ice cream for an extra indulgent treat.
* Chocolate Lover’s Delight: Drizzle melted white chocolate or dark chocolate over the cooled bars for a decadent twist.
* Citrus Symphony: Experiment with different citrus fruits! Try using lime or grapefruit juice in place of lemon for a unique flavor profile.
* Nutty Crunch: Add chopped pecans, walnuts, or almonds to the crust for a delightful textural contrast.
* Ginger Zing: Incorporate a teaspoon of ground ginger into the crust for a warm and spicy kick.
I’ve personally found that these lemon pie bars are perfect for everything from afternoon tea to potlucks to holiday gatherings. They’re easy to transport, hold up well, and are always a crowd-pleaser. Plus, they’re a fantastic make-ahead dessert you can bake them a day or two in advance and store them in the refrigerator until you’re ready to serve.
I truly hope you’ll give this recipe a try. I’ve poured my heart and soul into perfecting it, and I’m confident that you’ll love the results. Don’t be intimidated by the seemingly long list of ingredients the process is actually quite simple, and the reward is well worth the effort.
Once you’ve made these lemon pie bars, I’d absolutely love to hear about your experience! Did you try any of the variations I suggested? Did you add your own special touch? Share your photos and stories in the comments below I can’t wait to see what you create! Happy baking, and may your days be filled with sunshine and delicious desserts! I am sure that you will love this recipe as much as I do. It is a great way to impress your friends and family with your baking skills. So, go ahead and give it a try. You won’t regret it!
Lemon Pie Bars: The Ultimate Guide to Baking Perfection
Tangy and sweet lemon pie bars with a buttery, flaky crust. A perfect dessert for any occasion!
Ingredients
- 1 1/2 cups all-purpose flour
- 1/2 cup (1 stick) cold unsalted butter, cut into cubes
- 1/4 cup powdered sugar
- 1/4 teaspoon salt
- 3-5 tablespoons ice water
- 1 3/4 cups granulated sugar
- 1/4 cup all-purpose flour
- 1/4 teaspoon salt
- 4 large eggs
- 2/3 cup freshly squeezed lemon juice (from about 4-5 lemons)
- 1/4 cup (1/2 stick) unsalted butter, melted
- 1 tablespoon lemon zest
- Powdered sugar, for dusting
Instructions
- Combine Dry Ingredients: In a large bowl, whisk together the flour, powdered sugar, and salt.
- Cut in the Butter: Add the cold, cubed butter to the flour mixture. Using a pastry blender or your fingertips (work quickly to keep the butter cold!), cut the butter into the flour until the mixture resembles coarse crumbs.
- Add Ice Water: Gradually add the ice water, one tablespoon at a time, mixing gently after each addition. Continue adding water until the dough just comes together. Be careful not to overmix.
- Form the Dough: Gently gather the dough into a ball. Flatten it into a disc, wrap it tightly in plastic wrap, and refrigerate for at least 30 minutes.
- Preheat Oven and Prepare Pan: Preheat your oven to 350°F (175°C). Grease and flour a 9×13 inch baking pan.
- Roll Out the Dough: On a lightly floured surface, roll out the chilled dough into a rectangle slightly larger than your baking pan.
- Transfer to Pan: Carefully transfer the rolled-out dough to the prepared baking pan. Gently press the dough into the bottom and up the sides of the pan. Use a fork to prick the bottom of the crust several times.
- Pre-bake the Crust: Bake the crust for 15-20 minutes, or until it is lightly golden brown.
- Combine Dry Ingredients: In a large bowl, whisk together the granulated sugar, flour, and salt.
- Add Eggs: Add the eggs to the sugar mixture and whisk until well combined and smooth.
- Add Lemon Juice and Zest: Gradually whisk in the fresh lemon juice and lemon zest.
- Add Melted Butter: Slowly pour in the melted butter, whisking constantly until the filling is smooth and well combined.
- Pour Filling into Crust: Carefully pour the lemon filling over the pre-baked crust. Spread it evenly.
- Bake: Bake in the preheated oven for 20-25 minutes, or until the filling is set but still slightly jiggly in the center.
- Cool Completely: Remove the bars from the oven and let them cool completely in the pan on a wire rack.
- Chill (Optional but Recommended): For best results, chill the bars in the refrigerator for at least 2 hours, or even overnight.
- Cut and Serve: Once the bars are completely cool and chilled (if desired), cut them into squares or rectangles.
- Dust with Powdered Sugar (Optional): Before serving, dust the bars with powdered sugar.
Notes
- Use fresh lemon juice for the best flavor.
- Don’t overbake the filling. It should be set but still slightly jiggly in the center.
- Chilling the bars completely is crucial for the filling to set properly and for easy cutting.
- These lemon pie bars are a great make-ahead dessert.
- Feel free to experiment with different flavors. You could add a layer of raspberry jam to the crust before pouring in the lemon filling, or sprinkle the top with toasted coconut flakes before baking.
- Store leftover lemon pie bars in an airtight container in the refrigerator for up to 3-4 days. They can also be frozen for longer storage. Wrap the bars individually in plastic wrap and then place them in a freezer-safe container. They can be frozen for up to 2 months. Thaw in the refrigerator before serving.