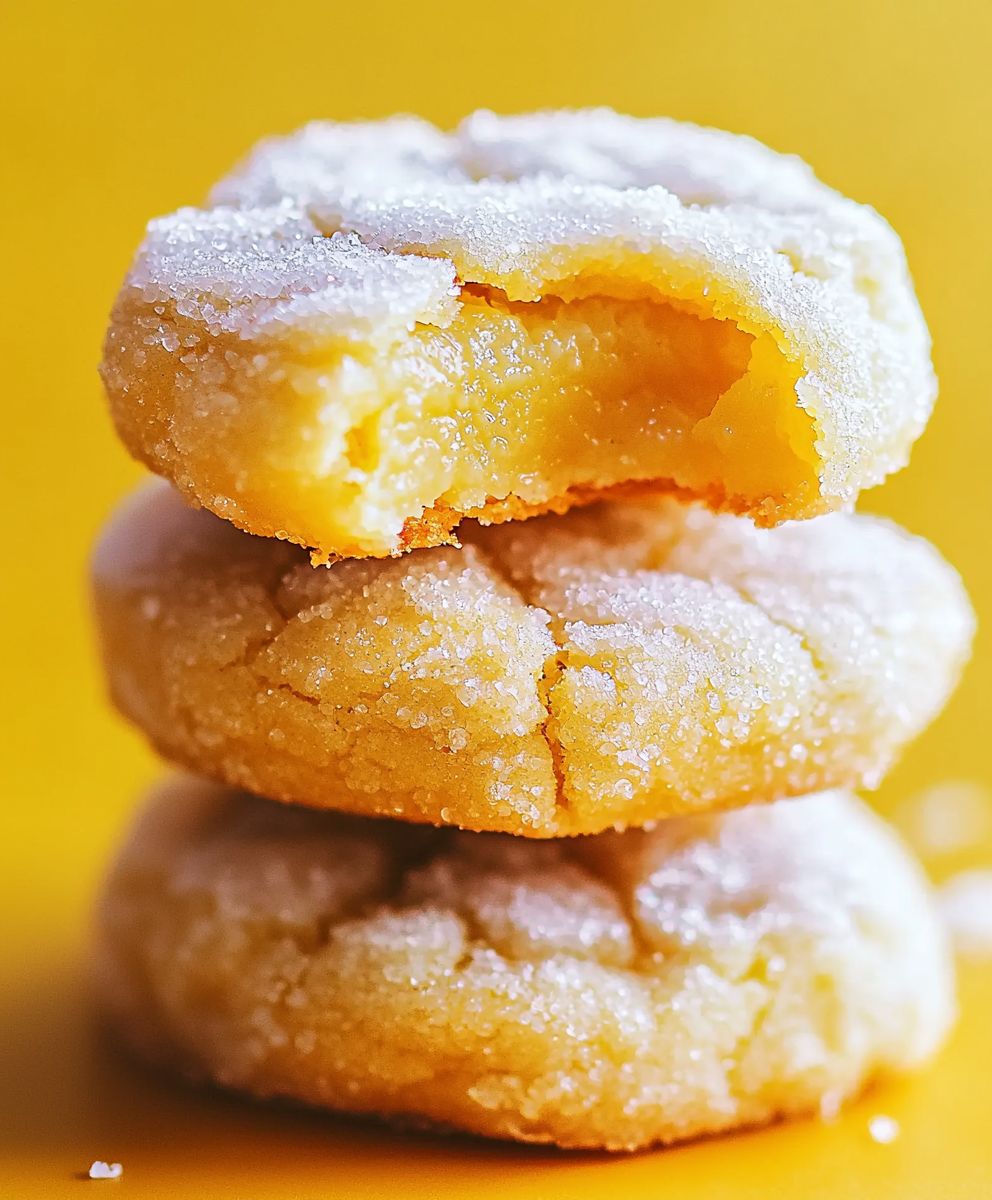
Lemon Pixie Cookies, those tiny bursts of sunshine, are about to become your new favorite treat! Imagine sinking your teeth into a delicate, melt-in-your-mouth cookie, bursting with bright, tangy lemon flavor. These aren’t your average cookies; they’re little bites of happiness, perfect for an afternoon pick-me-up or a delightful addition to any dessert platter.
While the exact origins of these particular cookies are shrouded in a bit of mystery, the concept of citrus-infused cookies has been around for centuries. Lemons, prized for their vibrant flavor and refreshing qualities, have long been incorporated into baking traditions across various cultures. From classic Italian lemon knots to zesty French madeleines, the allure of lemon in baked goods is undeniable. These Lemon Pixie Cookies carry on that tradition, offering a uniquely delightful twist.
So, what makes these cookies so irresistible? It’s the perfect balance of sweet and tart, the incredibly tender texture, and the sheer convenience of their small size. They’re easy to make, require minimal ingredients, and are guaranteed to disappear quickly! Whether you’re a seasoned baker or just starting out, this recipe is a surefire way to impress your friends and family (or simply treat yourself!). Get ready to experience the magic of these little lemon gems!

Ingredients:
- 1 cup (2 sticks) unsalted butter, softened
- 1 ½ cups granulated sugar
- 2 large eggs
- ¼ cup lemon juice, freshly squeezed
- 2 teaspoons lemon zest, finely grated
- 1 teaspoon vanilla extract
- 3 cups all-purpose flour
- 1 teaspoon baking powder
- ½ teaspoon baking soda
- ¼ teaspoon salt
- ½ cup powdered sugar, for dusting
Preparing the Dough: The Foundation of Our Pixie Magic
Alright, let’s get started on these delightful Lemon Pixie Cookies! The first step, and arguably the most important, is creating the perfect dough. This is where the magic truly begins, so pay close attention to the details.
- Creaming the Butter and Sugar: In a large bowl (or the bowl of your stand mixer), cream together the softened butter and granulated sugar until light and fluffy. This usually takes about 3-5 minutes on medium speed. Don’t rush this step! The creaming process incorporates air into the butter and sugar, which is essential for creating a tender cookie. You want the mixture to be pale and almost doubled in volume. Scrape down the sides of the bowl occasionally to ensure everything is evenly combined.
- Adding the Eggs: Beat in the eggs one at a time, mixing well after each addition. Make sure each egg is fully incorporated before adding the next. This prevents the mixture from curdling. If it does happen to curdle slightly, don’t panic! Just add a tablespoon of flour from the measured amount and continue mixing.
- Infusing the Lemon Flavor: Stir in the lemon juice, lemon zest, and vanilla extract. The aroma at this point should be absolutely divine! The lemon zest is crucial for that intense lemon flavor, so don’t skimp on it. Make sure you’re only zesting the yellow part of the lemon, avoiding the white pith, which can be bitter.
- Combining the Dry Ingredients: In a separate medium bowl, whisk together the all-purpose flour, baking powder, baking soda, and salt. Whisking ensures that the baking powder and baking soda are evenly distributed throughout the flour, which is essential for proper leavening.
- Gradually Adding the Dry Ingredients to the Wet Ingredients: Gradually add the dry ingredients to the wet ingredients, mixing on low speed until just combined. Be careful not to overmix! Overmixing develops the gluten in the flour, which can result in tough cookies. Mix until the flour is just incorporated, and then stop. A few streaks of flour are okay at this point.
- Chilling the Dough: Cover the dough with plastic wrap and refrigerate for at least 2 hours, or preferably overnight. This chilling time is crucial! It allows the gluten to relax, which prevents the cookies from spreading too much during baking. It also allows the flavors to meld together and deepen. The longer you chill the dough, the better the flavor and texture of the cookies will be.
Baking the Cookies: Transforming Dough into Golden Delights
Now that our dough has had a good chill, it’s time to transform it into those irresistible Lemon Pixie Cookies! This part requires a little bit of precision, but don’t worry, I’ll guide you through it.
- Preheating the Oven: Preheat your oven to 350°F (175°C). Make sure your oven rack is in the center position.
- Preparing the Baking Sheets: Line baking sheets with parchment paper. Parchment paper prevents the cookies from sticking to the baking sheets and makes cleanup a breeze. You can also use silicone baking mats if you prefer.
- Scooping the Dough: Remove the chilled dough from the refrigerator. Using a small cookie scoop (about 1 tablespoon), scoop out portions of the dough and roll them into balls. If the dough is too firm to scoop easily, let it sit at room temperature for a few minutes to soften slightly.
- Coating in Powdered Sugar: Place the powdered sugar in a shallow bowl. Roll each dough ball in the powdered sugar, coating it completely. This creates that signature “pixie dust” effect and adds a touch of sweetness. Make sure the dough balls are well coated, as the powdered sugar will help prevent them from spreading too much during baking.
- Arranging on Baking Sheets: Place the coated dough balls on the prepared baking sheets, leaving about 2 inches between each cookie. This allows for proper air circulation and prevents the cookies from sticking together as they bake.
- Baking Time: Bake for 10-12 minutes, or until the edges are lightly golden brown and the centers are set. Keep a close eye on the cookies, as baking times can vary depending on your oven. You want the cookies to be slightly soft in the center, as they will continue to firm up as they cool.
- Cooling the Cookies: Remove the baking sheets from the oven and let the cookies cool on the baking sheets for a few minutes before transferring them to a wire rack to cool completely. This prevents the cookies from breaking apart while they are still warm and delicate.
Tips and Tricks for Lemon Pixie Cookie Perfection
Here are a few extra tips and tricks to ensure your Lemon Pixie Cookies are absolutely perfect every time:
- Use High-Quality Ingredients: The quality of your ingredients will directly impact the flavor of your cookies. Use good-quality butter, fresh lemon juice, and pure vanilla extract for the best results.
- Don’t Overmix the Dough: Overmixing the dough develops the gluten in the flour, which can result in tough cookies. Mix until the flour is just incorporated, and then stop.
- Chill the Dough Thoroughly: Chilling the dough is crucial for preventing the cookies from spreading too much during baking. The longer you chill the dough, the better the flavor and texture of the cookies will be.
- Don’t Overbake the Cookies: Overbaking the cookies will result in dry, crumbly cookies. Bake until the edges are lightly golden brown and the centers are set. The cookies will continue to firm up as they cool.
- Store the Cookies Properly: Store the cooled cookies in an airtight container at room temperature for up to 3 days. You can also freeze the cookies for longer storage.
- Experiment with Flavors: While this recipe is for Lemon Pixie Cookies, you can easily adapt it to create other flavors. Try adding orange zest, lime zest, or even a pinch of cardamom to the dough.
- Adjust Sweetness: If you prefer a less sweet cookie, you can reduce the amount of granulated sugar slightly.
- Make Ahead: The dough can be made ahead of time and stored in the refrigerator for up to 2 days. You can also freeze the dough for longer storage. Just thaw the dough in the refrigerator overnight before baking.
Troubleshooting Common Cookie Problems
Sometimes, even with the best intentions, things can go a little sideways in the kitchen. Here’s a quick guide to troubleshooting some common cookie problems:
- Cookies Spreading Too Much: This is usually caused by using softened butter that is too warm, not chilling the dough long enough, or overmixing the dough. Make sure your butter is softened but still cool to the touch, chill the dough for at least 2 hours, and avoid overmixing.
- Cookies Too Dry: This is usually caused by overbaking the cookies or using too much flour. Bake the cookies until the edges are lightly golden brown and the centers are set, and measure your flour accurately.
- Cookies Too Tough: This is usually caused by overmixing the dough. Mix until the flour is just incorporated, and then stop.
- Cookies Not Spreading Enough: This is usually caused by using butter that is too cold or not using enough leavening. Make sure your butter is softened but still cool to the touch, and use fresh baking powder and baking soda.
Enjoying Your Lemon Pixie Cookies
Now that you’ve baked these delightful Lemon Pixie Cookies, it’s time to enjoy them! These cookies are perfect for serving with a cup of tea or coffee, or as a sweet treat after dinner. They’re also a great addition to any cookie platter or gift basket. Share them with your friends and family, and watch their faces light up with joy!
Conclusion:
And there you have it! These Lemon Pixie Cookies are more than just a treat; they’re a burst of sunshine in every bite. I truly believe this recipe is a must-try for anyone who loves bright, citrusy flavors and a perfectly soft, melt-in-your-mouth texture. The combination of the tangy lemon zest and juice with the sweet, buttery dough is simply irresistible. It’s a cookie that’s both comforting and refreshing, making it perfect for any occasion, from a casual afternoon snack to a sophisticated dessert.
But what truly sets these cookies apart is their simplicity. You don’t need to be a master baker to achieve incredible results. The recipe is straightforward, the ingredients are readily available, and the process is incredibly satisfying. Plus, the aroma that fills your kitchen as these cookies bake is pure bliss! I promise, the effort you put in will be richly rewarded with a batch of cookies that will disappear faster than you can say “Lemon Pixie.”
Why are these Lemon Pixie Cookies a must-try? Because they are:
* Incredibly flavorful and refreshing.
* Easy to make, even for beginner bakers.
* Perfect for any occasion.
* Guaranteed to bring a smile to your face.
Now, let’s talk about serving suggestions and variations! These cookies are delightful on their own, enjoyed with a cup of tea or coffee. But you can also elevate them with a few simple additions. Consider dusting them with powdered sugar for an extra touch of sweetness and elegance. Or, for a more decadent treat, try sandwiching two cookies together with a layer of lemon curd or a light cream cheese frosting.
If you’re feeling adventurous, you can experiment with different citrus flavors. Lime Pixie Cookies, anyone? Simply substitute the lemon zest and juice with lime for a zesty twist. You could also add a touch of orange or grapefruit for a more complex citrus profile. Another fun variation is to add a handful of white chocolate chips to the dough for a creamy, melt-in-your-mouth surprise.
For a festive touch, you can decorate the cookies with colorful sprinkles or edible glitter. This is a great way to get kids involved in the baking process and make the cookies even more special. And if you’re looking for a unique gift idea, a batch of these Lemon Pixie Cookies, beautifully packaged, is sure to be a hit.
I’m so excited for you to try this recipe and experience the joy of baking these delightful cookies. I’ve poured my heart into perfecting this recipe, and I truly believe you’ll love it as much as I do. So, gather your ingredients, preheat your oven, and get ready to create some magic in your kitchen.
Don’t forget to share your experience with me! I’d love to see your creations and hear about any variations you try. You can tag me in your photos on social media or leave a comment below. I’m always eager to learn from other bakers and see how you make this recipe your own. Happy baking, and enjoy every single bite of these amazing Lemon Pixie Cookies! I can’t wait to hear what you think!
Lemon Pixie Cookies: A Zesty Delight You'll Love
Melt-in-your-mouth Lemon Pixie Cookies coated in powdered sugar. Bursting with fresh lemon flavor and a tender, delicate crumb.
Ingredients
- 1 cup (2 sticks) unsalted butter, softened
- 1 ½ cups granulated sugar
- 2 large eggs
- ¼ cup lemon juice, freshly squeezed
- 2 teaspoons lemon zest, finely grated
- 1 teaspoon vanilla extract
- 3 cups all-purpose flour
- 1 teaspoon baking powder
- ½ teaspoon baking soda
- ¼ teaspoon salt
- ½ cup powdered sugar, for dusting
Instructions
- Cream Butter and Sugar: In a large bowl, cream together the softened butter and granulated sugar until light and fluffy (3-5 minutes).
- Add Eggs: Beat in the eggs one at a time, mixing well after each addition.
- Infuse Lemon Flavor: Stir in the lemon juice, lemon zest, and vanilla extract.
- Combine Dry Ingredients: In a separate bowl, whisk together the flour, baking powder, baking soda, and salt.
- Combine Wet and Dry: Gradually add the dry ingredients to the wet ingredients, mixing on low speed until just combined. Do not overmix.
- Chill Dough: Cover the dough with plastic wrap and refrigerate for at least 2 hours, or preferably overnight.
- Preheat Oven: Preheat oven to 350°F (175°C). Line baking sheets with parchment paper.
- Scoop Dough: Scoop dough using a small cookie scoop (about 1 tablespoon) and roll into balls.
- Coat in Powdered Sugar: Roll each dough ball in powdered sugar, coating completely.
- Arrange on Baking Sheets: Place coated dough balls on prepared baking sheets, leaving 2 inches between each cookie.
- Bake: Bake for 10-12 minutes, or until the edges are lightly golden brown and the centers are set.
- Cool: Let the cookies cool on the baking sheets for a few minutes before transferring them to a wire rack to cool completely.
Notes
- Use high-quality ingredients for the best flavor.
- Do not overmix the dough.
- Chilling the dough is crucial for preventing spreading.
- Do not overbake the cookies.
- Store in an airtight container at room temperature for up to 3 days.
- The dough can be made ahead and stored in the refrigerator for up to 2 days or frozen for longer storage.
- If the cookies spread too much, chill the dough longer.
- If the cookies are too dry, avoid overbaking and measure flour accurately.
- Experiment with flavors by adding orange zest, lime zest, or cardamom.