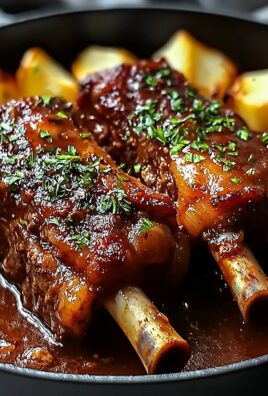
Low temp roast beef, a culinary technique often shrouded in mystery, is about to become your new best friend in the kitchen. Imagine sinking your teeth into a slice of perfectly cooked roast beef, boasting a rosy pink center from edge to edge, so tender it practically melts in your mouth. Forget the days of dry, overcooked roasts! This method unlocks a level of succulence and flavor you never thought possible.
While the exact origins of low and slow cooking are debated, the principles have been employed for centuries across various cultures. Think of the pit barbecues of the American South or the slow-cooked stews of Europe. The beauty lies in the gentle coaxing of flavors and the breakdown of tough connective tissues, resulting in unparalleled tenderness. This technique is especially well-suited for larger cuts of beef, transforming them into a feast fit for a king (or a weeknight dinner!).
People adore low temp roast beef for several reasons. First, the taste is simply divine rich, beefy, and intensely flavorful. Second, the texture is unbelievably tender, a far cry from the chewy roasts of yesteryear. And finally, while the cooking time is longer, the hands-on time is minimal, making it surprisingly convenient for busy cooks. You can prep it in the morning, let it slowly roast all day, and come home to a ready-to-carve masterpiece. Ready to unlock the secrets to perfect roast beef? Let’s get started!

Ingredients:
- 3-4 lb Beef Roast (Chuck Roast, Round Roast, or Sirloin Tip Roast work well)
- 2 tbsp Olive Oil
- 2 tsp Salt
- 1 tsp Black Pepper
- 1 tsp Garlic Powder
- 1 tsp Onion Powder
- 1/2 tsp Dried Thyme
- 1/2 tsp Dried Rosemary
- 1 large Onion, quartered
- 4 Carrots, peeled and chopped into 2-inch pieces
- 4 Celery Stalks, chopped into 2-inch pieces
- 4 cloves Garlic, minced
- 1 cup Beef Broth
- 1/2 cup Red Wine (optional, but adds great flavor)
Preparing the Roast:
- Pat the roast dry: This is crucial for getting a good sear. Use paper towels to thoroughly dry the surface of the beef. Moisture is the enemy of browning!
- Season generously: In a small bowl, combine the salt, pepper, garlic powder, onion powder, thyme, and rosemary. Rub this mixture all over the roast, ensuring every surface is well coated. Don’t be shy with the seasoning; it will create a flavorful crust.
Searing the Roast:
- Heat the oil: Place a large, heavy-bottomed Dutch oven or oven-safe skillet over medium-high heat. Add the olive oil and let it heat up until it shimmers. The oil needs to be hot to create a good sear.
- Sear the roast on all sides: Carefully place the seasoned roast in the hot Dutch oven. Sear it for 3-4 minutes per side, until a deep brown crust forms. Don’t overcrowd the pan; if your roast is too large, sear it in batches. The goal is to develop a rich, flavorful crust that will add depth to the final dish. Use tongs to turn the roast and sear each side evenly.
- Remove the roast: Once the roast is seared on all sides, remove it from the Dutch oven and set it aside on a plate.
Building the Base:
- Sauté the vegetables: Add the quartered onion, chopped carrots, and chopped celery to the Dutch oven. Cook over medium heat, stirring occasionally, until the vegetables begin to soften and brown, about 8-10 minutes. Scrape up any browned bits from the bottom of the pan; these are packed with flavor!
- Add the garlic: Add the minced garlic to the vegetables and cook for another minute, until fragrant. Be careful not to burn the garlic, as it can become bitter.
- Deglaze the pan (optional): If using red wine, pour it into the Dutch oven and scrape up any remaining browned bits from the bottom of the pan. Let the wine simmer for a few minutes, allowing the alcohol to evaporate. This step adds a wonderful depth of flavor to the sauce.
- Add the beef broth: Pour the beef broth into the Dutch oven.
Low and Slow Roasting:
- Return the roast to the Dutch oven: Place the seared roast on top of the vegetables in the Dutch oven. The roast should be partially submerged in the liquid.
- Cover and roast: Cover the Dutch oven with a tight-fitting lid. Place it in a preheated oven at 275°F (135°C).
- Roast for 3-4 hours: Roast the beef for 3-4 hours, or until it is fork-tender. The exact cooking time will depend on the size and thickness of your roast. Check the roast after 3 hours; it should be easily pierced with a fork. If it’s still tough, continue roasting for another 30-60 minutes.
- Check the internal temperature (optional but recommended): For medium-rare, aim for an internal temperature of 130-135°F (54-57°C). For medium, aim for 135-145°F (57-63°C). For medium-well, aim for 145-155°F (63-68°C). Use a meat thermometer to accurately measure the internal temperature.
Resting and Slicing:
- Remove the roast from the oven: Carefully remove the Dutch oven from the oven.
- Let the roast rest: Transfer the roast to a cutting board and tent it loosely with foil. Let it rest for at least 20-30 minutes before slicing. This allows the juices to redistribute throughout the meat, resulting in a more tender and flavorful roast.
- Slice against the grain: After resting, slice the roast against the grain into thin slices. This will make the meat more tender and easier to chew.
Making the Gravy (Optional):
- Strain the cooking liquid: After removing the roast, strain the cooking liquid from the Dutch oven into a saucepan. Discard the solids (or reserve the vegetables for another use).
- Skim off excess fat: Let the liquid sit for a few minutes, allowing the fat to rise to the surface. Skim off as much of the fat as possible using a spoon or a fat separator.
- Thicken the gravy (Method 1: Cornstarch Slurry): In a small bowl, whisk together 2 tablespoons of cornstarch with 2 tablespoons of cold water to create a slurry. Bring the strained cooking liquid to a simmer over medium heat. Slowly whisk in the cornstarch slurry, stirring constantly, until the gravy thickens to your desired consistency. This usually takes just a few minutes.
- Thicken the gravy (Method 2: Roux): In a separate saucepan, melt 2 tablespoons of butter over medium heat. Whisk in 2 tablespoons of all-purpose flour and cook for 1-2 minutes, stirring constantly, to create a roux. Gradually whisk in the strained cooking liquid, stirring constantly to prevent lumps. Bring the gravy to a simmer and cook until it thickens to your desired consistency.
- Season to taste: Taste the gravy and season with salt and pepper as needed. You can also add a splash of Worcestershire sauce or a squeeze of lemon juice for extra flavor.
Serving:
- Serve the roast: Arrange the sliced roast on a platter.
- Serve with gravy (optional): Drizzle the gravy over the roast or serve it on the side.
- Serve with sides: Serve the roast with your favorite sides, such as mashed potatoes, roasted vegetables, or Yorkshire pudding.
Tips for Success:
- Choose the right cut of beef: Chuck roast, round roast, and sirloin tip roast are all good choices for low and slow roasting. These cuts are relatively inexpensive and become incredibly tender when cooked properly.
- Don’t skip the searing: Searing the roast is essential for developing a rich, flavorful crust.
- Use a meat thermometer: A meat thermometer is the best way to ensure that your roast is cooked to your desired level of doneness.
- Let the roast rest: Resting the roast allows the juices to redistribute, resulting in a more tender and flavorful final product.
- Slice against the grain: Slicing against the grain makes the meat more tender and easier to chew.
Variations:
- Add different vegetables: Feel free to add other vegetables to the Dutch oven, such as potatoes, parsnips, or turnips.
- Use different herbs and spices: Experiment with different herbs and spices to create your own unique flavor profile.
- Add a splash of balsamic vinegar: A splash of balsamic vinegar can add a touch of sweetness and acidity to the gravy.
- Use a slow cooker: You can also cook this roast in a slow cooker. Simply sear the roast as directed, then transfer it to the slow cooker with the vegetables and broth. Cook on low for 8-10 hours, or on high for 4-5 hours.

Conclusion:
So, there you have it! This low temp roast beef recipe is truly a game-changer. Forget dry, overcooked roasts of the past. This method guarantees a tender, juicy, and flavorful centerpiece that will impress your family and friends. I know, I know, it sounds almost too good to be true, but trust me, the proof is in the perfectly pink slices!
Why is this a must-try? Well, beyond the incredible texture and taste, it’s surprisingly simple. The low and slow cooking process does all the work, leaving you free to focus on other aspects of your meal or, dare I say, even relax a little! Plus, the consistent temperature ensures even cooking throughout the roast, eliminating those dreaded overcooked edges and raw center scenarios. It’s practically foolproof!
But the deliciousness doesn’t stop there. Think of all the incredible ways you can serve this masterpiece! For a classic Sunday dinner, pair it with roasted potatoes, glazed carrots, and Yorkshire pudding. Or, for a more casual meal, slice it thinly and pile it high on crusty rolls with horseradish mayo and caramelized onions for the ultimate roast beef sandwich. Leftovers (if you have any!) are fantastic in salads, wraps, or even as a topping for pizza.
And speaking of variations, feel free to experiment with different herbs and spices to create your own signature flavor profile. Rosemary and thyme are always a winning combination, but don’t be afraid to try adding a touch of smoked paprika for a smoky depth or a pinch of red pepper flakes for a little kick. You could also experiment with different cuts of beef, although I highly recommend sticking with a ribeye or sirloin roast for the best results. Just be sure to adjust the cooking time accordingly.
Another fun variation is to create a flavorful pan sauce using the drippings from the roast. Simply deglaze the pan with red wine or beef broth, add a dollop of Dijon mustard, and simmer until thickened. This sauce will add an extra layer of richness and complexity to your meal.
I’m absolutely confident that you’ll love this low temp roast beef recipe as much as I do. It’s a guaranteed crowd-pleaser that’s perfect for any occasion, from a special holiday gathering to a simple weeknight dinner. The key is patience and a good meat thermometer. Don’t rush the cooking process, and be sure to monitor the internal temperature closely to ensure that your roast is cooked to perfection.
So, what are you waiting for? Gather your ingredients, preheat your oven, and get ready to experience roast beef like never before. I promise you won’t be disappointed.
And most importantly, I want to hear about your experience! Did you try this recipe? What variations did you make? What did your family and friends think? Share your photos and stories in the comments below. I can’t wait to see your culinary creations and hear all about your low temp roast beef adventures! Happy cooking!
Low Temp Roast Beef: The Ultimate Guide to Perfect Tenderness
Tender, flavorful pot roast slow-cooked with vegetables in a rich broth. Perfect for a comforting family meal.
Ingredients
- 3-4 lb Beef Roast (Chuck Roast, Round Roast, or Sirloin Tip Roast)
- 2 tbsp Olive Oil
- 2 tsp Salt
- 1 tsp Black Pepper
- 1 tsp Garlic Powder
- 1 tsp Onion Powder
- 1/2 tsp Dried Thyme
- 1/2 tsp Dried Rosemary
- 1 large Onion, quartered
- 4 Carrots, peeled and chopped into 2-inch pieces
- 4 Celery Stalks, chopped into 2-inch pieces
- 4 cloves Garlic, minced
- 1 cup Beef Broth
- 1/2 cup Red Wine (optional)
Instructions
- Prepare the Roast: Pat the roast dry with paper towels. In a small bowl, combine salt, pepper, garlic powder, onion powder, thyme, and rosemary. Rub the mixture all over the roast.
- Sear the Roast: Heat olive oil in a large Dutch oven over medium-high heat. Sear the roast on all sides for 3-4 minutes per side, until a deep brown crust forms. Remove the roast and set aside.
- Sauté Vegetables: Add onion, carrots, and celery to the Dutch oven. Cook over medium heat, stirring occasionally, until softened and browned, about 8-10 minutes. Scrape up any browned bits from the bottom of the pan.
- Add Garlic: Add minced garlic and cook for another minute, until fragrant.
- Deglaze (Optional): If using red wine, pour it into the Dutch oven and scrape up any remaining browned bits. Let simmer for a few minutes.
- Add Broth: Pour beef broth into the Dutch oven.
- Roast: Place the seared roast on top of the vegetables in the Dutch oven. Cover with a tight-fitting lid. Place in a preheated oven at 275°F (135°C).
- Roast Time: Roast for 3-4 hours, or until fork-tender. Check after 3 hours.
- Check Internal Temperature (Optional): For medium-rare, aim for 130-135°F (54-57°C). For medium, aim for 135-145°F (57-63°C). For medium-well, aim for 145-155°F (63-68°C).
- Rest: Remove the roast from the oven and transfer to a cutting board. Tent loosely with foil and let rest for 20-30 minutes.
- Slice: Slice the roast against the grain into thin slices.
- Make Gravy (Optional): Strain the cooking liquid into a saucepan. Skim off excess fat.
- Thicken Gravy (Method 1: Cornstarch Slurry): Whisk 2 tablespoons cornstarch with 2 tablespoons cold water. Bring strained liquid to a simmer. Slowly whisk in the slurry, stirring constantly, until thickened.
- Thicken Gravy (Method 2: Roux): Melt 2 tablespoons butter in a saucepan. Whisk in 2 tablespoons all-purpose flour and cook for 1-2 minutes. Gradually whisk in the strained liquid, stirring constantly. Bring to a simmer and cook until thickened.
- Season Gravy: Taste and season with salt and pepper as needed. Add Worcestershire sauce or lemon juice for extra flavor.
- Serve: Arrange sliced roast on a platter. Drizzle with gravy (optional). Serve with your favorite sides.
Notes
- Choose a chuck roast, round roast, or sirloin tip roast.
- Searing is essential for flavor.
- Use a meat thermometer for accurate doneness.
- Resting the roast is crucial for tenderness.
- Slice against the grain.
- Add other vegetables like potatoes, parsnips, or turnips.
- Experiment with different herbs and spices.
- Add a splash of balsamic vinegar to the gravy.
- Can also be cooked in a slow cooker on low for 8-10 hours or on high for 4-5 hours after searing.