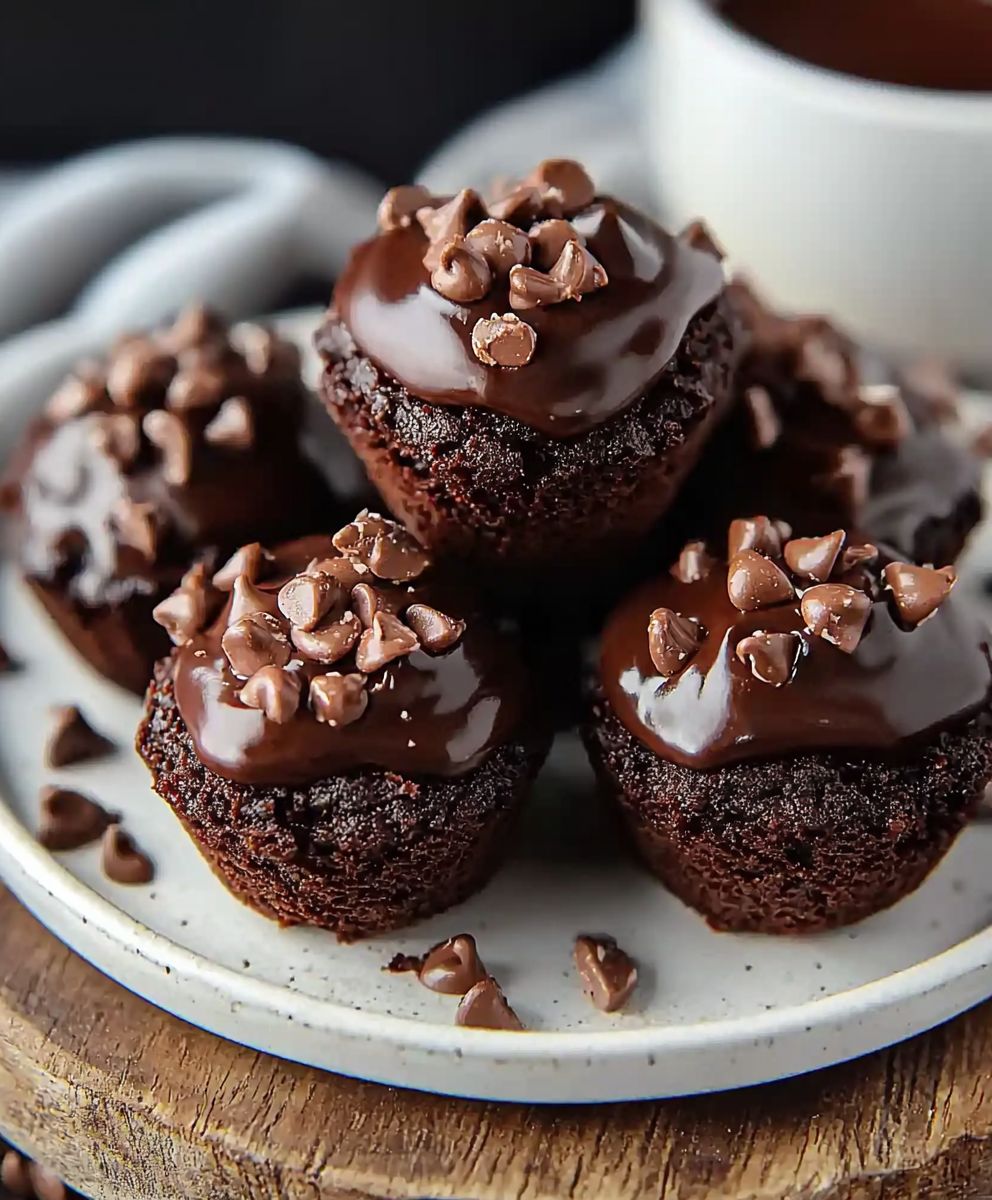
No Bake Brownie Bites: the words alone conjure up images of fudgy, chocolatey bliss, don’t they? Imagine sinking your teeth into a decadent treat that requires absolutely no oven time. That’s right, forget preheating and waiting these little morsels of happiness are ready in minutes!
While the exact origins of no-bake desserts are a bit hazy, they’ve undoubtedly gained popularity as busy lifestyles demand quicker, easier ways to satisfy our sweet cravings. Think of them as the modern answer to classic fudge, offering the same intense chocolate flavor without the fuss. They are a testament to our ingenuity in the kitchen, proving that deliciousness doesn’t always require hours of labor.
What’s not to love? These no bake brownie bites are incredibly easy to make, perfect for those moments when a chocolate craving strikes and you need a fix fast. Their rich, fudgy texture is incredibly satisfying, and the customizable nature of the recipe means you can add your favorite mix-ins, from nuts and chocolate chips to pretzels and dried fruit. Plus, they’re a fantastic option for warm weather when you want a cool, refreshing dessert without turning on the oven. Get ready to experience chocolatey perfection in every bite!

Ingredients:
- 1 ½ cups chocolate graham cracker crumbs
- ½ cup unsalted butter, melted
- 1 (14 ounce) can sweetened condensed milk
- 1 cup semi-sweet chocolate chips
- ½ cup unsweetened cocoa powder
- 1 teaspoon vanilla extract
- ¼ teaspoon salt
- Optional toppings: mini chocolate chips, chopped nuts, sprinkles, sea salt
Preparing the Base:
- First, let’s get our graham cracker crumbs ready. If you don’t have pre-made crumbs, you can easily make your own. Just toss the graham crackers into a food processor and pulse until they’re finely ground. You can also put them in a large zip-top bag and crush them with a rolling pin a little elbow grease never hurt anyone! Aim for a consistency similar to fine sand.
- Now, in a medium-sized bowl, combine the graham cracker crumbs and the melted butter. Make sure the butter is completely melted so it mixes evenly with the crumbs. Stir them together until the crumbs are thoroughly moistened. The mixture should resemble wet sand and hold its shape when pressed. This is the foundation of our brownie bites, so we want it to be nice and sturdy.
- Next, press the graham cracker mixture firmly into the bottom of a 9×13 inch baking dish. I like to use the bottom of a measuring cup or a flat-bottomed glass to really pack it down. This creates a solid base for our brownie filling. Make sure it’s evenly distributed across the entire dish. A well-packed base will prevent the brownie bites from crumbling later on.
- Place the prepared crust in the refrigerator while you prepare the chocolate filling. This will help it firm up and set, making it easier to work with later. Chilling the crust is a crucial step, so don’t skip it! It usually takes about 15-20 minutes in the fridge.
Making the Chocolate Filling:
- In a large, microwave-safe bowl, combine the sweetened condensed milk, semi-sweet chocolate chips, and unsweetened cocoa powder. Make sure you’re using a bowl that’s large enough to accommodate all the ingredients, as the mixture will expand slightly when heated.
- Microwave the mixture in 30-second intervals, stirring well after each interval, until the chocolate chips are completely melted and the mixture is smooth. It’s important to microwave in short bursts to prevent the chocolate from burning. Keep stirring until all the chocolate is melted and the cocoa powder is fully incorporated. The mixture should be glossy and free of any lumps.
- Once the chocolate is melted and smooth, stir in the vanilla extract and salt. The vanilla extract enhances the chocolate flavor, while the salt balances the sweetness. Mix everything together until it’s well combined. The mixture should be thick and rich.
Assembling and Chilling:
- Remove the graham cracker crust from the refrigerator. Pour the chocolate filling evenly over the chilled crust. Use a spatula to spread the filling to the edges of the dish, ensuring that the entire crust is covered. You want a nice, even layer of chocolate goodness.
- Now, here’s where you can get creative! If you want to add any toppings, such as mini chocolate chips, chopped nuts, sprinkles, or a sprinkle of sea salt, now is the time to do it. Gently press the toppings into the chocolate filling so they adhere properly.
- Cover the dish with plastic wrap and refrigerate for at least 2 hours, or preferably overnight, to allow the brownie bites to set completely. This is a crucial step, as it allows the chocolate filling to firm up and become sliceable. The longer you chill them, the better they will hold their shape.
Cutting and Serving:
- Once the brownie bites are fully set, remove them from the refrigerator. Use a sharp knife to cut them into small squares or rectangles. The size of the bites is up to you, but I find that smaller bites are easier to handle and perfect for snacking.
- To make cutting easier, you can run the knife under hot water and wipe it dry between each cut. This will help prevent the chocolate from sticking to the knife and create clean, even slices.
- Carefully remove the brownie bites from the dish using a spatula or a small knife. Arrange them on a serving platter or store them in an airtight container in the refrigerator.
- These no-bake brownie bites are best served chilled. They’re perfect for parties, potlucks, or just a sweet treat any time of day. Enjoy!
Tips and Variations:
- For a richer flavor: Use dark chocolate chips instead of semi-sweet chocolate chips.
- For a nutty twist: Add ½ cup of chopped walnuts or pecans to the chocolate filling.
- For a minty flavor: Add ½ teaspoon of peppermint extract to the chocolate filling.
- For a mocha flavor: Add 1 tablespoon of instant coffee granules to the chocolate filling.
- For a gluten-free option: Use gluten-free graham crackers.
- To make individual brownie bites: Press the graham cracker mixture into the bottom of muffin liners instead of a baking dish.
- Storage: Store the brownie bites in an airtight container in the refrigerator for up to 5 days.
- Freezing: You can also freeze the brownie bites for up to 2 months. Wrap them tightly in plastic wrap and then place them in a freezer-safe bag or container. Thaw them in the refrigerator before serving.
Troubleshooting:
- If the graham cracker crust is too crumbly: Add a little more melted butter to the mixture until it holds its shape.
- If the chocolate filling is too thick: Add a tablespoon of milk or cream to thin it out.
- If the brownie bites are too soft: Chill them for a longer period of time.
- If the brownie bites are too hard: Let them sit at room temperature for a few minutes before serving.
Nutritional Information (approximate, per serving):
- Calories: 250
- Fat: 15g
- Saturated Fat: 9g
- Cholesterol: 30mg
- Sodium: 100mg
- Carbohydrates: 30g
- Sugar: 20g
- Protein: 3g
Disclaimer: Nutritional information is an estimate and may vary based on specific ingredients and portion sizes.
Conclusion:
And there you have it! These No Bake Brownie Bites are truly a game-changer. I know, I know, I might be a little biased, but trust me on this one. The sheer simplicity of this recipe, combined with the intensely rich, fudgy flavor, makes it an absolute must-try for anyone craving a chocolate fix. Forget slaving over a hot oven; these little delights come together in minutes, requiring minimal effort and maximum reward. Why are these brownie bites a must-try? Well, beyond the ease of preparation, they’re incredibly versatile. They’re perfect for those moments when you need a quick dessert to satisfy a sudden craving. They’re also fantastic for parties and gatherings, as they’re easy to transport and always a crowd-pleaser. Plus, they’re naturally gluten-free (if you use gluten-free oats!), making them a great option for those with dietary restrictions. But the best part? The flavor! The combination of cocoa powder, nut butter, and maple syrup creates a deep, decadent chocolate experience that rivals any baked brownie. The texture is perfectly fudgy and satisfying, and the optional toppings add an extra layer of deliciousness. Speaking of toppings, let’s talk about serving suggestions and variations. While I personally love these brownie bites plain, there are endless possibilities for customization. For a touch of elegance, try drizzling them with melted dark chocolate and sprinkling them with sea salt. If you’re feeling adventurous, add a pinch of cayenne pepper to the batter for a spicy kick. Chopped nuts, shredded coconut, or even mini chocolate chips are also fantastic additions. For a truly decadent experience, serve these brownie bites with a scoop of vanilla ice cream or a dollop of whipped cream. They’re also delicious alongside a cup of hot coffee or a glass of cold milk. And if you’re looking for a healthier option, try using almond butter instead of peanut butter and adding a handful of chia seeds to the batter. Don’t be afraid to experiment and get creative! The beauty of this recipe is that it’s incredibly forgiving. You can adjust the ingredients to suit your taste preferences and dietary needs. The most important thing is to have fun and enjoy the process. I truly believe that these No Bake Brownie Bites will become a staple in your dessert repertoire. They’re quick, easy, delicious, and endlessly customizable. What more could you ask for? So, what are you waiting for? Gather your ingredients, put on some music, and get ready to whip up a batch of these irresistible treats. I promise you won’t regret it! And once you’ve tried them, I’d love to hear about your experience. Did you make any variations? What toppings did you use? Did you share them with friends and family? Let me know in the comments below! I’m always eager to hear your feedback and see your creations. Happy baking (or rather, no-baking)! I am confident you will love this recipe for No Bake Brownie Bites as much as I do. Print
No Bake Brownie Bites: Easy Recipe & Delicious Dessert
- Total Time: 140 minutes
- Yield: 24–32 brownie bites 1x
Description
Easy no-bake brownie bites with a graham cracker crust and rich chocolate filling. Perfect for a quick dessert or party treat!
Ingredients
- 1 ½ cups chocolate graham cracker crumbs
- ½ cup unsalted butter, melted
- 1 (14 ounce) can sweetened condensed milk
- 1 cup semi-sweet chocolate chips
- ½ cup unsweetened cocoa powder
- 1 teaspoon vanilla extract
- ¼ teaspoon salt
- Optional toppings: mini chocolate chips, chopped nuts, sprinkles, sea salt
Instructions
- Prepare the Crust: If using graham crackers, pulse in a food processor or crush in a zip-top bag until finely ground. In a medium bowl, combine graham cracker crumbs and melted butter. Stir until moistened. Press firmly into the bottom of a 9×13 inch baking dish. Refrigerate for 15-20 minutes.
- Make the Filling: In a large, microwave-safe bowl, combine sweetened condensed milk, chocolate chips, and cocoa powder. Microwave in 30-second intervals, stirring well after each interval, until chocolate is melted and smooth. Stir in vanilla extract and salt.
- Assemble and Chill: Remove crust from refrigerator. Pour chocolate filling evenly over the crust. Add desired toppings, pressing gently to adhere. Cover with plastic wrap and refrigerate for at least 2 hours, or preferably overnight, to set.
- Cut and Serve: Remove from refrigerator. Cut into small squares or rectangles. Serve chilled.
Notes
- For easier cutting, run the knife under hot water and wipe dry between cuts.
- Store in an airtight container in the refrigerator for up to 5 days.
- Can be frozen for up to 2 months. Thaw in the refrigerator before serving.
- Prep Time: 15 minutes
- Cook Time: 5 minutes