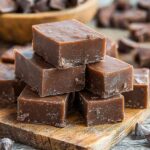
Old Fashioned Fudge is a delightful treat that brings back memories of cozy kitchens and family gatherings. This rich, creamy confection has been a beloved dessert for generations, often associated with holiday celebrations and special occasions. The history of fudge dates back to the late 19th century, when it was first made in the United States, quickly becoming a staple in candy shops and home kitchens alike. What I love most about Old Fashioned Fudge is its perfect balance of sweetness and texture; it melts in your mouth while leaving a satisfying richness that keeps you coming back for more.
People adore this classic treat not just for its taste, but also for the nostalgia it evokes. The process of making Old Fashioned Fudge can be a fun and rewarding experience, allowing you to create something truly special to share with loved ones. Whether you enjoy it as a simple dessert or as a thoughtful gift, Old Fashioned Fudge is sure to bring joy to any occasion. So, lets dive into this timeless recipe and create some delicious memories together!
Ingredients:
- 2 cups granulated sugar
- 1/2 cup unsweetened cocoa powder
- 1/2 cup whole milk
- 1/4 cup unsalted butter
- 1 teaspoon vanilla extract
- 1/2 cup chopped nuts (optional, I love using walnuts or pecans)
- Pinch of salt
Preparing the Fudge Mixture
Now that we have our ingredients ready, lets dive into the process of making this delicious old-fashioned fudge. Its a simple yet rewarding experience, and I cant wait to share it with you!
- In a medium-sized saucepan, combine the granulated sugar, unsweetened cocoa powder, and a pinch of salt. Stir these dry ingredients together until they are well mixed. This step is crucial as it ensures that the cocoa is evenly distributed throughout the fudge.
- Next, pour in the whole milk and add the unsalted butter. Place the saucepan over medium heat. Stir the mixture continuously until the sugar and cocoa are completely dissolved. This should take about 5 minutes. Be patient and keep stirring to prevent any burning at the bottom of the pan.
- Once the mixture is smooth and well combined, bring it to a gentle boil. Allow it to boil for about 5 minutes without stirring. This is an important step as it helps to achieve the right consistency for the fudge. Youll notice the mixture bubbling and thickening slightly.
- After 5 minutes, remove the saucepan from the heat. Its time to add the vanilla extract. Pour it in and stir well to incorporate it into the fudge mixture. The aroma of vanilla will fill your kitchen, and its simply delightful!
- If youre using nuts, now is the time to fold them into the fudge mixture. I love the added crunch and flavor they bring, but feel free to skip this step if you prefer a smoother fudge.
Cooling and Setting the Fudge
Now that we have our fudge mixture ready, its time to pour it into a prepared pan and let it set.
- Prepare an 8-inch square baking pan by lining it with parchment paper. This will make it easier to remove the fudge once its set. You can also lightly grease the pan with butter or cooking spray if you prefer.
- Carefully pour the hot fudge mixture into the prepared pan. Use a spatula to spread it evenly, ensuring that it reaches all corners of the pan. The fudge will be quite hot, so be cautious during this step.
- Allow the fudge to cool at room temperature for about 1 hour. After it has cooled, transfer it to the refrigerator for an additional 2 hours to set completely. This step is essential for achieving that perfect fudge texture.
Cutting and Serving the Fudge
Once the fudge has set, its time to cut it into delicious squares and enjoy!
- Remove the fudge from the refrigerator and take it out of the pan using the parchment paper. Place it on a cutting board.
- Using a sharp knife, cut the fudge into squares. I usually aim for about 1-inch pieces, but you can cut them larger or smaller depending on your preference.
- Once cut, you can serve the fudge immediately or store it in an airtight container. If youre storing it, make sure to separate the layers with parchment paper to prevent sticking.
- Enjoy your homemade old-fashioned fudge! Its perfect for sharing with friends and family or indulging in a sweet treat for yourself.
Tips for Perfect Fudge
Here are some tips Ive learned over the years to ensure your fudge turns out perfectly every time:
- Make sure to use a candy thermometer if you want to be precise. The fudge should reach a temperature of about 234°F (112°C) for the best texture.
- Stirring is key! Make sure to stir continuously while the sugar and cocoa are dissolving to avoid any burning.
- Dont skip the cooling time! Allowing the fudge to cool and set properly is crucial for achieving that rich, creamy texture.

Conclusion:
In summary, this Old Fashioned Fudge recipe is an absolute must-try for anyone who appreciates the rich, creamy texture and decadent flavor of homemade sweets. The simplicity of the ingredients combined with the nostalgia of traditional fudge-making makes this treat not only delicious but also a delightful trip down memory lane. Whether youre preparing it for a holiday gathering, a special occasion, or just a cozy night in, this fudge is sure to impress. For serving suggestions, consider cutting the fudge into bite-sized squares and presenting it on a decorative platter. It pairs wonderfully with a cup of coffee or hot cocoa, making it a perfect treat for chilly evenings. If youre feeling adventurous, try adding a sprinkle of sea salt on top for a sweet and salty twist, or mix in your favorite nuts or dried fruits for added texture and flavor. You can even experiment with different extracts, like peppermint or almond, to create your own unique variations. I encourage you to give this Old Fashioned Fudge recipe a try and share your experience with friends and family. Id love to hear how it turns out for you! Whether you stick to the classic version or put your own spin on it, Im sure youll create something truly special. So grab your ingredients, roll up your sleeves, and lets make some fudge magic happen! Print
Old Fashioned Fudge: A Timeless Recipe for Sweet Indulgence
- Total Time: 145 minutes
- Yield: 16 squares 1x
Description
Indulge in this classic old-fashioned fudge, featuring a rich and creamy texture with a hint of vanilla. Made with simple ingredients, it’s perfect for sharing or enjoying solo. Easy to prepare, this delightful treat is sure to satisfy your sweet tooth.
Ingredients
- 2 cups granulated sugar
- 1/2 cup unsweetened cocoa powder
- 1/2 cup whole milk
- 1/4 cup unsalted butter
- 1 teaspoon vanilla extract
- 1/2 cup chopped nuts (optional, walnuts or pecans recommended)
- Pinch of salt
Instructions
- In a medium-sized saucepan, combine the granulated sugar, unsweetened cocoa powder, and a pinch of salt. Stir until well mixed.
- Pour in the whole milk and add the unsalted butter. Place the saucepan over medium heat, stirring continuously until the sugar and cocoa are completely dissolved (about 5 minutes).
- Bring the mixture to a gentle boil and allow it to boil for about 5 minutes without stirring.
- Remove the saucepan from heat and stir in the vanilla extract. If using nuts, fold them into the mixture at this point.
- Prepare an 8-inch square baking pan by lining it with parchment paper or lightly greasing it.
- Carefully pour the hot fudge mixture into the prepared pan, spreading it evenly with a spatula.
- Allow the fudge to cool at room temperature for about 1 hour, then transfer it to the refrigerator for an additional 2 hours to set completely.
- Remove the fudge from the refrigerator and lift it out of the pan using the parchment paper.
- Place it on a cutting board and cut into squares (about 1-inch pieces).
- Serve immediately or store in an airtight container, separating layers with parchment paper to prevent sticking.
Notes
- For best results, use a candy thermometer to ensure the fudge reaches a temperature of about 234°F (112°C).
- Continuous stirring while dissolving the sugar and cocoa is crucial to prevent burning.
- Allowing the fudge to cool and set properly is essential for achieving the desired texture.
- Prep Time: 15 minutes
- Cook Time: 10 minutes


