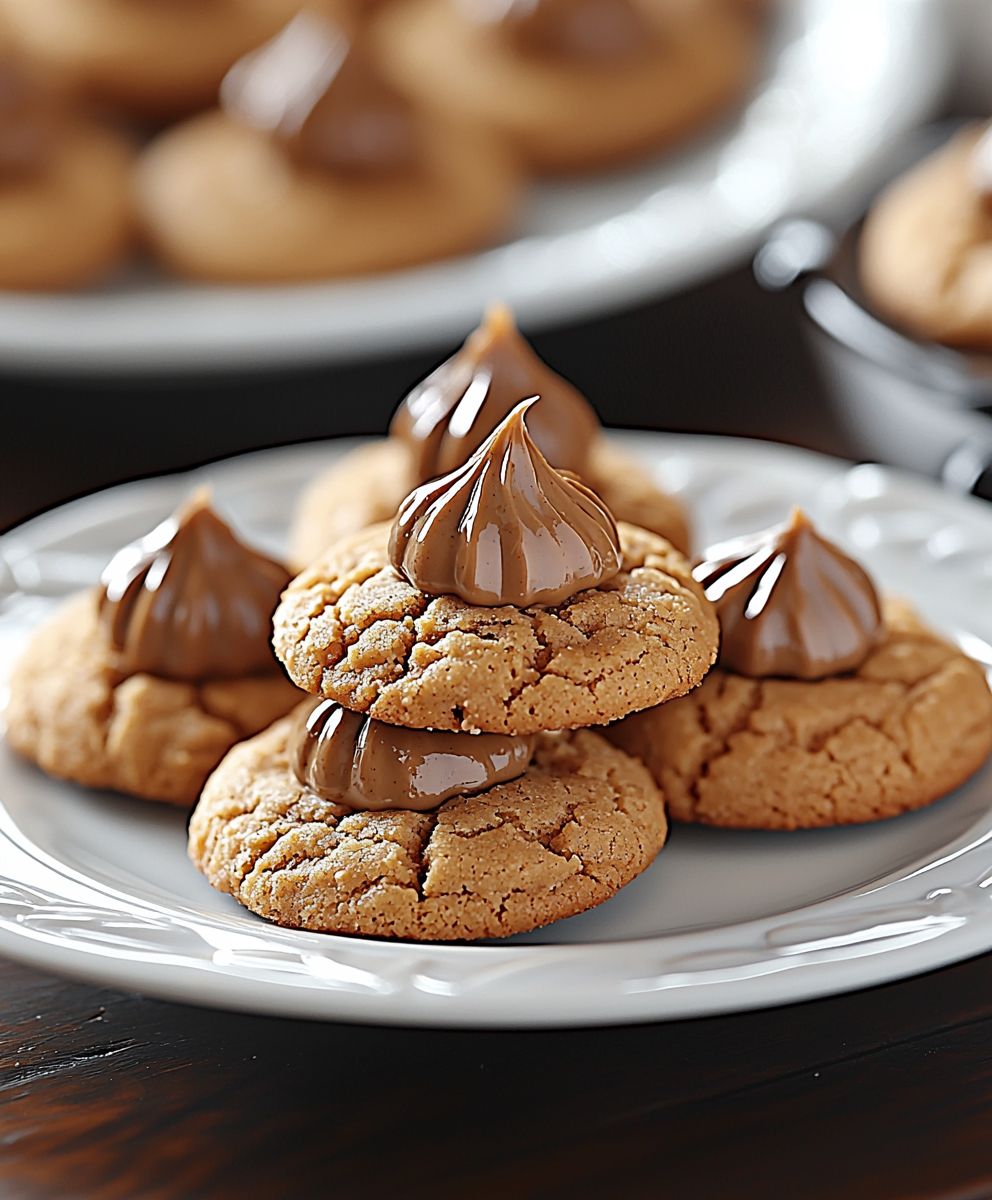
Peanut Butter Kiss Cookies: the very name conjures up images of holiday baking, cheerful gatherings, and that irresistible combination of salty peanut butter and sweet chocolate. But these aren’t just any cookies; they’re a nostalgic treat that has graced dessert tables for generations, becoming a beloved tradition for families across the country.
The history of Peanut Butter Kiss Cookies is intertwined with the rise of both peanut butter and Hershey’s Kisses as household staples in the early 20th century. While the exact origin is debated, it’s widely believed that resourceful home bakers, eager to showcase these new and exciting ingredients, began experimenting with variations of peanut butter cookies, eventually topping them with the iconic chocolate kiss. The result? A perfect marriage of flavors and textures that quickly captured hearts (and taste buds!).
What makes these cookies so universally adored? It’s the delightful contrast! The slightly crumbly, melt-in-your-mouth peanut butter cookie base provides a savory counterpoint to the smooth, rich sweetness of the Hershey’s Kiss. Plus, they’re relatively simple to make, making them a perfect baking project for both novice and experienced bakers alike. Whether you’re looking to recreate cherished childhood memories or simply want a delicious and satisfying treat, these cookies are guaranteed to be a crowd-pleaser. So, let’s get baking and create some magic in the kitchen!

Ingredients:
- 1 ½ cups all-purpose flour
- 1 teaspoon baking soda
- ½ teaspoon baking powder
- ½ cup (1 stick) unsalted butter, softened
- ½ cup creamy peanut butter
- ½ cup granulated sugar
- ½ cup packed brown sugar
- 1 large egg
- 2 tablespoons milk
- 1 teaspoon vanilla extract
- Approximately 48 Hershey’s Kisses, unwrapped
- Optional: Coarse sugar for sprinkling
Preparing the Dough:
- Combine Dry Ingredients: In a medium bowl, whisk together the flour, baking soda, and baking powder. Make sure everything is evenly distributed. This ensures a consistent rise and texture in your cookies. Set this bowl aside for later.
- Cream Butter and Peanut Butter: In a large bowl (or the bowl of your stand mixer), cream together the softened butter and peanut butter until light and fluffy. This step is crucial for creating a tender cookie. If using a stand mixer, use the paddle attachment. If using a hand mixer, make sure your butter is truly softened to avoid lumps. This process usually takes about 2-3 minutes. Scrape down the sides of the bowl occasionally to ensure even mixing.
- Add Sugars: Gradually add the granulated sugar and brown sugar to the butter mixture, beating until well combined. The mixture should be light and airy. Again, scrape down the sides of the bowl as needed. The brown sugar adds moisture and a chewy texture to the cookies, while the granulated sugar contributes to the overall sweetness and crispness.
- Incorporate Egg, Milk, and Vanilla: Beat in the egg, then add the milk and vanilla extract. Mix until everything is fully incorporated. Don’t overmix at this stage, just mix until the wet ingredients are evenly distributed. The egg acts as a binder and adds richness, while the milk provides moisture and the vanilla enhances the flavor.
- Gradually Add Dry Ingredients: Gradually add the dry ingredients to the wet ingredients, mixing on low speed until just combined. Be careful not to overmix the dough, as this can lead to tough cookies. Mix until you no longer see streaks of flour. Overmixing develops the gluten in the flour, resulting in a less tender cookie.
- Chill the Dough: Cover the bowl with plastic wrap and chill the dough in the refrigerator for at least 30 minutes. This chilling period is important because it allows the gluten to relax, preventing the cookies from spreading too much during baking. It also makes the dough easier to handle. You can chill the dough for longer, even overnight, if needed.
Baking the Cookies:
- Preheat Oven and Prepare Baking Sheets: Preheat your oven to 375°F (190°C). Line baking sheets with parchment paper or silicone baking mats. This prevents the cookies from sticking and makes cleanup easier.
- Shape the Dough: Roll the chilled dough into 1-inch balls. You can use a small cookie scoop to ensure uniform size. Place the dough balls on the prepared baking sheets, leaving about 2 inches between each cookie to allow for spreading.
- Optional: Sprinkle with Sugar: If desired, lightly sprinkle the tops of the dough balls with coarse sugar for added sparkle and texture.
- Bake the Cookies: Bake for 8-10 minutes, or until the edges are lightly golden brown. The centers of the cookies will still appear slightly soft. Be careful not to overbake, as this will result in dry cookies.
- Cool Slightly: Remove the baking sheets from the oven and let the cookies cool on the baking sheets for a few minutes before transferring them to a wire rack to cool completely. This allows the cookies to firm up slightly and prevents them from breaking when you move them.
Adding the Hershey’s Kisses:
- Press in the Kisses: While the cookies are still warm (but not too hot to handle), gently press a Hershey’s Kiss into the center of each cookie. The warmth of the cookie will slightly melt the chocolate, helping it to adhere.
- Cool Completely: Allow the cookies to cool completely on the wire rack with the Kisses in place. This will allow the chocolate to set and prevent it from melting all over your fingers when you eat them.
Tips and Variations:
- Peanut Butter Options: While creamy peanut butter is recommended for the best texture, you can experiment with chunky peanut butter for added texture.
- Chocolate Variations: Instead of Hershey’s Kisses, you can use other types of chocolate candies, such as miniature peanut butter cups or chocolate stars.
- Add-Ins: For extra flavor and texture, consider adding chopped peanuts, chocolate chips, or sprinkles to the dough.
- Storage: Store the cookies in an airtight container at room temperature for up to 3 days.
- Freezing: You can freeze the baked cookies for up to 2 months. Thaw them at room temperature before serving. You can also freeze the dough balls before baking. Place the dough balls on a baking sheet and freeze until solid, then transfer them to a freezer bag. When ready to bake, bake from frozen, adding a few extra minutes to the baking time.
- Preventing Spreading: If your cookies are spreading too much, make sure your butter is not too soft. You can also add a tablespoon or two of flour to the dough. Chilling the dough for a longer period of time can also help prevent spreading.
- Even Baking: To ensure even baking, rotate the baking sheets halfway through the baking time.
- Soft Cookies: For softer cookies, slightly underbake them. They will continue to bake on the baking sheet as they cool.
- Crispy Cookies: For crispier cookies, bake them for a minute or two longer.
- Gluten-Free Option: To make these cookies gluten-free, use a gluten-free all-purpose flour blend. Be sure to check the label to ensure that the blend contains xanthan gum, which helps to bind the ingredients together.
- Vegan Option: To make these cookies vegan, substitute the butter with vegan butter, the egg with a flax egg (1 tablespoon ground flaxseed mixed with 3 tablespoons water), and the milk with plant-based milk.
Troubleshooting:
Why are my cookies flat?
Flat cookies can be caused by several factors, including using butter that is too soft, not chilling the dough long enough, or overmixing the dough. Make sure your butter is softened but not melted, chill the dough for at least 30 minutes, and avoid overmixing.
Why are my cookies dry?
Dry cookies are often the result of overbaking. Be sure to bake the cookies for the recommended time and check them frequently. You can also try adding a tablespoon or two of milk to the dough to increase the moisture content.
Why are my cookies tough?
Tough cookies are usually caused by overmixing the dough. Overmixing develops the gluten in the flour, resulting in a less tender cookie. Mix the dough until just combined.
Why are my Hershey’s Kisses melting too much?
If your Hershey’s Kisses are melting too much, make sure the cookies are not too hot when you press them in. Let the cookies cool slightly before adding the Kisses.
Can I use a different type of nut butter?
Yes, you can experiment with different types of nut butter, such as almond butter or cashew butter. Keep in mind that the flavor and texture of the cookies may vary depending on the type of nut butter you use.
Can I make these cookies without chilling the dough?
While you can make these cookies without chilling the dough, the cookies will spread more and may not be as tender. Chilling the dough is recommended for the best results.
How do I prevent the cookies from sticking to the baking sheet?
To prevent the cookies from sticking to the baking sheet, line the baking sheet with parchment paper or a silicone baking mat.
Conclusion:
This isn’t just another cookie recipe; it’s a guaranteed crowd-pleaser, a nostalgic trip down memory lane, and a surefire way to brighten anyone’s day. The perfect balance of sweet and salty, the melt-in-your-mouth texture, and that iconic Hershey’s Kiss nestled on top what’s not to love? These Peanut Butter Kiss Cookies are more than just a treat; they’re an experience.
I truly believe this recipe is a must-try for several reasons. First, the simplicity is unbeatable. You likely already have most of the ingredients in your pantry, and the steps are straightforward, making it perfect for even novice bakers. Second, the flavor profile is universally appealing. Peanut butter and chocolate are a match made in heaven, and these cookies perfectly showcase that classic combination. Finally, they’re incredibly versatile.
Looking for serving suggestions? These cookies are fantastic on their own, of course, but they also pair beautifully with a cold glass of milk, a scoop of vanilla ice cream, or even a warm cup of coffee. Imagine serving them at your next holiday gathering, potluck, or bake sale they’re guaranteed to be a hit!
But the fun doesn’t stop there! Feel free to experiment with variations to make this recipe your own. For a richer, more decadent flavor, try using dark chocolate Kisses instead of milk chocolate. Or, if you’re feeling adventurous, swap the peanut butter for almond butter or cashew butter for a unique twist. You could even add a sprinkle of sea salt on top before baking to enhance the salty-sweet contrast. Another fun idea is to roll the dough in colored sprinkles before baking for a festive touch, especially around the holidays. Consider adding chopped peanuts to the dough for extra crunch and peanut flavor. For a gluten-free option, you can substitute the all-purpose flour with a gluten-free blend, ensuring everyone can enjoy these delightful cookies.
Don’t be afraid to get creative and personalize these Peanut Butter Kiss Cookies to your liking. The possibilities are endless! I’ve made them with different types of peanut butter (creamy, chunky, natural), and each variation has been delicious in its own way. I’ve even tried adding a touch of cinnamon to the dough for a warm, spicy flavor.
I’m so confident that you’ll love this recipe, and I can’t wait to hear about your baking adventures. So, gather your ingredients, preheat your oven, and get ready to create some magic in the kitchen. Once you’ve tried these cookies, I have a feeling they’ll become a staple in your baking repertoire.
I truly encourage you to give this recipe a try. It’s a simple, satisfying, and utterly delicious way to treat yourself and your loved ones. And most importantly, please share your experience! Let me know in the comments below how your cookies turned out, what variations you tried, and any tips or tricks you discovered along the way. I’m always eager to learn from fellow bakers and see how you’ve made this recipe your own. Happy baking! I hope you enjoy these Peanut Butter Kiss Cookies as much as I do!
Peanut Butter Kiss Cookies: The Ultimate Recipe & Baking Guide
Classic peanut butter cookies with a chocolatey surprise! These soft and chewy cookies are topped with a Hershey's Kiss for the perfect sweet and salty treat.
Ingredients
- 1 ½ cups all-purpose flour
- 1 teaspoon baking soda
- ½ teaspoon baking powder
- ½ cup (1 stick) unsalted butter, softened
- ½ cup creamy peanut butter
- ½ cup granulated sugar
- ½ cup packed brown sugar
- 1 large egg
- 2 tablespoons milk
- 1 teaspoon vanilla extract
- Approximately 48 Hershey’s Kisses, unwrapped
- Optional: Coarse sugar for sprinkling
Instructions
- Combine Dry Ingredients: In a medium bowl, whisk together the flour, baking soda, and baking powder. Set aside.
- Cream Butter and Peanut Butter: In a large bowl, cream together the softened butter and peanut butter until light and fluffy (2-3 minutes). Scrape down the sides of the bowl occasionally.
- Add Sugars: Gradually add the granulated sugar and brown sugar to the butter mixture, beating until well combined. Scrape down the sides of the bowl as needed.
- Incorporate Egg, Milk, and Vanilla: Beat in the egg, then add the milk and vanilla extract. Mix until fully incorporated.
- Gradually Add Dry Ingredients: Gradually add the dry ingredients to the wet ingredients, mixing on low speed until just combined. Be careful not to overmix.
- Chill the Dough: Cover the bowl with plastic wrap and chill the dough in the refrigerator for at least 30 minutes.
- Preheat Oven and Prepare Baking Sheets: Preheat your oven to 375°F (190°C). Line baking sheets with parchment paper or silicone baking mats.
- Shape the Dough: Roll the chilled dough into 1-inch balls. Place the dough balls on the prepared baking sheets, leaving about 2 inches between each cookie.
- Optional: Sprinkle with Sugar: If desired, lightly sprinkle the tops of the dough balls with coarse sugar.
- Bake the Cookies: Bake for 8-10 minutes, or until the edges are lightly golden brown. The centers of the cookies will still appear slightly soft.
- Cool Slightly: Remove the baking sheets from the oven and let the cookies cool on the baking sheets for a few minutes before transferring them to a wire rack to cool completely.
- Press in the Kisses: While the cookies are still warm, gently press a Hershey’s Kiss into the center of each cookie.
- Cool Completely: Allow the cookies to cool completely on the wire rack with the Kisses in place.
Notes
- Peanut Butter Options: Creamy peanut butter is recommended, but you can use chunky.
- Chocolate Variations: Use other chocolate candies instead of Hershey’s Kisses.
- Add-Ins: Add chopped peanuts, chocolate chips, or sprinkles to the dough.
- Storage: Store in an airtight container at room temperature for up to 3 days.
- Freezing: Freeze baked cookies for up to 2 months. Freeze dough balls before baking.
- Preventing Spreading: Ensure butter isn’t too soft, chill dough longer, or add 1-2 tbsp flour.
- Even Baking: Rotate baking sheets halfway through.
- Soft Cookies: Slightly underbake.
- Crispy Cookies: Bake for a minute or two longer.
- Gluten-Free Option: Use a gluten-free all-purpose flour blend with xanthan gum.
- Vegan Option: Substitute butter with vegan butter, egg with a flax egg, and milk with plant-based milk.