Peruvian Grilled Chicken Marinade is a culinary gem that brings the vibrant flavors of Peru right to your kitchen. As I embarked on my culinary journey, I discovered that this marinade is not just a recipe; its a celebration of culture and tradition. Originating from the heart of Peru, this marinade is infused with zesty lime, aromatic garlic, and a blend of spices that create a symphony of flavors. People adore this dish not only for its tantalizing taste but also for its tender, juicy texture that results from marinating the chicken. The convenience of whipping up this Peruvian Grilled Chicken Marinade makes it a go-to for weeknight dinners or festive gatherings. Trust me, once you try it, youll understand why this dish has captured the hearts and palates of so many!

Ingredients:
- 4 boneless, skinless chicken breasts
- 1/4 cup olive oil
- 1/4 cup fresh lime juice (about 2-3 limes)
- 4 cloves garlic, minced
- 1 tablespoon ground cumin
- 1 tablespoon paprika
- 1 tablespoon dried oregano
- 1 teaspoon salt
- 1 teaspoon black pepper
- 1 teaspoon cayenne pepper (optional, for heat)
- 1/4 cup fresh cilantro, chopped (for garnish)
Preparing the Marinade
1. **Gather Your Ingredients**: Start by gathering all the ingredients listed above. Its always easier to have everything in one place before you start cooking. 2. **Mix the Marinade**: In a medium-sized bowl, combine the olive oil, fresh lime juice, minced garlic, ground cumin, paprika, dried oregano, salt, black pepper, and cayenne pepper (if you like a bit of heat). 3. **Whisk Together**: Using a whisk or a fork, mix all the ingredients together until they are well combined. You want to ensure that the spices are evenly distributed throughout the marinade. 4. **Taste Test**: Give the marinade a little taste. Adjust the seasoning if necessary. If you prefer it tangier, add a bit more lime juice. If you want it spicier, add more cayenne pepper.Marinating the Chicken
5. **Prepare the Chicken**: Take your boneless, skinless chicken breasts and place them in a large resealable plastic bag or a shallow dish. 6. **Add the Marinade**: Pour the marinade over the chicken, making sure each piece is well coated. If youre using a plastic bag, seal it tightly and massage the marinade into the chicken. If youre using a dish, cover it with plastic wrap. 7. **Marinate**: Place the chicken in the refrigerator and let it marinate for at least 1 hour. For the best flavor, I recommend marinating it for 4-6 hours or even overnight if you have the time. The longer it marinates, the more flavorful it will be.Preparing for Grilling
8. **Preheat the Grill**: About 15-20 minutes before youre ready to cook, preheat your grill to medium-high heat. If youre using a charcoal grill, make sure the coals are hot and ashy. 9. **Remove Chicken from Marinade**: After marinating, take the chicken out of the refrigerator. Remove the chicken from the marinade and let any excess marinade drip off. Discard the leftover marinade to avoid contamination. 10. **Bring to Room Temperature**: Allow the chicken to sit at room temperature for about 10-15 minutes before grilling. This helps it cook more evenly.Grilling the Chicken
11. **Oil the Grill Grates**: To prevent sticking, lightly oil the grill grates using a paper towel dipped in oil. You can use tongs to hold the paper towel while you wipe the grates. 12. **Place Chicken on the Grill**: Once the grill is hot, place the chicken breasts on the grill. Make sure to leave some space between each piece for even cooking. 13. **Grill the Chicken**: Grill the chicken for about 6-7 minutes on one side without moving it. This will help create those beautiful grill marks. 14. **Flip the Chicken**: After 6-7 minutes, flip the chicken breasts over using tongs. Grill for another 6-7 minutes on the other side. The chicken is done when it reaches an internal temperature of 165°F (75°C). 15. **Check for Doneness**: If you have a meat thermometer, this is the best way to ensure your chicken is cooked through. If you dont have one, you can cut into the thickest part of the chicken to check that the juices run clear and theres no pink meat.Resting and Serving
16. **Remove from Grill**: Once the chicken is cooked, carefully remove it from the grill and place it on a cutting board or a plate. 17. **Let it Rest**: Allow the chicken to rest for about 5-10 minutes. This helps the juices redistribute throughout the meat, making it more tender and juicy. 18. **Slice and Serve**: After resting, slice the chicken into strips or serve it whole. I love to garnish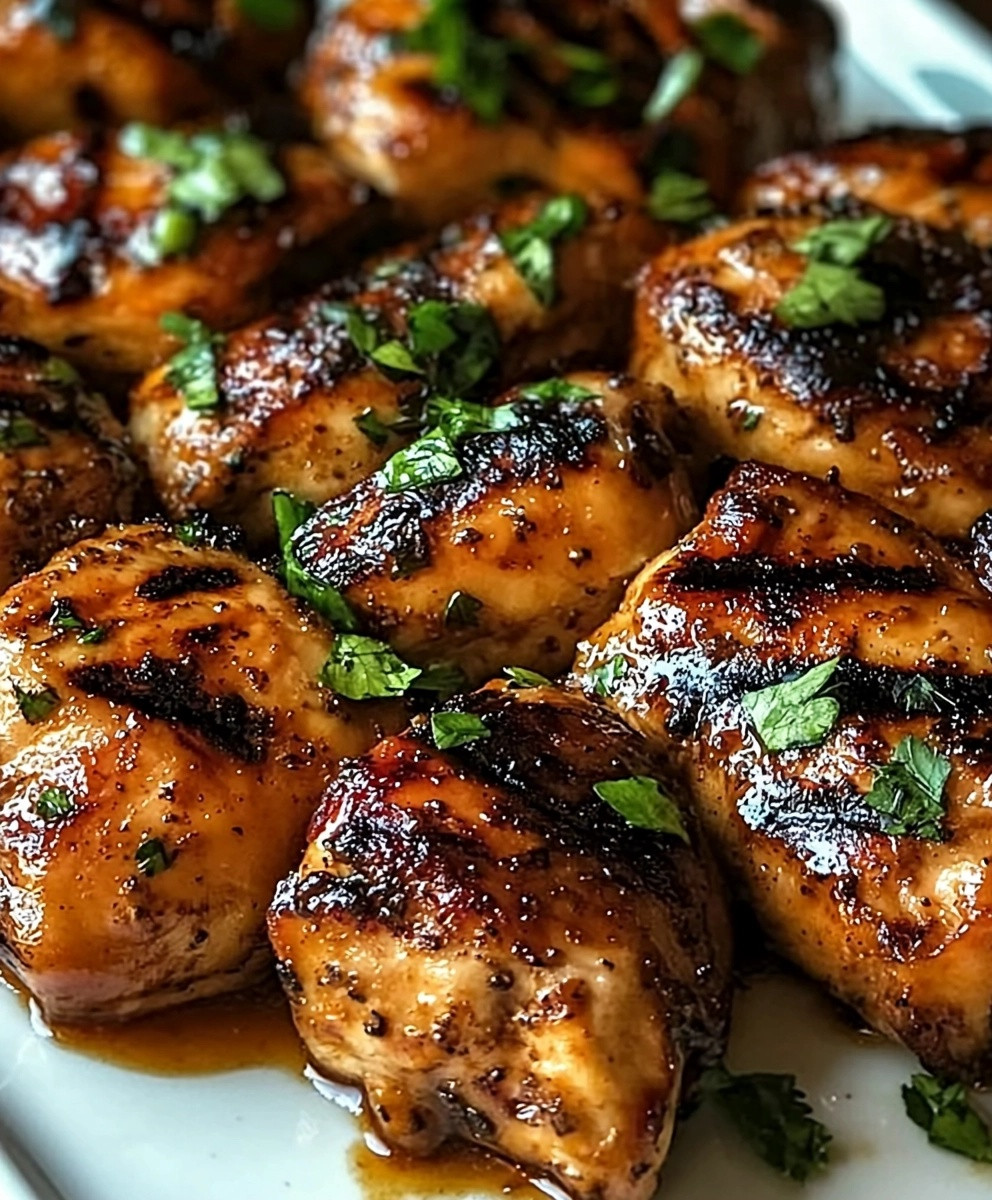
Conclusion:
In conclusion, this Peruvian Grilled Chicken Marinade is an absolute must-try for anyone looking to elevate their grilling game. The combination of zesty lime, aromatic garlic, and a hint of spice creates a flavor profile that is both vibrant and irresistible. Whether you’re hosting a summer barbecue or simply craving a delicious weeknight dinner, this marinade will transform your chicken into a mouthwatering dish that will have everyone coming back for seconds. For serving suggestions, I love pairing this grilled chicken with a refreshing side of cilantro-lime rice or a crisp salad topped with avocado and cherry tomatoes. You can also get creative with variations by adding your favorite herbs or spices to the marinade, such as fresh oregano or a dash of smoked paprika for an extra kick. If you’re feeling adventurous, try marinating other proteins like shrimp or tofu for a delightful twist! I encourage you to give this Peruvian Grilled Chicken Marinade a try and experience the explosion of flavors for yourself. Dont forget to share your cooking adventures and any personal twists you add to the recipe! I cant wait to hear how it turns out for you. Happy grilling! Print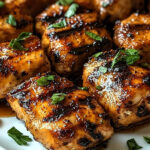
Peruvian Grilled Chicken Marinade: A Flavorful Recipe for Perfectly Grilled Chicken
- Total Time: 90 minutes
- Yield: 4 servings 1x
Description
as whole breasts. Garnish with fresh cilantro and serve with your favorite sides for a delicious meal that’s perfect for any occasion. Enjoy the vibrant flavors of this grilled chicken!
Ingredients
- 4 boneless, skinless chicken breasts
- 1/4 cup olive oil
- 1/4 cup fresh lime juice (about 2–3 limes)
- 4 cloves garlic, minced
- 1 tablespoon ground cumin
- 1 tablespoon paprika
- 1 tablespoon dried oregano
- 1 teaspoon salt
- 1 teaspoon black pepper
- 1 teaspoon cayenne pepper (optional, for heat)
- 1/4 cup fresh cilantro, chopped (for garnish)
Instructions
“`html
- Gather Your Ingredients: Start by gathering all the ingredients listed above. Its always easier to have everything in one place before you start cooking.
- Mix the Marinade: In a medium-sized bowl, combine the olive oil, fresh lime juice, minced garlic, ground cumin, paprika, dried oregano, salt, black pepper, and cayenne pepper (if you like a bit of heat).
- Whisk Together: Using a whisk or a fork, mix all the ingredients together until they are well combined. You want to ensure that the spices are evenly distributed throughout the marinade.
- Taste Test: Give the marinade a little taste. Adjust the seasoning if necessary. If you prefer it tangier, add a bit more lime juice. If you want it spicier, add more cayenne pepper.
- Prepare the Chicken: Take your boneless, skinless chicken breasts and place them in a large resealable plastic bag or a shallow dish.
- Add the Marinade: Pour the marinade over the chicken, making sure each piece is well coated. If youre using a plastic bag, seal it tightly and massage the marinade into the chicken. If youre using a dish, cover it with plastic wrap.
- Marinate: Place the chicken in the refrigerator and let it marinate for at least 1 hour. For the best flavor, I recommend marinating it for 4-6 hours or even overnight if you have the time. The longer it marinates, the more flavorful it will be.
- Preheat the Grill: About 15-20 minutes before youre ready to cook, preheat your grill to medium-high heat. If youre using a charcoal grill, make sure the coals are hot and ashy.
- Remove Chicken from Marinade: After marinating, take the chicken out of the refrigerator. Remove the chicken from the marinade and let any excess marinade drip off. Discard the leftover marinade to avoid contamination.
- Bring to Room Temperature: Allow the chicken to sit at room temperature for about 10-15 minutes before grilling. This helps it cook more evenly.
- Oil the Grill Grates: To prevent sticking, lightly oil the grill grates using a paper towel dipped in oil. You can use tongs to hold the paper towel while you wipe the grates.
- Place Chicken on the Grill: Once the grill is hot, place the chicken breasts on the grill. Make sure to leave some space between each piece for even cooking.
- Grill the Chicken: Grill the chicken for about 6-7 minutes on one side without moving it. This will help create those beautiful grill marks.
- Flip the Chicken: After 6-7 minutes, flip the chicken breasts over using tongs. Grill for another 6-7 minutes on the other side. The chicken is done when it reaches an internal temperature of 165°F (75°C).
- Check for Doneness: If you have a meat thermometer, this is the best way to ensure your chicken is cooked through. If you dont have one, you can cut into the thickest part of the chicken to check that the juices run clear and theres no pink meat.
- Remove from Grill: Once the chicken is cooked, carefully remove it from the grill and place it on a cutting board or a plate.
- Let it Rest: Allow the chicken to rest for about 5-10 minutes. This helps the juices redistribute throughout the meat, making it more tender and juicy.
- Slice and Serve: After resting, slice the chicken into strips or serve it whole.
“`
Notes
- For the best flavor, marinate the chicken for 4-6 hours or even overnight if you have the time.
- Allow the chicken to sit at room temperature for about 10-15 minutes before grilling to help it cook more evenly.
- To prevent sticking, lightly oil the grill grates using a paper towel dipped in oil.
- Grill the chicken for about 6-7 minutes on one side without moving it to create beautiful grill marks.
- Use a meat thermometer to check for doneness; the chicken should reach an internal temperature of 165°F (75°C).
- Let the chicken rest for about 5-10 minutes after grilling to help the juices redistribute throughout the meat.
- Prep Time: 15 minutes
- Cook Time: 13 minutes