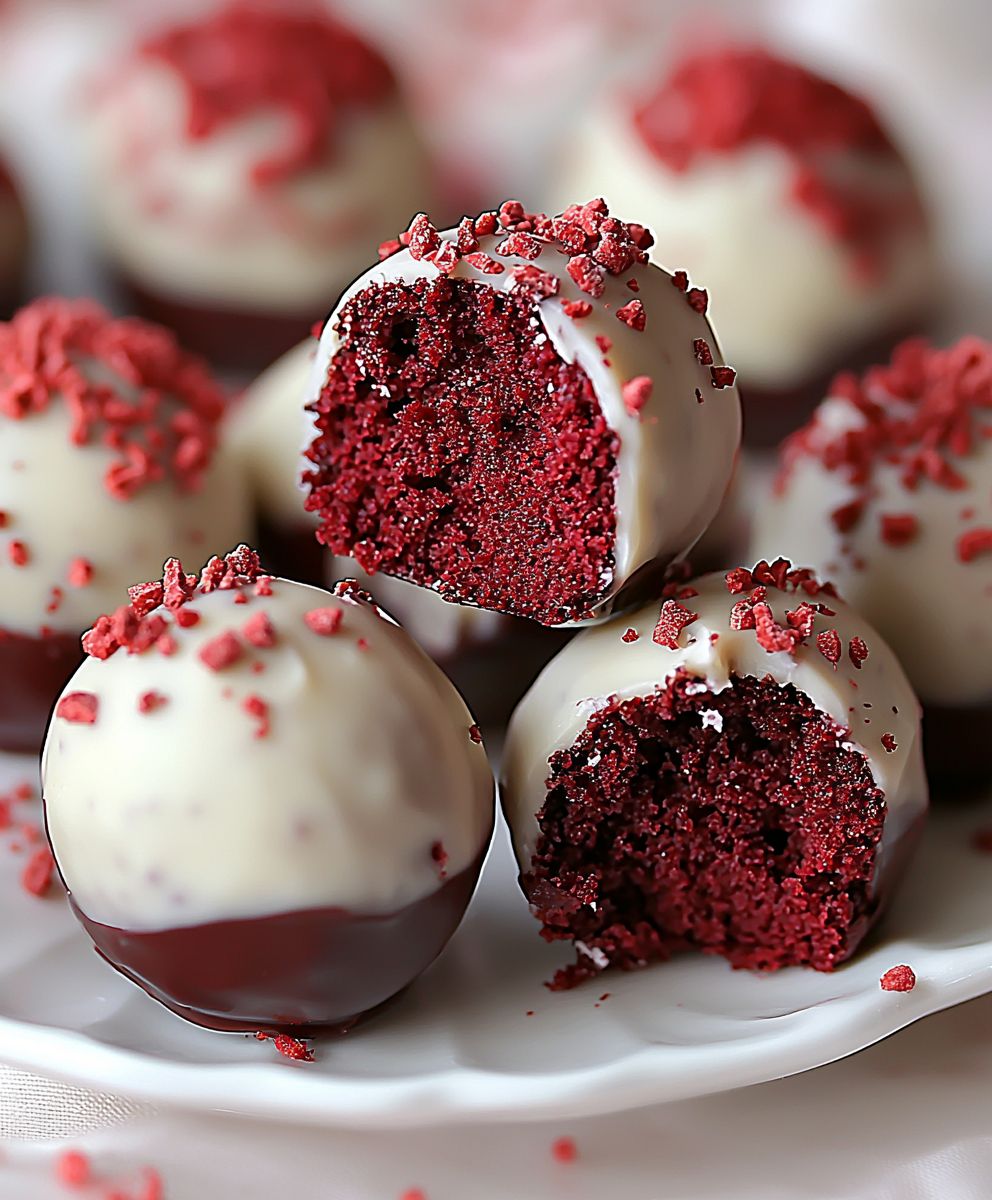
Red Velvet Cake Balls: Prepare to be utterly captivated by these bite-sized morsels of pure indulgence! Imagine the classic, sophisticated flavor of red velvet cake, transformed into a decadent, no-fuss treat that’s perfect for any occasion. These aren’t just cake balls; they’re miniature celebrations of flavor and texture, guaranteed to disappear in a flash.
The allure of red velvet itself is steeped in history. While its exact origins are debated, many believe it gained popularity during the Great Depression as a way to make cakes more appealing with the use of beet juice or cocoa powder to enhance the color and moisture. Over time, the vibrant red hue became synonymous with elegance and special occasions, making it a beloved flavor profile for cakes, cupcakes, and now, these irresistible red velvet cake balls.
What makes these cake balls so universally adored? It’s the perfect combination of moist, tender cake, a hint of cocoa, and the tangy cream cheese frosting that binds it all together. The smooth, velvety texture melts in your mouth, leaving you craving more. Plus, they’re incredibly convenient! No need for forks or plates just pop one (or two, or three!) into your mouth for a quick and satisfying treat. Whether you’re looking for a show-stopping dessert for a party, a delightful homemade gift, or simply a little something to brighten your day, these red velvet cake balls are the answer.

Ingredients:
- For the Red Velvet Cake:
- 2 1/2 cups all-purpose flour
- 2 cups granulated sugar
- 1 teaspoon baking soda
- 1 teaspoon baking powder
- 1 teaspoon salt
- 1 cup buttermilk
- 1 cup vegetable oil
- 2 large eggs
- 2 tablespoons unsweetened cocoa powder
- 1 ounce (2 tablespoons) red food coloring
- 1 teaspoon white vinegar
- 1 teaspoon vanilla extract
- For the Cream Cheese Frosting:
- 8 ounces cream cheese, softened
- 1/2 cup (1 stick) unsalted butter, softened
- 4 cups powdered sugar
- 1 teaspoon vanilla extract
- 2-4 tablespoons milk (optional, for desired consistency)
- For Coating:
- 12 ounces melting chocolate (white, dark, or milk chocolate, your choice!)
- 1 tablespoon vegetable shortening (optional, for smoother melting)
- Sprinkles, for decoration (optional)
Baking the Red Velvet Cake:
- Preheat and Prep: First things first, preheat your oven to 350°F (175°C). Grease and flour a 9×13 inch baking pan. This will prevent the cake from sticking and make it easier to remove later. I like to use baking spray with flour already in it for extra insurance!
- Combine Dry Ingredients: In a large bowl, whisk together the flour, sugar, baking soda, baking powder, salt, and cocoa powder. Make sure everything is evenly distributed you don’t want any pockets of baking soda!
- Combine Wet Ingredients: In a separate bowl, whisk together the buttermilk, oil, eggs, red food coloring, vanilla extract, and vinegar. The vinegar helps activate the baking soda, giving the cake its signature tang.
- Combine Wet and Dry: Gradually add the wet ingredients to the dry ingredients, mixing on low speed until just combined. Be careful not to overmix! Overmixing can lead to a tough cake.
- Pour and Bake: Pour the batter into the prepared pan and spread it evenly. Bake for 25-30 minutes, or until a toothpick inserted into the center comes out clean. Keep an eye on it ovens can vary!
- Cool Completely: Let the cake cool in the pan for 10 minutes before inverting it onto a wire rack to cool completely. This is crucial! You need the cake to be completely cool before you start crumbling it.
Making the Cream Cheese Frosting:
- Cream Butter and Cream Cheese: In a large bowl (or the bowl of your stand mixer), beat the softened cream cheese and butter together until smooth and creamy. This is where softened ingredients are key you don’t want any lumps!
- Add Powdered Sugar: Gradually add the powdered sugar, one cup at a time, beating on low speed until combined. Be careful not to create a powdered sugar cloud!
- Add Vanilla and Milk: Stir in the vanilla extract. If the frosting is too thick, add milk, one tablespoon at a time, until you reach your desired consistency. I like my frosting to be thick enough to hold its shape but still spreadable.
Creating the Cake Ball Mixture:
- Crumble the Cake: Once the cake is completely cool, crumble it into a large bowl. You can use your hands or a fork to do this. Make sure there are no large chunks remaining.
- Add Frosting: Add the cream cheese frosting to the crumbled cake. Start with about 3/4 of the frosting and mix well with your hands until the cake is evenly moistened and holds together when pressed. You might not need all of the frosting, so add it gradually until you reach the right consistency. The mixture should be moist enough to form balls but not too sticky.
- Chill the Mixture: Cover the bowl with plastic wrap and refrigerate for at least 30 minutes. This will help the mixture firm up and make it easier to roll into balls. I sometimes chill it for an hour or even longer if I have the time.
Forming and Coating the Cake Balls:
- Roll into Balls: Remove the cake mixture from the refrigerator. Use a small cookie scoop or your hands to roll the mixture into 1-inch balls. Place the balls on a baking sheet lined with parchment paper or wax paper.
- Chill Again: Place the baking sheet with the cake balls back in the refrigerator for another 30 minutes. This will help them hold their shape when you dip them in the melted chocolate. This step is important!
- Melt the Chocolate: While the cake balls are chilling, melt the chocolate in a double boiler or in the microwave. If using a double boiler, fill the bottom pot with water and bring it to a simmer. Place the chocolate in the top pot and stir until melted and smooth. If using the microwave, heat the chocolate in 30-second intervals, stirring in between, until melted and smooth. Be careful not to overheat the chocolate, as it can burn. If the chocolate is too thick, add the vegetable shortening and stir until smooth. The shortening helps to thin the chocolate and gives it a smoother consistency.
- Dip the Cake Balls: Remove the cake balls from the refrigerator. Use a fork or dipping tools to dip each cake ball into the melted chocolate, making sure it is completely coated. Gently tap off any excess chocolate.
- Decorate: Immediately sprinkle the cake balls with sprinkles or other decorations while the chocolate is still wet. You can also drizzle them with a contrasting color of melted chocolate.
- Set the Chocolate: Place the dipped and decorated cake balls back on the parchment-lined baking sheet. Refrigerate for at least 15 minutes, or until the chocolate is set.
- Enjoy! Once the chocolate is set, the cake balls are ready to enjoy! Store them in an airtight container in the refrigerator. They’re best enjoyed within a few days.
Tips and Variations:
- Cake Variations: Don’t have time to bake a cake from scratch? You can use a store-bought red velvet cake mix instead. Just bake the cake according to the package directions and let it cool completely before crumbling.
- Frosting Variations: Feel free to experiment with different frosting flavors. Chocolate frosting, vanilla frosting, or even peanut butter frosting would all be delicious.
- Chocolate Variations: Use any type of melting chocolate you like white, dark, milk, or even flavored chocolate. You can also use candy melts for a variety of colors.
- Decoration Variations: Get creative with your decorations! Use sprinkles, chopped nuts, shredded coconut, mini chocolate chips, or even edible glitter.
- Adding Extracts: A tiny drop of peppermint extract in the chocolate coating during the melting process can add a festive touch, especially around the holidays.
- Liqueur Infusion: For an adult version, brush the crumbled cake with a tablespoon or two of your favorite liqueur (like rum or bourbon) before mixing in the frosting.
- Preventing Cracking: To minimize cracking in the chocolate coating, ensure the cake balls are thoroughly chilled before dipping. Also, avoid drastic temperature changes.
- Dipping Tools: Invest in a good set of dipping tools. They make the dipping process much easier and neater. You can find them at most craft stores or online.
- Melting Chocolate Tips: If melting chocolate in the microwave, use short intervals (30 seconds) and stir frequently to prevent burning. Burnt chocolate is unusable and has to be discarded.
- Storage: Store the cake balls in an airtight container in the refrigerator for up to a week. They can also be frozen for longer storage. Thaw them in the refrigerator before serving.
- Making Ahead: You can make the cake and frosting a day or two in advance. Just store them separately in the refrigerator until you’re ready to assemble the cake balls.
- Troubleshooting Sticky Mixture: If your cake ball mixture is too sticky, add a little more crumbled cake or powdered sugar until it reaches the right consistency.
- Troubleshooting Dry Mixture: If your cake ball mixture is too dry, add a little more frosting until it holds together.
Conclusion:
And there you have it! These Red Velvet Cake Balls are truly irresistible, and I genuinely believe they’re a must-try for anyone who loves a decadent, easy-to-make treat. The combination of the moist, slightly tangy red velvet cake, the creamy, sweet frosting, and the rich chocolate coating is simply divine. They’re the perfect bite-sized indulgence for parties, holidays, or just a special treat for yourself (because you deserve it!). But why are these cake balls so special? It’s more than just the taste; it’s the simplicity. Forget spending hours decorating a complicated cake. These little beauties come together quickly and easily, making them ideal for busy bakers or anyone who wants a show-stopping dessert without the fuss. Plus, they’re incredibly versatile! Serving Suggestions and Variations: Think beyond the basic chocolate coating! Get creative with your decorations. Sprinkle them with crushed nuts, festive sprinkles, or even a drizzle of white chocolate. For a truly elegant touch, try dipping them in melted white chocolate and then drizzling with dark chocolate. * For a festive twist: Use red and green sprinkles for Christmas, pastel sprinkles for Easter, or orange and black sprinkles for Halloween. * Nutty Delight: Roll the cake balls in finely chopped pecans, walnuts, or almonds after dipping them in chocolate. * Coffee Kick: Add a teaspoon of instant espresso powder to the melted chocolate for a mocha-flavored coating. * Boozy Bites: For an adult-only treat, add a tablespoon of your favorite liqueur (like rum or Kahlua) to the frosting. * Cream Cheese Dream: While the recipe calls for a specific amount of cream cheese, feel free to adjust it to your liking. Some people prefer a tangier flavor, so adding a bit more cream cheese to the frosting can really enhance that red velvet flavor profile. * Different Chocolate: Experiment with different types of chocolate for the coating. Milk chocolate, dark chocolate, semi-sweet chocolate, or even white chocolate all work beautifully. You can even use flavored chocolate, like mint chocolate or orange chocolate, for a unique twist. * Cake Mix Alternatives: While I love the classic red velvet flavor, you could also try this recipe with other cake mixes. Chocolate cake, vanilla cake, or even strawberry cake would all be delicious. Just be sure to adjust the frosting flavor accordingly. * Presentation is Key: Arrange the cake balls on a pretty platter or in a decorative box for a stunning presentation. They also make great gifts! I’m so excited for you to try this recipe! I know you’ll love how easy and delicious these red velvet cake balls are. They’re guaranteed to be a crowd-pleaser, and I can’t wait to hear what you think. So, go ahead and gather your ingredients, preheat your oven (or don’t, if you’re using leftover cake!), and get ready to create some magic in the kitchen. Don’t be afraid to experiment with different flavors and decorations to make them your own. Once you’ve made your batch of these delightful red velvet cake balls, please come back and share your experience in the comments below! I’d love to hear about your variations, your successes, and any tips you have for other bakers. Did you try a different coating? Did you add a secret ingredient to the frosting? Let me know! Your feedback is invaluable and helps me (and other readers) learn and grow as bakers. Happy baking! Print
Red Velvet Cake Balls: The Ultimate Guide to Delicious Treats
- Total Time: 120 minutes
- Yield: 36 cake balls 1x
Description
Decadent red velvet cake balls coated in rich chocolate and festive sprinkles. A perfect bite-sized treat!
Ingredients
- 2 1/2 cups all-purpose flour
- 2 cups granulated sugar
- 1 teaspoon baking soda
- 1 teaspoon baking powder
- 1 teaspoon salt
- 1 cup buttermilk
- 1 cup vegetable oil
- 2 large eggs
- 2 tablespoons unsweetened cocoa powder
- 1 ounce (2 tablespoons) red food coloring
- 1 teaspoon white vinegar
- 1 teaspoon vanilla extract
- 8 ounces cream cheese, softened
- 1/2 cup (1 stick) unsalted butter, softened
- 4 cups powdered sugar
- 1 teaspoon vanilla extract
- 2–4 tablespoons milk (optional, for desired consistency)
- 12 ounces melting chocolate (white, dark, or milk chocolate, your choice!)
- 1 tablespoon vegetable shortening (optional, for smoother melting)
- Sprinkles, for decoration (optional)
Instructions
- Bake the Cake: Preheat oven to 350°F (175°C). Grease and flour a 9×13 inch baking pan.
- Combine Dry: Whisk together flour, sugar, baking soda, baking powder, salt, and cocoa powder in a large bowl.
- Combine Wet: In a separate bowl, whisk together buttermilk, oil, eggs, red food coloring, vanilla extract, and vinegar.
- Combine Wet and Dry: Gradually add wet ingredients to dry ingredients, mixing on low speed until just combined. Do not overmix.
- Pour and Bake: Pour batter into prepared pan and spread evenly. Bake for 25-30 minutes, or until a toothpick inserted into the center comes out clean.
- Cool Completely: Let the cake cool in the pan for 10 minutes before inverting it onto a wire rack to cool completely.
- Make Frosting: Beat softened cream cheese and butter until smooth. Gradually add powdered sugar, beating on low speed until combined. Stir in vanilla extract. Add milk, 1 tablespoon at a time, until desired consistency is reached.
- Crumble Cake: Once the cake is completely cool, crumble it into a large bowl.
- Add Frosting: Add about 3/4 of the cream cheese frosting to the crumbled cake and mix well with your hands until evenly moistened and holds together when pressed. Add more frosting gradually if needed.
- Chill Mixture: Cover the bowl with plastic wrap and refrigerate for at least 30 minutes.
- Roll into Balls: Remove cake mixture from refrigerator. Roll into 1-inch balls and place on a baking sheet lined with parchment paper.
- Chill Again: Place the baking sheet with the cake balls back in the refrigerator for another 30 minutes.
- Melt Chocolate: Melt chocolate in a double boiler or microwave in 30-second intervals, stirring in between, until melted and smooth. Add vegetable shortening if needed.
- Dip Cake Balls: Remove cake balls from refrigerator. Use a fork or dipping tools to dip each cake ball into the melted chocolate, making sure it is completely coated. Gently tap off any excess chocolate.
- Decorate: Immediately sprinkle with sprinkles or other decorations.
- Set Chocolate: Place the dipped and decorated cake balls back on the parchment-lined baking sheet. Refrigerate for at least 15 minutes, or until the chocolate is set.
- Enjoy: Store in an airtight container in the refrigerator.
Notes
- Cake Variations: Use a store-bought red velvet cake mix.
- Frosting Variations: Experiment with different frosting flavors.
- Chocolate Variations: Use any type of melting chocolate you like.
- Decoration Variations: Get creative with your decorations.
- Adding Extracts: A tiny drop of peppermint extract in the chocolate coating during the melting process can add a festive touch.
- Liqueur Infusion: For an adult version, brush the crumbled cake with a tablespoon or two of your favorite liqueur.
- Preventing Cracking: Ensure the cake balls are thoroughly chilled before dipping.
- Dipping Tools: Invest in a good set of dipping tools.
- Melting Chocolate Tips: Use short intervals (30 seconds) and stir frequently to prevent burning.
- Storage: Store the cake balls in an airtight container in the refrigerator for up to a week. They can also be frozen for longer storage.
- Making Ahead: You can make the cake and frosting a day or two in advance.
- Troubleshooting Sticky Mixture: If your cake ball mixture is too sticky, add a little more crumbled cake or powdered sugar.
- Troubleshooting Dry Mixture: If your cake ball mixture is too dry, add a little more frosting.
- Prep Time: 30 minutes
- Cook Time: 30 minutes