Salted Caramel Rice Krispies are a delightful twist on the classic treat that many of us grew up loving. Imagine the satisfying crunch of Rice Krispies combined with the rich, buttery flavor of salted caramelit’s a match made in dessert heaven! This recipe not only brings back nostalgic memories but also adds a modern flair that makes it perfect for any occasion.
Originating from the simple marshmallow treat, the addition of salted caramel elevates these bars to a whole new level. People adore Salted Caramel Rice Krispies for their irresistible taste and texture; the sweet and salty balance creates a flavor explosion that keeps you coming back for more. Plus, they are incredibly easy to make, making them a go-to dessert for busy weeknights or last-minute gatherings. Join me as we dive into this scrumptious recipe that is sure to impress your family and friends!

Ingredients:
- 6 cups Rice Krispies cereal
- 1 cup granulated sugar
- 1/2 cup unsalted butter (1 stick)
- 1 cup light corn syrup
- 1 teaspoon vanilla extract
- 1/2 teaspoon salt (plus extra for sprinkling)
- 1 cup semi-sweet chocolate chips (optional)
- 1 cup caramel sauce (store-bought or homemade)
Preparing the Caramel Sauce
1. If youre using store-bought caramel sauce, you can skip this step. However, if you want to make your own, start by combining 1 cup of granulated sugar and 1/4 cup of water in a medium saucepan over medium heat. Stir gently until the sugar dissolves. 2. Once the sugar has dissolved, stop stirring and allow the mixture to boil. Keep an eye on it as it turns a golden amber color, which should take about 8-10 minutes. 3. When it reaches the desired color, remove it from the heat and carefully add 1/2 cup of heavy cream. Be cautious, as the mixture will bubble up. Stir until smooth. 4. Add a pinch of salt to enhance the flavor, and let it cool slightly before using.Preparing the Rice Krispies Mixture
1. In a large saucepan, melt 1/2 cup of unsalted butter over medium heat. 2. Once the butter is melted, add 1 cup of granulated sugar and 1 cup of light corn syrup. Stir continuously until the mixture comes to a gentle boil. 3. Allow the mixture to boil for 1 minute without stirring. This step is crucial as it helps to create a chewy texture in the final product. 4. After 1 minute, remove the saucepan from the heat and stir in 1 teaspoon of vanilla extract and 1/2 teaspoon of salt. This will add depth to the flavor. 5. Immediately pour in the 6 cups of Rice Krispies cereal. Stir gently but thoroughly until all the cereal is evenly coated with the mixture.Assembling the Treats
1. Prepare a 9×13 inch baking dish by greasing it lightly with butter or lining it with parchment paper for easy removal. 2. Transfer the Rice Krispies mixture into the prepared baking dish. Using a spatula or your hands (lightly greased), press the mixture down firmly and evenly into the dish. Make sure its compact, as this will help the treats hold their shape. 3. Allow the mixture to cool for about 10-15 minutes at room temperature.Adding the Caramel and Chocolate (Optional)
1. Once the Rice Krispies mixture has cooled slightly, drizzle the prepared caramel sauce evenly over the top. Use a spatula to spread it out if necessary. 2. If youre a chocolate lover, melt 1 cup of semi-sweet chocolate chips in a microwave-safe bowl. Heat in 30-second intervals, stirring in between, until smooth. 3. Drizzle the melted chocolate over the caramel layer. You can use a fork to create a decorative pattern if you like. 4. While the chocolate is still warm, sprinkle a pinch of sea salt over the top. This will enhance the salted caramel flavor and add a delightful crunch.Final Cooling and Cutting
1. Allow the assembled Rice Krispies treats to cool completely at room temperature. This may take about 30-60 minutes, depending on your kitchen temperature. 2. Once cooled, use a sharp knife to cut the treats into squares or rectangles. I find that running the knife under hot water and then drying it helps to make cleaner cuts. 3. If you have any leftover caramel sauce, you can serve it on the side for drizzling or dipping.Storing the Treats
1. Store any leftover Rice Krispies treats in an airtight container at room temperature. They should stay fresh for about 3-5 days. 2. If you want to keep them longer, you can refrigerate them, but be aware that the texture may change slightly. Enjoy your delicious Salted Caramel Rice Krispies treats! Theyre perfect for parties, snacks, or just a sweet treat to enjoy at home.
Conclusion:
In conclusion, this Salted Caramel Rice Krispies recipe is an absolute must-try for anyone looking to indulge in a sweet and salty treat thats both nostalgic and modern. The combination of crispy rice cereal, gooey caramel, and a hint of sea salt creates a delightful contrast that will have your taste buds dancing with joy. Whether youre making these for a special occasion, a cozy night in, or just because you deserve a little something sweet, these treats are sure to impress. For serving suggestions, consider drizzling some extra melted chocolate on top for an added layer of flavor, or sprinkle some chopped nuts for a delightful crunch. You can also experiment with different types of cereal or add in your favorite mix-ins like mini marshmallows or dried fruit to make this recipe your own. The possibilities are endless! I encourage you to give this Salted Caramel Rice Krispies recipe a try and share your experience with friends and family. Id love to hear how they turn out for you! Dont forget to snap a picture and tag me on social media so we can celebrate your delicious creation together. Happy cooking! Print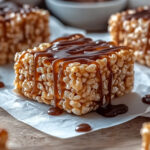
Salted Caramel Rice Krispies: A Deliciously Sweet Treat You Can’t Resist
- Total Time: 30 minutes
- Yield: 12–16 servings 1x
Description
Enjoy a sweet twist on a classic treat with these Salted Caramel Rice Krispies Treats. Featuring a crispy and chewy base, they’re topped with rich caramel and an optional chocolate drizzle, making them a delightful dessert for any occasion. Perfect for satisfying your sweet cravings!
Ingredients
- 6 cups Rice Krispies cereal
- 1 cup granulated sugar
- 1/2 cup unsalted butter (1 stick)
- 1 cup light corn syrup
- 1 teaspoon vanilla extract
- 1/2 teaspoon salt (plus extra for sprinkling)
- 1 cup semi-sweet chocolate chips (optional)
- 1 cup caramel sauce (store-bought or homemade)
Instructions
- If using store-bought caramel sauce, skip this step. For homemade, combine 1 cup granulated sugar and 1/4 cup water in a medium saucepan over medium heat. Stir gently until sugar dissolves.
- Once dissolved, stop stirring and let it boil until it turns golden amber (about 8-10 minutes).
- Remove from heat and carefully add 1/2 cup heavy cream, stirring until smooth. Add a pinch of salt and let cool slightly.
- In a large saucepan, melt 1/2 cup unsalted butter over medium heat.
- Add 1 cup granulated sugar and 1 cup light corn syrup, stirring continuously until it reaches a gentle boil.
- Boil for 1 minute without stirring to create a chewy texture.
- Remove from heat and stir in 1 teaspoon vanilla extract and 1/2 teaspoon salt.
- Pour in 6 cups Rice Krispies cereal and stir gently until evenly coated.
- Grease a 9×13 inch baking dish with butter or line with parchment paper.
- Transfer the Rice Krispies mixture into the dish, pressing down firmly and evenly with a spatula or greased hands.
- Let cool for 10-15 minutes at room temperature.
- Drizzle the prepared caramel sauce over the cooled Rice Krispies mixture, spreading it out if needed.
- Melt 1 cup semi-sweet chocolate chips in a microwave-safe bowl, heating in 30-second intervals until smooth.
- Drizzle the melted chocolate over the caramel layer and create a decorative pattern if desired.
- Sprinkle a pinch of sea salt over the top while the chocolate is still warm.
- Allow the treats to cool completely at room temperature (30-60 minutes).
- Cut into squares or rectangles using a sharp knife (run under hot water for cleaner cuts).
- Serve any leftover caramel sauce on the side for drizzling or dipping.
Notes
- Store leftovers in an airtight container at room temperature for 3-5 days. Refrigeration is possible but may alter texture.
- Feel free to customize with nuts or other toppings as desired.
- Prep Time: 15 minutes
- Cook Time: 15 minutes