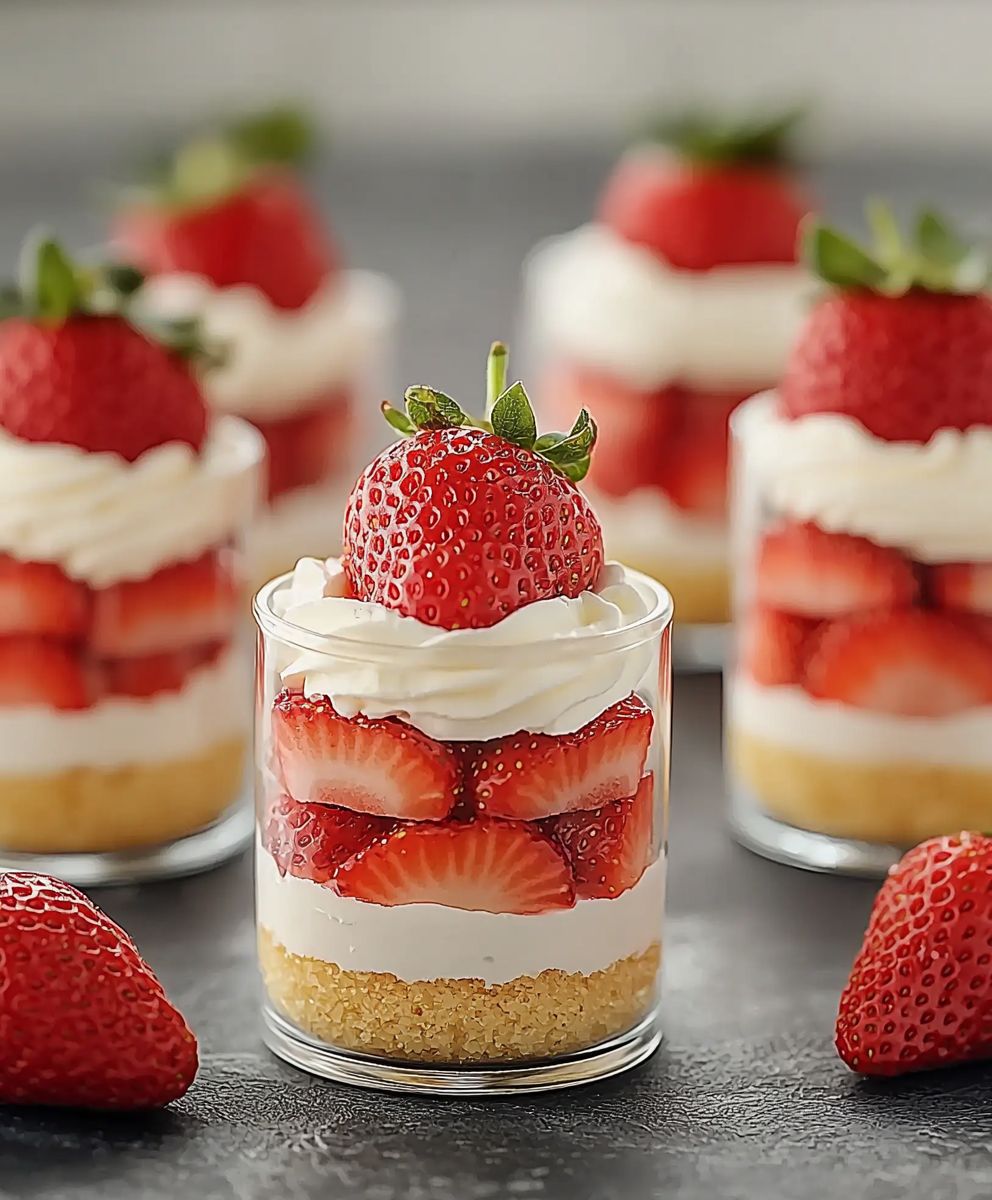
Strawberry mini desserts, are you ready to dive into a world of delightful, bite-sized bliss? Imagine this: a warm summer evening, a gathering of friends, and a tray laden with the most adorable and delicious strawberry treats you’ve ever seen. These aren’t just desserts; they’re tiny explosions of flavor, perfect for satisfying your sweet tooth without the guilt of a full-sized indulgence.
Strawberries have long been celebrated as a symbol of love and perfection, and their vibrant color and sweet-tart taste make them a natural fit for desserts. While the concept of mini desserts has gained popularity in recent years, the idea of portion control and elegant presentation has roots in classic French patisserie. Think of these strawberry mini desserts as a modern twist on timeless elegance.
What’s not to love? These little gems are incredibly versatile. They’re perfect for parties, potlucks, or even a simple weeknight treat. People adore them because they offer a burst of fresh, fruity flavor in a perfectly portioned package. Plus, the combination of textures from creamy fillings to crisp crusts creates a truly irresistible experience. And let’s be honest, who can resist something so cute and delicious? Get ready to impress your friends and family with these easy-to-make and utterly charming strawberry mini desserts!

Ingredients:
- For the Crust:
- 1 ½ cups graham cracker crumbs
- 5 tablespoons unsalted butter, melted
- ¼ cup granulated sugar
- For the Cheesecake Filling:
- 16 ounces cream cheese, softened
- ¾ cup granulated sugar
- 2 large eggs
- 1 teaspoon vanilla extract
- ¼ cup sour cream
- For the Strawberry Topping:
- 1 pound fresh strawberries, hulled and sliced
- ¼ cup granulated sugar
- 2 tablespoons lemon juice
- 1 tablespoon cornstarch
- 2 tablespoons water
- Optional Garnish:
- Fresh mint leaves
- Whipped cream
- Chocolate shavings
Preparing the Graham Cracker Crust:
- Combine the Ingredients: In a medium bowl, combine the graham cracker crumbs, melted butter, and granulated sugar. Mix well until all the crumbs are moistened and the mixture resembles wet sand.
- Press into Mini Muffin Tins: Line a mini muffin tin with paper liners. This makes removing the mini cheesecakes much easier. If you don’t have liners, you can lightly grease the tin with cooking spray.
- Form the Crust: Spoon about 1-2 teaspoons of the graham cracker mixture into each muffin liner. Use the back of a spoon or a small measuring cup to firmly press the crumbs into an even layer at the bottom of each liner. The firmer you press, the better the crust will hold together.
- Bake the Crust (Optional): For a slightly more stable and flavorful crust, you can pre-bake it. Bake in a preheated oven at 350°F (175°C) for 5-7 minutes. This step is optional, but I find it helps prevent the crust from becoming soggy. Let the crusts cool completely before adding the filling.
Making the Cheesecake Filling:
- Cream the Cream Cheese: In a large bowl, beat the softened cream cheese with an electric mixer until smooth and creamy. Make sure your cream cheese is truly softened; otherwise, you’ll end up with lumps in your filling.
- Add Sugar: Gradually add the granulated sugar to the cream cheese, beating until well combined and the mixture is light and fluffy. Scrape down the sides of the bowl as needed to ensure everything is evenly mixed.
- Incorporate the Eggs: Add the eggs one at a time, beating well after each addition. Be careful not to overmix at this stage, as overmixing can incorporate too much air into the batter, which can cause the cheesecakes to crack during baking.
- Add Vanilla and Sour Cream: Stir in the vanilla extract and sour cream until just combined. The sour cream adds a lovely tang and helps to keep the cheesecakes moist.
Assembling and Baking the Mini Cheesecakes:
- Fill the Crusts: Spoon the cheesecake filling into each of the prepared graham cracker crusts, filling them almost to the top. Try to distribute the filling evenly among all the mini cheesecakes.
- Bake the Cheesecakes: Bake in a preheated oven at 325°F (160°C) for 18-22 minutes, or until the edges are set but the centers are still slightly jiggly. The baking time may vary depending on your oven, so keep a close eye on them.
- Cooling Process: Turn off the oven and crack the oven door slightly. Let the cheesecakes cool in the oven for about an hour. This gradual cooling helps prevent cracking.
- Refrigerate: After cooling in the oven, remove the cheesecakes from the muffin tin and refrigerate them for at least 2 hours, or preferably overnight. This allows the cheesecakes to fully set and develop their flavor.
Preparing the Strawberry Topping:
- Combine Strawberries and Sugar: In a medium saucepan, combine the sliced strawberries and granulated sugar. Let them sit for about 10-15 minutes, allowing the strawberries to release their juices.
- Cook the Strawberries: Place the saucepan over medium heat and bring the strawberry mixture to a simmer. Cook for about 5-7 minutes, or until the strawberries have softened and the juices have thickened slightly.
- Add Lemon Juice: Stir in the lemon juice. The lemon juice brightens the flavor of the strawberries and adds a nice touch of acidity.
- Thicken the Sauce: In a small bowl, whisk together the cornstarch and water to create a slurry. Pour the cornstarch slurry into the simmering strawberry mixture and stir constantly until the sauce thickens. This should only take a minute or two.
- Cool the Topping: Remove the saucepan from the heat and let the strawberry topping cool completely. As it cools, it will thicken further.
Assembling the Strawberry Mini Desserts:
- Top the Cheesecakes: Once the cheesecakes have fully chilled and the strawberry topping has cooled, spoon a generous amount of the strawberry topping onto each mini cheesecake.
- Garnish (Optional): Garnish with fresh mint leaves, a dollop of whipped cream, or chocolate shavings for an extra touch of elegance.
- Serve and Enjoy: Serve the strawberry mini cheesecakes immediately or store them in the refrigerator for up to 3 days. They are best enjoyed cold!
Tips for Success:
- Softened Cream Cheese is Key: Make sure your cream cheese is completely softened before you start. This will ensure a smooth and creamy filling.
- Don’t Overmix: Avoid overmixing the cheesecake batter, especially after adding the eggs. Overmixing can incorporate too much air, leading to cracks.
- Cool Gradually: The gradual cooling process in the oven is crucial for preventing cracks. Don’t skip this step!
- Make Ahead: These mini cheesecakes can be made a day or two in advance. Just store them in the refrigerator until you’re ready to serve.
- Customize Your Topping: Feel free to get creative with your toppings! You can use other berries, chocolate sauce, caramel sauce, or even a sprinkle of nuts.
Variations:
- Chocolate Crust: Substitute some of the graham cracker crumbs with cocoa powder for a chocolatey crust.
- Lemon Cheesecake: Add lemon zest to the cheesecake filling for a bright and citrusy flavor.
- Different Berries: Use raspberries, blueberries, or blackberries instead of strawberries for a different flavor profile.
- No-Bake Version: For a no-bake version, use a no-bake cheesecake filling recipe and chill the cheesecakes until firm.
Troubleshooting:
- Cracked Cheesecakes: If your cheesecakes crack, don’t worry! They will still taste delicious. You can cover the cracks with the strawberry topping. To prevent cracking, make sure to cool the cheesecakes gradually in the oven.
- Soggy Crust: To prevent a soggy crust, pre-bake the crust for a few minutes before adding the filling.
- Lumpy Filling: If your filling is lumpy, it’s likely because the cream cheese wasn’t softened enough. Make sure to use softened cream cheese and beat it well until smooth.
This recipe is a guaranteed crowd-pleaser, and I hope you enjoy making and eating these delightful strawberry mini cheesecakes! They are perfect for parties, potlucks, or just a special treat for yourself. Happy baking!
Conclusion:
This recipe for Strawberry Mini Desserts is truly a must-try, and I’m not just saying that! From the delightful burst of fresh strawberries to the satisfying crunch of the base and the creamy smoothness of the filling, every bite is a little piece of heaven. It’s the perfect balance of sweet and tart, light and decadent, and incredibly easy to make, making it ideal for both seasoned bakers and kitchen novices. Seriously, if you’re looking for a dessert that will impress your guests (or just yourself!), this is it.
What makes these Strawberry Mini Desserts so special is their versatility. They’re perfect as is, a delightful treat for any occasion, from a casual weeknight dessert to a sophisticated dinner party. But the fun doesn’t stop there! Feel free to get creative with your toppings. A sprinkle of chopped pistachios adds a lovely nutty crunch, while a drizzle of balsamic glaze elevates the flavor profile to something truly extraordinary. For a chocolatey twist, consider adding mini chocolate chips to the filling or drizzling melted dark chocolate over the finished desserts.
And speaking of variations, you can easily adapt this recipe to suit your dietary needs or preferences. For a gluten-free version, simply use gluten-free graham crackers or almond flour for the crust. To make it vegan, substitute the butter with a vegan butter alternative and use a plant-based cream cheese for the filling. The possibilities are endless!
These mini desserts are also incredibly convenient. They can be made ahead of time and stored in the refrigerator for up to three days, making them perfect for entertaining. Serve them chilled for a refreshing treat on a warm day, or let them sit at room temperature for a few minutes before serving to allow the flavors to fully develop. They’re also perfectly portioned, making them a guilt-free indulgence.
I personally love serving these Strawberry Mini Desserts with a dollop of whipped cream and a fresh strawberry on top. They also pair beautifully with a glass of sparkling wine or a cup of herbal tea. For a more casual presentation, arrange them on a platter and let your guests help themselves. No matter how you choose to serve them, I guarantee they’ll be a hit!
But the best part about this recipe is the joy it brings. The process of making these little desserts is so therapeutic, and the satisfaction of seeing the smiles on people’s faces when they taste them is priceless. It’s a recipe that’s meant to be shared, enjoyed, and celebrated.
So, what are you waiting for? Gather your ingredients, preheat your oven, and get ready to create some magic in the kitchen. I’m confident that you’ll love these Strawberry Mini Desserts as much as I do.
I’m so excited for you to try this recipe! Once you do, please come back and share your experience in the comments below. I’d love to hear about your variations, your serving suggestions, and most importantly, how much you enjoyed them. Don’t forget to snap a picture of your creations and tag me on social media! Happy baking, and enjoy your delicious Strawberry Mini Desserts!
Strawberry Mini Desserts: Delicious & Easy Recipes
Easy strawberry mini cheesecakes with graham cracker crust, creamy filling, and sweet strawberry topping. Perfect for parties!
Ingredients
- 1 ½ cups graham cracker crumbs
- 5 tablespoons unsalted butter, melted
- ¼ cup granulated sugar
- 16 ounces cream cheese, softened
- ¾ cup granulated sugar
- 2 large eggs
- 1 teaspoon vanilla extract
- ¼ cup sour cream
- 1 pound fresh strawberries, hulled and sliced
- ¼ cup granulated sugar
- 2 tablespoons lemon juice
- 1 tablespoon cornstarch
- 2 tablespoons water
- Fresh mint leaves
- Whipped cream
- Chocolate shavings
Instructions
- In a medium bowl, combine the graham cracker crumbs, melted butter, and granulated sugar. Mix well until all the crumbs are moistened and the mixture resembles wet sand.
- Line a mini muffin tin with paper liners. This makes removing the mini cheesecakes much easier. If you don’t have liners, you can lightly grease the tin with cooking spray.
- Spoon about 1-2 teaspoons of the graham cracker mixture into each muffin liner. Use the back of a spoon or a small measuring cup to firmly press the crumbs into an even layer at the bottom of each liner. The firmer you press, the better the crust will hold together.
- For a slightly more stable and flavorful crust, you can pre-bake it. Bake in a preheated oven at 350°F (175°C) for 5-7 minutes. This step is optional, but I find it helps prevent the crust from becoming soggy. Let the crusts cool completely before adding the filling.
- In a large bowl, beat the softened cream cheese with an electric mixer until smooth and creamy. Make sure your cream cheese is truly softened; otherwise, you’ll end up with lumps in your filling.
- Gradually add the granulated sugar to the cream cheese, beating until well combined and the mixture is light and fluffy. Scrape down the sides of the bowl as needed to ensure everything is evenly mixed.
- Add the eggs one at a time, beating well after each addition. Be careful not to overmix at this stage, as overmixing can incorporate too much air into the batter, which can cause the cheesecakes to crack during baking.
- Stir in the vanilla extract and sour cream until just combined. The sour cream adds a lovely tang and helps to keep the cheesecakes moist.
- Spoon the cheesecake filling into each of the prepared graham cracker crusts, filling them almost to the top. Try to distribute the filling evenly among all the mini cheesecakes.
- Bake in a preheated oven at 325°F (160°C) for 18-22 minutes, or until the edges are set but the centers are still slightly jiggly. The baking time may vary depending on your oven, so keep a close eye on them.
- Turn off the oven and crack the oven door slightly. Let the cheesecakes cool in the oven for about an hour. This gradual cooling helps prevent cracking.
- After cooling in the oven, remove the cheesecakes from the muffin tin and refrigerate them for at least 2 hours, or preferably overnight. This allows the cheesecakes to fully set and develop their flavor.
- In a medium saucepan, combine the sliced strawberries and granulated sugar. Let them sit for about 10-15 minutes, allowing the strawberries to release their juices.
- Place the saucepan over medium heat and bring the strawberry mixture to a simmer. Cook for about 5-7 minutes, or until the strawberries have softened and the juices have thickened slightly.
- Stir in the lemon juice. The lemon juice brightens the flavor of the strawberries and adds a nice touch of acidity.
- In a small bowl, whisk together the cornstarch and water to create a slurry. Pour the cornstarch slurry into the simmering strawberry mixture and stir constantly until the sauce thickens. This should only take a minute or two.
- Remove the saucepan from the heat and let the strawberry topping cool completely. As it cools, it will thicken further.
- Once the cheesecakes have fully chilled and the strawberry topping has cooled, spoon a generous amount of the strawberry topping onto each mini cheesecake.
- Garnish with fresh mint leaves, a dollop of whipped cream, or chocolate shavings for an extra touch of elegance.
- Serve the strawberry mini cheesecakes immediately or store them in the refrigerator for up to 3 days. They are best enjoyed cold!
Notes
- Softened Cream Cheese is Key: Make sure your cream cheese is completely softened before you start. This will ensure a smooth and creamy filling.
- Don’t Overmix: Avoid overmixing the cheesecake batter, especially after adding the eggs. Overmixing can incorporate too much air, leading to cracks.
- Cool Gradually: The gradual cooling process in the oven is crucial for preventing cracks. Don’t skip this step!
- Make Ahead: These mini cheesecakes can be made a day or two in advance. Just store them in the refrigerator until you’re ready to serve.
- Customize Your Topping: Feel free to get creative with your toppings! You can use other berries, chocolate sauce, caramel sauce, or even a sprinkle of nuts.
- Chocolate Crust: Substitute some of the graham cracker crumbs with cocoa powder for a chocolatey crust.
- Lemon Cheesecake: Add lemon zest to the cheesecake filling for a bright and citrusy flavor.
- Different Berries: Use raspberries, blueberries, or blackberries instead of strawberries for a different flavor profile.
- No-Bake Version: For a no-bake version, use a no-bake cheesecake filling recipe and chill the cheesecakes until firm.
- Cracked Cheesecakes: If your cheesecakes crack, don’t worry! They will still taste delicious. You can cover the cracks with the strawberry topping. To prevent cracking, make sure to cool the cheesecakes gradually in the oven.
- Soggy Crust: To prevent a soggy crust, pre-bake the crust for a few minutes before adding the filling.
- Lumpy Filling: If your filling is lumpy, it’s likely because the cream cheese wasn’t softened enough. Make sure to use softened cream cheese and beat it well until smooth.