Watermelon Cake Summer Dessert: Imagine a dessert that’s as refreshing as a dip in the pool on a scorching summer day, yet surprisingly elegant and visually stunning. That’s precisely what you get with this delightful treat! Forget heavy, oven-baked cakes; we’re diving into the world of naturally sweet and hydrating goodness with a Watermelon Cake.
While not a traditional cake in the baked sense, the concept of transforming a watermelon into a show-stopping dessert has roots in creative culinary experimentation. It’s a modern twist on enjoying this beloved summer fruit, elevating it from a simple snack to a centerpiece worthy of any gathering. Think of it as edible art, a conversation starter that’s as delicious as it is beautiful.
People adore this Watermelon Cake Summer Dessert for its simplicity and health-conscious appeal. It’s naturally gluten-free, dairy-free, and requires no baking! The crisp, juicy watermelon provides a refreshing base, while toppings like whipped coconut cream, fresh berries, and toasted nuts add layers of flavor and texture. It’s the perfect guilt-free indulgence that satisfies your sweet tooth while keeping you cool and hydrated. Plus, it’s incredibly easy to customize with your favorite fruits and toppings, making it a fun and interactive dessert for everyone to enjoy. Get ready to impress your friends and family with this vibrant and unforgettable summer treat!

Ingredients:
- For the “Cake” Base:
- 1 large seedless watermelon (about 10-12 pounds), oblong shape preferred
- For the Whipped Cream Frosting:
- 4 cups heavy cream, very cold
- 1 cup powdered sugar, sifted
- 2 teaspoons vanilla extract
- 1/4 teaspoon almond extract (optional, but adds a lovely flavor)
- For the Berry Topping:
- 2 cups fresh strawberries, hulled and sliced
- 1 cup fresh blueberries
- 1 cup fresh raspberries
- 1/2 cup fresh blackberries
- Optional Garnishes:
- Fresh mint leaves
- Edible flowers
- Chocolate shavings (white or dark)
- Toasted coconut flakes
- Chopped nuts (almonds, pistachios, or pecans work well)
Preparing the Watermelon “Cake”
- Choose Your Watermelon Wisely: The shape of your watermelon is crucial. Look for an oblong watermelon that is relatively symmetrical. This will make it easier to create a cake-like shape. Make sure it feels heavy for its size, indicating it’s juicy and ripe.
- Wash and Dry the Watermelon: Thoroughly wash the watermelon under cold running water to remove any dirt or debris. Pat it completely dry with paper towels. This is important for food safety and will also help the frosting adhere better.
- Trim the Ends: Using a large, sharp knife (a chef’s knife or a long serrated knife works best), carefully cut off both ends of the watermelon. You want to remove enough of the rind so that the watermelon can stand upright on a flat surface. Be careful not to cut too much of the red flesh away.
- Shape the Watermelon: Now, stand the watermelon upright on one of the cut ends. Carefully trim away the remaining green rind and white pith, working from top to bottom. Follow the natural curve of the watermelon to create a smooth, cylindrical shape. Try to remove all the white pith, as it doesn’t taste very good. Aim for a clean, even surface. This step requires patience and a steady hand!
- Pat Dry Again: Once you’ve shaped the watermelon, pat it dry again with paper towels. This will help the whipped cream frosting stick better. You can even let it sit in the refrigerator for about 30 minutes to chill and dry out slightly.
Making the Whipped Cream Frosting
- Chill Everything: This is the key to perfect whipped cream! Make sure your heavy cream, mixing bowl, and whisk attachment (or beaters if using a hand mixer) are all thoroughly chilled. I usually put my bowl and whisk in the freezer for about 15-20 minutes before I start.
- Combine Ingredients: Pour the cold heavy cream into the chilled mixing bowl. Add the sifted powdered sugar and vanilla extract (and almond extract, if using). Sifting the powdered sugar prevents lumps in your frosting.
- Whip the Cream: Using a stand mixer or hand mixer, begin whipping the cream on medium speed. Gradually increase the speed to medium-high as the cream starts to thicken. Watch it carefully! You want to whip it until stiff peaks form. This means that when you lift the whisk or beaters, the peaks of the whipped cream stand straight up without collapsing. Be careful not to overwhip, or you’ll end up with butter!
- Test for Stiff Peaks: To test for stiff peaks, stop the mixer and lift the whisk or beaters. If the peaks stand straight up or curl slightly at the tip, the whipped cream is ready. If it’s still too soft, continue whipping for a few more seconds and test again.
- Keep it Cold: Once the whipped cream is ready, keep it refrigerated until you’re ready to frost the watermelon. This will help it stay firm and prevent it from melting.
Frosting and Decorating the Watermelon Cake
- Apply the First Layer of Frosting: Using an offset spatula or a large spoon, spread a generous layer of whipped cream frosting evenly over the entire surface of the watermelon “cake.” Don’t worry about making it perfectly smooth at this point. This is just the first layer, and it will help the second layer adhere better.
- Chill Briefly: Place the frosted watermelon in the refrigerator for about 15-20 minutes to allow the frosting to set slightly. This will make it easier to apply the second layer.
- Apply the Second Layer of Frosting: Remove the watermelon from the refrigerator and apply a second, thicker layer of whipped cream frosting. This time, focus on creating a smooth, even surface. Use the offset spatula to smooth out any imperfections and create a professional-looking finish. You can create swirls or patterns with the spatula if you like.
- Arrange the Berries: Now comes the fun part! Arrange the fresh strawberries, blueberries, raspberries, and blackberries on top of the frosted watermelon cake. Get creative with your design! You can create concentric circles, stripes, or a random, natural-looking arrangement. Make sure the berries are evenly distributed and that they cover most of the surface of the cake.
- Add Optional Garnishes: If desired, add any optional garnishes, such as fresh mint leaves, edible flowers, chocolate shavings, toasted coconut flakes, or chopped nuts. These will add extra flavor, texture, and visual appeal to your watermelon cake.
- Chill Before Serving: Once you’ve finished decorating the watermelon cake, chill it in the refrigerator for at least 30 minutes before serving. This will allow the frosting to set completely and the flavors to meld together. Chilling also makes the watermelon even more refreshing.
- Slice and Serve: When you’re ready to serve, use a sharp knife to slice the watermelon cake into wedges. Be careful when slicing, as the watermelon can be slippery. Serve immediately and enjoy!
Tips and Variations
- Watermelon Selection: As mentioned before, the shape of the watermelon is key. Look for an oblong watermelon that is relatively symmetrical. Also, choose a watermelon that feels heavy for its size, indicating it’s juicy and ripe.
- Whipped Cream Stability: To make the whipped cream frosting more stable, you can add a stabilizer such as gelatin or cream cheese. For gelatin, bloom 1 teaspoon of gelatin in 1 tablespoon of cold water for 5 minutes. Then, microwave for 10-15 seconds until melted. Let it cool slightly and then whisk it into the heavy cream before whipping. For cream cheese, beat 4 ounces of softened cream cheese with the powdered sugar before adding the heavy cream.
- Berry Variations: Feel free to use any combination of berries that you like. Other options include blackberries, gooseberries, or even sliced kiwi.
- Chocolate Drizzle: For a chocolatey twist, melt some dark or white chocolate and drizzle it over the top of the watermelon cake.
- Coconut Whipped Cream: For a dairy-free option, use coconut cream instead of heavy cream to make the frosting. Make sure to chill the coconut cream overnight before whipping.
- Citrus Zest: Add a touch of citrus flavor by grating some lemon or lime zest into the whipped cream frosting.
- Make it Ahead: You can prepare the watermelon “cake” base and the whipped cream frosting a day in advance. Store them separately in the refrigerator and assemble the cake just before serving.
- Serving Suggestions: Watermelon cake is best served immediately after assembling, as the watermelon can release moisture over time. If you have leftovers, store them in an airtight container in the refrigerator.
Enjoy your refreshing and beautiful Watermelon Cake!
Conclusion:
This isn’t just a dessert; it’s a vibrant celebration of summer, a refreshing escape from the heat, and a guaranteed conversation starter. I truly believe this watermelon cake summer dessert is a must-try for anyone looking to impress without spending hours in a hot kitchen. The simplicity is deceptive; the flavor is anything but basic. The combination of juicy watermelon, creamy whipped topping, and your choice of delightful toppings creates a symphony of textures and tastes that will leave everyone wanting more.
Think of it: a slice of this cool, refreshing “cake” on a sweltering afternoon. It’s pure bliss! And the best part? It’s naturally gluten-free and can easily be made dairy-free with coconut whipped cream, making it a perfect option for guests with dietary restrictions.
But the fun doesn’t stop there! Feel free to get creative with your toppings. I’ve suggested some of my favorites berries, chocolate shavings, chopped nuts but the possibilities are endless. Imagine adding a sprinkle of toasted coconut flakes for a tropical twist, or a drizzle of honey for extra sweetness. You could even incorporate edible flowers for an extra touch of elegance. For a more decadent version, consider adding a thin layer of mascarpone cheese under the whipped topping. The slight tanginess of the mascarpone will complement the sweetness of the watermelon beautifully.
Serving suggestions are just as versatile. This watermelon cake is perfect as a light dessert after a barbecue, a refreshing treat at a picnic, or even a healthy snack on a hot day. Cut it into wedges for easy serving, or use cookie cutters to create fun shapes for kids. You can even thread the watermelon pieces onto skewers for a playful presentation.
For a truly memorable experience, try chilling the watermelon for at least an hour before assembling the cake. This will ensure that it’s extra refreshing and holds its shape better. And don’t be afraid to experiment with different types of watermelon. Seedless watermelons are the easiest to work with, but a classic watermelon with seeds will add a nostalgic touch. Just be sure to remove the seeds before assembling the cake.
I’m so excited for you to try this recipe! It’s a guaranteed crowd-pleaser, and I know you’ll love how easy and delicious it is. It’s a fantastic way to showcase the natural sweetness of watermelon in a fun and unexpected way. This watermelon cake summer dessert is more than just a recipe; it’s an experience.
So, go ahead, give it a try! I promise you won’t be disappointed. And when you do, please share your creations with me! I’d love to see your variations and hear about your experience. Tag me in your photos on social media I can’t wait to see what you come up with! Let’s spread the joy of this refreshing and delightful summer treat together. Happy baking (or rather, assembling)! I am confident that this will become your go-to dessert for all your summer gatherings.
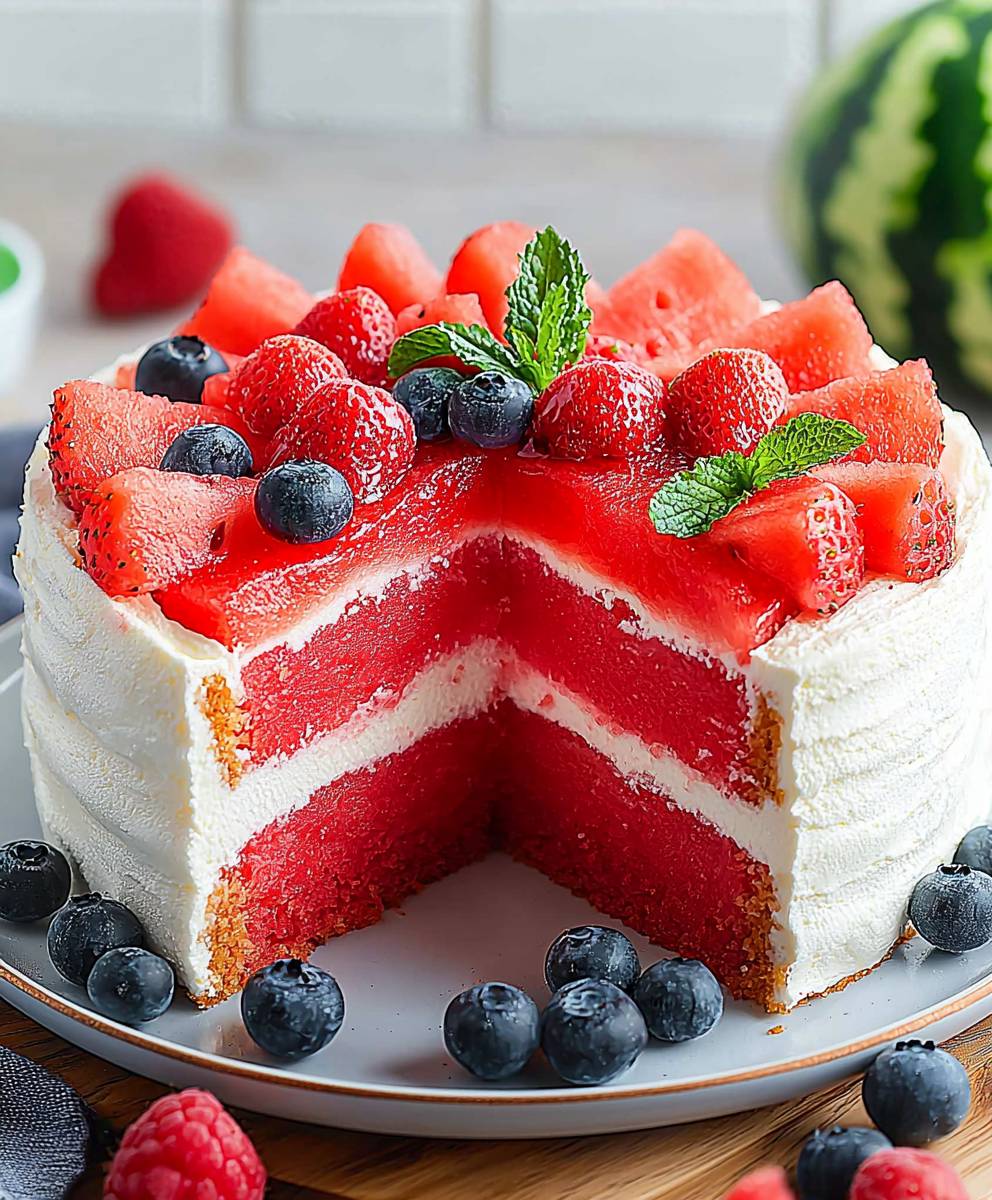
Watermelon Cake Summer Dessert: The Ultimate Refreshing Treat
A refreshing and healthy "cake" made from a carved watermelon, frosted with whipped cream, and topped with fresh berries. A fun and delicious alternative to traditional cake!
Ingredients
- 1 large seedless watermelon (about 10-12 pounds), oblong shape preferred
- 4 cups heavy cream, very cold
- 1 cup powdered sugar, sifted
- 2 teaspoons vanilla extract
- 1/4 teaspoon almond extract (optional)
- 2 cups fresh strawberries, hulled and sliced
- 1 cup fresh blueberries
- 1 cup fresh raspberries
- 1/2 cup fresh blackberries
- Fresh mint leaves
- Edible flowers
- Chocolate shavings (white or dark)
- Toasted coconut flakes
- Chopped nuts (almonds, pistachios, or pecans)
Instructions
- Select an oblong, symmetrical watermelon that feels heavy for its size.
- Thoroughly wash and dry the watermelon.
- Cut off both ends of the watermelon so it can stand upright.
- Trim away the green rind and white pith to create a smooth, cylindrical shape.
- Pat the shaped watermelon dry and refrigerate for 30 minutes to chill.
- Chill heavy cream, mixing bowl, and whisk attachment (or beaters).
- Pour cold heavy cream into the chilled bowl. Add sifted powdered sugar, vanilla extract, and almond extract (if using).
- Whip on medium speed, gradually increasing to medium-high, until stiff peaks form.
- Lift the whisk or beaters; peaks should stand straight up or curl slightly.
- Refrigerate the whipped cream until ready to use.
- Spread a generous layer of whipped cream over the watermelon.
- Refrigerate the frosted watermelon for 15-20 minutes.
- Apply a second, thicker layer of whipped cream, smoothing it out.
- Arrange strawberries, blueberries, raspberries, and blackberries on top.
- Add mint leaves, edible flowers, chocolate shavings, coconut flakes, or nuts, if desired.
- Chill the decorated cake for at least 30 minutes before serving.
- Slice into wedges and serve immediately.
Notes
- The shape of the watermelon is key.
- Chilling the bowl and beaters is essential for perfect whipped cream.
- Be careful not to overwhip the cream.
- Watermelon cake is best served immediately.
- To make the whipped cream frosting more stable, you can add a stabilizer such as gelatin or cream cheese. For gelatin, bloom 1 teaspoon of gelatin in 1 tablespoon of cold water for 5 minutes. Then, microwave for 10-15 seconds until melted. Let it cool slightly and then whisk it into the heavy cream before whipping. For cream cheese, beat 4 ounces of softened cream cheese with the powdered sugar before adding the heavy cream.
- Feel free to use any combination of berries that you like. Other options include blackberries, gooseberries, or even sliced kiwi.
- For a chocolatey twist, melt some dark or white chocolate and drizzle it over the top of the watermelon cake.
- For a dairy-free option, use coconut cream instead of heavy cream to make the frosting. Make sure to chill the coconut cream overnight before whipping.
- Add a touch of citrus flavor by grating some lemon or lime zest into the whipped cream frosting.
- You can prepare the watermelon “cake” base and the whipped cream frosting a day in advance. Store them separately in the refrigerator and assemble the cake just before serving.
- Watermelon cake is best served immediately after assembling, as the watermelon can release moisture over time. If you have leftovers, store them in an airtight container in the refrigerator.