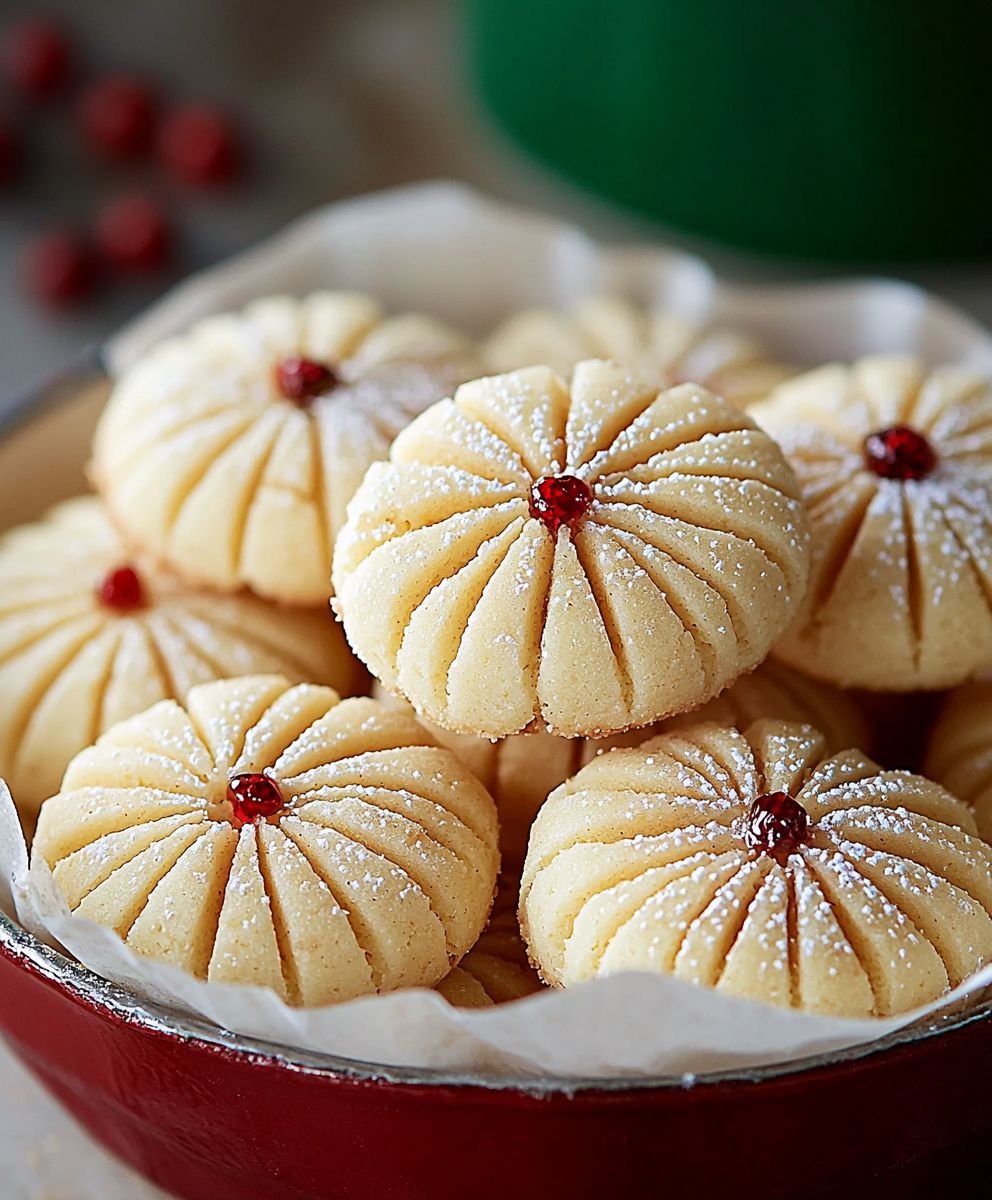
Whipped shortbread cookies: just the name conjures up images of melt-in-your-mouth deliciousness, doesn’t it? Forget those crumbly, sometimes dry, shortbreads of the past. We’re talking about a delicate, buttery, and utterly irresistible treat that will have everyone reaching for seconds (and thirds!). These aren’t just cookies; they’re an experience.
While the exact origins of shortbread are debated, it’s widely accepted that it evolved from medieval biscuit bread in Scotland. Over centuries, butter replaced yeast, transforming it into the rich, crumbly delight we know today. The “whipped” variation takes this classic to a whole new level of lightness, creating a texture that’s almost ethereal.
So, what makes whipped shortbread cookies so beloved? It’s a combination of factors. The incredibly tender, almost sandy texture is a major draw. The buttery flavor is pure comfort, and the subtle sweetness makes them perfect with a cup of tea or coffee. Plus, they’re surprisingly easy to make! This recipe requires minimal ingredients and simple techniques, making it a perfect baking project for any skill level. Get ready to impress your friends and family with these delightful little bites of heaven!
Ingredients:
- 1 cup (2 sticks) unsalted butter, softened
- 1/2 cup powdered sugar, plus more for dusting
- 1/4 cup cornstarch
- 2 cups all-purpose flour
- 1/4 teaspoon salt
- 1 teaspoon vanilla extract (optional)
Preparing the Dough:
- Cream the Butter: In a large bowl, or the bowl of your stand mixer, cream the softened butter until it is light and fluffy. This is a crucial step, so don’t rush it! It usually takes about 3-5 minutes on medium speed. You want the butter to be almost white and very airy. Scrape down the sides of the bowl occasionally to ensure everything is evenly mixed.
- Add the Powdered Sugar: Gradually add the powdered sugar to the creamed butter, mixing on low speed until fully incorporated. Be careful not to add it all at once, or you’ll end up with a cloud of powdered sugar! Again, scrape down the sides of the bowl to ensure everything is well combined. The mixture should be smooth and creamy.
- Incorporate the Cornstarch: Add the cornstarch to the mixture and mix on low speed until just combined. Cornstarch helps to create that melt-in-your-mouth texture that whipped shortbread is known for. Don’t overmix at this stage.
- Combine Dry Ingredients: In a separate bowl, whisk together the all-purpose flour and salt. This ensures that the salt is evenly distributed throughout the dough.
- Gradually Add Dry Ingredients to Wet Ingredients: Slowly add the flour mixture to the butter mixture, about 1/2 cup at a time, mixing on low speed until just combined. It’s important not to overmix the dough, as this will develop the gluten in the flour and result in a tougher cookie. Stop mixing as soon as the flour is incorporated. The dough will be crumbly at first, but it will come together as you mix.
- Add Vanilla Extract (Optional): If you’re using vanilla extract, add it now and mix until just combined. Vanilla adds a lovely warmth to the cookies, but it’s perfectly fine to omit it if you prefer a more traditional shortbread flavor.
- Form the Dough into a Ball: Gently gather the dough together with your hands and form it into a ball. The dough will be quite soft and delicate.
- Chill the Dough (Important!): Wrap the dough tightly in plastic wrap and refrigerate for at least 30 minutes, or up to 2 hours. Chilling the dough is essential for preventing the cookies from spreading too much during baking. It also makes the dough easier to handle.
Shaping and Baking the Cookies:
- Preheat the Oven: Preheat your oven to 325°F (160°C). Line a baking sheet with parchment paper. Parchment paper prevents the cookies from sticking and makes cleanup a breeze.
- Roll Out the Dough (Optional): On a lightly floured surface, gently roll out the chilled dough to about 1/4-inch thickness. Use cookie cutters to cut out desired shapes. Alternatively, you can skip the rolling and shaping and simply form the dough into small balls or logs.
- Forming Cookies by Hand (Alternative Method): If you prefer not to roll out the dough, you can pinch off small pieces of dough (about 1 tablespoon each) and roll them into balls. Place the balls on the prepared baking sheet, leaving about 1 inch of space between each cookie. You can also roll the dough into a log, wrap it in plastic wrap, and chill it for a longer period (at least an hour). Then, slice the chilled log into 1/4-inch thick rounds.
- Place Cookies on Baking Sheet: Carefully transfer the shaped cookies to the prepared baking sheet. Make sure to leave a little space between each cookie to allow for even baking.
- Docking the Cookies (Optional): Use a fork to gently prick the tops of the cookies. This helps to prevent them from puffing up too much during baking. It also gives them a more traditional shortbread appearance.
- Bake the Cookies: Bake for 12-15 minutes, or until the edges are lightly golden brown. The cookies should still be pale in the center. Keep a close eye on them, as they can burn easily.
- Cool the Cookies: Remove the baking sheet from the oven and let the cookies cool on the baking sheet for a few minutes before transferring them to a wire rack to cool completely. This allows them to firm up slightly and prevents them from breaking.
Finishing Touches:
- Dust with Powdered Sugar: Once the cookies are completely cool, dust them generously with powdered sugar. This adds a touch of sweetness and makes them look even more appealing. You can use a sifter or a small strainer to evenly distribute the powdered sugar.
- Serve and Enjoy: Serve the whipped shortbread cookies immediately, or store them in an airtight container at room temperature for up to a week. They are perfect with a cup of tea or coffee, or as a sweet treat any time of day.
Tips for Perfect Whipped Shortbread:
- Use Softened Butter: Make sure your butter is properly softened before you start. It should be soft enough to easily cream, but not melted. If the butter is too soft, the cookies will spread too much during baking.
- Don’t Overmix: Overmixing the dough will develop the gluten in the flour and result in a tougher cookie. Mix only until the ingredients are just combined.
- Chill the Dough: Chilling the dough is essential for preventing the cookies from spreading and making them easier to handle.
- Bake at a Low Temperature: Baking at a low temperature ensures that the cookies bake evenly and don’t brown too quickly.
- Don’t Overbake: Overbaking will result in dry, crumbly cookies. The cookies should still be pale in the center when they are done.
- Experiment with Flavors: Feel free to experiment with different flavors. You can add a pinch of cinnamon, nutmeg, or cardamom to the dough. You can also add citrus zest or chopped nuts.
- Storage: Store the cookies in an airtight container at room temperature for up to a week. They can also be frozen for longer storage.
Troubleshooting:
- Cookies Spreading Too Much: If your cookies are spreading too much during baking, it could be due to several factors. Make sure your butter is not too soft, and that you are chilling the dough for long enough. You may also need to add a little more flour to the dough.
- Cookies Too Dry: If your cookies are too dry, it could be because you overbaked them. Make sure to bake them for the correct amount of time, and don’t overbake them. You may also need to add a little more butter to the dough.
- Cookies Too Tough: If your cookies are too tough, it could be because you overmixed the dough. Make sure to mix only until the ingredients are just combined.

Conclusion:
So, there you have it! These whipped shortbread cookies are truly something special, and I wholeheartedly believe you need to experience them. They’re not just cookies; they’re little clouds of buttery, melt-in-your-mouth happiness. The delicate crumb, the subtle sweetness, and the sheer simplicity of the recipe make them a winner every single time. If you’re looking for a cookie that’s both impressive and incredibly easy to make, look no further. This is it!
What makes these cookies a must-try? Well, beyond the incredible texture and flavor, they’re surprisingly versatile. They’re perfect for any occasion, from a casual afternoon tea to a more formal holiday gathering. They also make a wonderful homemade gift imagine the delight on someone’s face when you present them with a beautifully packaged box of these delicate treats! Plus, let’s be honest, who can resist a cookie that practically dissolves on your tongue?
Serving Suggestions and Variations:
The beauty of these whipped shortbread cookies lies in their adaptability. While they’re absolutely divine on their own, there are countless ways to customize them to your liking. Here are a few ideas to get you started:
- Chocolate Dipped: Dip half of each cookie in melted dark, milk, or white chocolate for an extra touch of indulgence. A sprinkle of sea salt on the chocolate adds a delightful contrast.
- Citrus Zest: Add the zest of a lemon, orange, or lime to the dough for a bright and refreshing flavor.
- Nuts: Incorporate finely chopped pecans, walnuts, or almonds into the dough for a bit of crunch.
- Spices: A pinch of cinnamon, nutmeg, or cardamom can add warmth and complexity to the flavor profile.
- Glaze: Drizzle a simple powdered sugar glaze over the cooled cookies for a touch of sweetness and visual appeal. You can even add a few drops of food coloring to the glaze for a festive touch.
- Sandwich Cookies: Spread a thin layer of your favorite jam, buttercream frosting, or chocolate ganache between two cookies to create a delightful sandwich cookie.
Don’t be afraid to experiment and get creative! The possibilities are endless. Think about your favorite flavors and see how you can incorporate them into this recipe. Maybe a hint of lavender, a touch of rosewater, or even a sprinkle of chili flakes for a sweet and spicy kick? The only limit is your imagination!
I truly hope you’ll give this recipe a try. I’m confident that you’ll be amazed by how easy it is to create such a delicious and elegant treat. Once you’ve made them, I’d absolutely love to hear about your experience! Did you try any of the variations I suggested? Did you come up with your own unique twist? What did your friends and family think? Please, share your thoughts and photos in the comments below. I can’t wait to see what you create!
Happy baking, and enjoy every single bite of these heavenly whipped shortbread cookies! I know you’ll love them as much as I do.
Whipped Shortbread Cookies: The Ultimate Guide to Baking Perfection
Melt-in-your-mouth whipped shortbread cookies! These delicate, buttery treats are easy to make and perfect for any occasion.
Ingredients
- 1 cup (2 sticks) unsalted butter, softened
- 1/2 cup powdered sugar, plus more for dusting
- 1/4 cup cornstarch
- 2 cups all-purpose flour
- 1/4 teaspoon salt
- 1 teaspoon vanilla extract (optional)
Instructions
- Cream the Butter: In a large bowl, or the bowl of your stand mixer, cream the softened butter until it is light and fluffy. This is a crucial step, so don’t rush it! It usually takes about 3-5 minutes on medium speed. You want the butter to be almost white and very airy. Scrape down the sides of the bowl occasionally to ensure everything is evenly mixed.
- Add the Powdered Sugar: Gradually add the powdered sugar to the creamed butter, mixing on low speed until fully incorporated. Be careful not to add it all at once, or you’ll end up with a cloud of powdered sugar! Again, scrape down the sides of the bowl to ensure everything is well combined. The mixture should be smooth and creamy.
- Incorporate the Cornstarch: Add the cornstarch to the mixture and mix on low speed until just combined. Cornstarch helps to create that melt-in-your-mouth texture that whipped shortbread is known for. Don’t overmix at this stage.
- Combine Dry Ingredients: In a separate bowl, whisk together the all-purpose flour and salt. This ensures that the salt is evenly distributed throughout the dough.
- Gradually Add Dry Ingredients to Wet Ingredients: Slowly add the flour mixture to the butter mixture, about 1/2 cup at a time, mixing on low speed until just combined. It’s important not to overmix the dough, as this will develop the gluten in the flour and result in a tougher cookie. Stop mixing as soon as the flour is incorporated. The dough will be crumbly at first, but it will come together as you mix.
- Add Vanilla Extract (Optional): If you’re using vanilla extract, add it now and mix until just combined. Vanilla adds a lovely warmth to the cookies, but it’s perfectly fine to omit it if you prefer a more traditional shortbread flavor.
- Form the Dough into a Ball: Gently gather the dough together with your hands and form it into a ball. The dough will be quite soft and delicate.
- Chill the Dough (Important!): Wrap the dough tightly in plastic wrap and refrigerate for at least 30 minutes, or up to 2 hours. Chilling the dough is essential for preventing the cookies from spreading too much during baking. It also makes the dough easier to handle.
- Preheat the Oven: Preheat your oven to 325°F (160°C). Line a baking sheet with parchment paper. Parchment paper prevents the cookies from sticking and makes cleanup a breeze.
- Roll Out the Dough (Optional): On a lightly floured surface, gently roll out the chilled dough to about 1/4-inch thickness. Use cookie cutters to cut out desired shapes. Alternatively, you can skip the rolling and shaping and simply form the dough into small balls or logs.
- Forming Cookies by Hand (Alternative Method): If you prefer not to roll out the dough, you can pinch off small pieces of dough (about 1 tablespoon each) and roll them into balls. Place the balls on the prepared baking sheet, leaving about 1 inch of space between each cookie. You can also roll the dough into a log, wrap it in plastic wrap, and chill it for a longer period (at least an hour). Then, slice the chilled log into 1/4-inch thick rounds.
- Place Cookies on Baking Sheet: Carefully transfer the shaped cookies to the prepared baking sheet. Make sure to leave a little space between each cookie to allow for even baking.
- Docking the Cookies (Optional): Use a fork to gently prick the tops of the cookies. This helps to prevent them from puffing up too much during baking. It also gives them a more traditional shortbread appearance.
- Bake the Cookies: Bake for 12-15 minutes, or until the edges are lightly golden brown. The cookies should still be pale in the center. Keep a close eye on them, as they can burn easily.
- Cool the Cookies: Remove the baking sheet from the oven and let the cookies cool on the baking sheet for a few minutes before transferring them to a wire rack to cool completely. This allows them to firm up slightly and prevents them from breaking.
- Dust with Powdered Sugar: Once the cookies are completely cool, dust them generously with powdered sugar. This adds a touch of sweetness and makes them look even more appealing. You can use a sifter or a small strainer to evenly distribute the powdered sugar.
- Serve and Enjoy: Serve the whipped shortbread cookies immediately, or store them in an airtight container at room temperature for up to a week. They are perfect with a cup of tea or coffee, or as a sweet treat any time of day.
Notes
- Use Softened Butter: Make sure your butter is properly softened before you start. It should be soft enough to easily cream, but not melted. If the butter is too soft, the cookies will spread too much during baking.
- Don’t Overmix: Overmixing the dough will develop the gluten in the flour and result in a tougher cookie. Mix only until the ingredients are just combined.
- Chill the Dough: Chilling the dough is essential for preventing the cookies from spreading and making them easier to handle.
- Bake at a Low Temperature: Baking at a low temperature ensures that the cookies bake evenly and don’t brown too quickly.
- Don’t Overbake: Overbaking will result in dry, crumbly cookies. The cookies should still be pale in the center when they are done.
- Experiment with Flavors: Feel free to experiment with different flavors. You can add a pinch of cinnamon, nutmeg, or cardamom to the dough. You can also add citrus zest or chopped nuts.
- Storage: Store the cookies in an airtight container at room temperature for up to a week. They can also be frozen for longer storage.

